Search In This Website

Sabtu, 31 Mei 2025

Start Turbo C++

Starting A Turbo C++

Practise this lesson to starting Turbo C++

Preparation

  • Download Turbo C++ from internet.
  • Install it on your computer.
  • Then Shortcut icon will be created on your computer.
  1. Double Click on Turbo C++ icon on Microsoft Windows Desktop to open it.
    Click on the Turbo C++ icon.
  2. If you want to run turbo c++ on full screen, simply click on the "Start Turbo C++" button.
    click on the "Start Turbo C++" button.
  3. The Turbo C++ software is displayed, as shown below.
    The Turbo C++ software Full screen mode
  4. "OR" If you do not want full-screen mode uncheck the "Full screen mode" check box and click on the "Start Turbo C++" button.
    uncheck the "Full screen mode" check box

    The Turbo C++ software window

< back to Study About C and C++ 1

Bibliography

https://developerinsider.co/
https://studyopedia.com/
https://terracottainstitute.blogspot.com/
Turbo C++ Version 3.0 User's Guide;Borland International
C++ ebook series;Thomson Larning
C++ ebook series;Addison Wesley
C ebook series;Prentice Hall

Jumat, 30 Mei 2025

Form Website Industry Sample

1. Type this following HTML source code in your web editor:
<!DOCTYPE HTML public "-//W3C//DTD HTML 4.01 Transitional//EN" "http://"><html><head><meta http-equiv="Content-Type" content="text/html;charset=UTF-8"><title>Registration Form</title>  
<style type="text/css">
  h4 { margin-bottom: 0.5em; margin-top: 0.3em;}
  h5 { margin-top: -0.01px; margin-bottom: 0.3em;}
  label { font-size: 10pt;}  
  </style>
</head>

  <body>    
<!-- /.content-wrapper-->
  <div class="content-wrapper">
    <form id="frm-add-expense">
      <h4 class="frm-title"><b>I work in &#8230;&#8230; industry company</b></h4>
      <h5>Using select option</h5>
      <label for="sel-industry">Industry : </label>
      <select name="sel-industry" id="sel-industry">
        <option value=""></option>
        <option value="Agricultural Sector">Agricultural Sector</option>
        <option value="Education Sector">Education Sector</option>
        <option value="Energy Sector">Energy Sector</option>
        <option value="Entertainment Sector">Entertainment Sector</option>
        <option value="Financial Sector">Financial Sector</option>
        <option value="Food and Beverage Sector">Food and Beverage Sector</option>
        <option value="Healthcare Sector">Healthcare Sector</option>
        <option value="Manufacturing Sector">Manufacturing Sector</option>
        <option value="Real Estate Sector">Real Estate Sector</option>
        <option value="Retail Sector">Retail Sector</option>
        <option value="Technology Sector">Technology Sector</option>
        <option value="Transportation Sector">Transportation Sector</option>
      </select>
      <h5>Using radio</h5>
      Industry:<br/>
<!-- /region of type each code line in same line -->
<input type="radio" value="Agricultural Sector" name="rad-industry-sector" id="rad-agricultural-sector"><label for="rad-agricultural-sector">Agricultural Sector</label><br />
<input type="radio" value="Education Sector" name="rad-industry-sector" id="rad-education-sector"><label for="rad-education-sector">Education Sector</label><br />
<input type="radio" value="Energy Sector" name="rad-industry-sector" id="rad-energy-sector"><label for="rad-energy-sector">Energy Sector</label><br />
<input type="radio" value="Entertainment Sector" name="rad-industry-sector" id="rad-entertainment-sector"><label for="rad-entertainment-sector">Entertainment Sector</label><br />
<input type="radio" value="Financial Sector" name="rad-industry-sector" id="rad-financial-sector"><label for="rad-financial-sector">Financial Sector</label><br />
<input type="radio" value="Food and Beverage Sector" name="rad-industry-sector" id="rad-food-and-beverage-sector"><label for="rad-food-and-beverage-sector">Food and Beverage Sector</label><br />
<input type="radio" value="Healthcare Sector" name="rad-industry-sector" id="rad-healthcare-sector"><label for="rad-healthcare-sector">Healthcare Sector</label><br />
<input type="radio" value="Manufacturing Sector" name="rad-industry-sector" id="rad-manufacturing-sector"><label for="rad-manufacturing-sector">Manufacturing Sector</label><br />
<input type="radio" value="Real Estate Sector" name="rad-industry-sector" id="rad-real-estate-sector"><label for="rad-real-estate-sector">Real Estate Sector</label><br />
<input type="radio" value="Retail Sector" name="rad-industry-sector" id="rad-retail-sector"><label for="rad-retail-sector">Retail Sector</label><br />
<input type="radio" value="Technology Sector" name="rad-industry-sector" id="rad-technology-sector"><label for="rad-technology-sector">Technology Sector</label><br />
<input type="radio" value="Transportation Sector" name="rad-industry-sector" id="rad-transportation-sector"><label for="rad-transportation-sector">Transportation Sector</label><br />
<!-- /end region of type each code line in same line -->
<h5>Using Checkbox</h5>
      Industry:<br/>
<!-- /region of type each code line in same line -->
<input type="checkbox" value="Agricultural Sector" name="chk-agricultural-sector" id="chk-agricultural-sector"><label for="chk-agricultural-sector">Agricultural Sector</label><br />
<input type="checkbox" value="Education Sector" name="chk-agricultural-sector" id="chk-education-sector"><label for="chk-agricultural-sector">Education Sector</label><br />
<input type="checkbox" value="Energy Sector" name="chk-energy-sector" id="chk-energy-sector"><label for="chk-energy-sector">Energy Sector</label><br />
<input type="checkbox" value="Entertainment Sector" name="chk-entertainment-sector" id="chk-entertainment-sector"><label for="chk-entertainment-sector">Entertainment Sector</label><br />
<input type="checkbox" value="Financial Sector" name="chk-financial-sector" id="chk-financial-sector"><label for="chk-financial-sector">Financial Sector</label><br />
<input type="checkbox" value="Food and Beverage Sector" name="chk-food-and-beverage-sector" id="chk-food-and-beverage-sector"><label for="chk-food-and-beverage-sector">Food and Beverage Sector</label><br />
<input type="checkbox" value="Healthcare Sector" name="chk-healthcare-sector" id="chk-healthcare-sector"><label for="chk-healthcare-sector">Healthcare Sector</label><br />
<input type="checkbox" value="Manufacturing Sector" name="chk-manufacturing-sector" id="chk-manufacturing-sector"><label for="chk-manufacturing-sector">Manufacturing Sector</label><br />
<input type="checkbox" value="Real Estate Sector" name="chk-real-estate-sector" id="chk-real-estate-sector"><label for="chk-real-estate-sector">Real Estate Sector</label><br />
<input type="checkbox" value="Retail Sector" name="chk-retail-sector" id="chk-retail-sector"><label for="chk-retail-sector">Retail Sector</label><br />
<input type="checkbox" value="Technology Sector" name="chk-technology-sector" id="chk-technology-sector"><label for="chk-technology-sector">Technology Sector</label><br />
<input type="checkbox" value="Transportation Sector" name="chk-transportation-sector" id="chk-transportation-sector"><label for="chk-transportation-sector">Transportation Sector</label><br />      <button type="submit" class="btn">Add</button>
<!-- /end region of type each code line in same line -->
      </form>
    </div>        
    <!-- /.content-wrapper-->
</body>
</html>
2. Save as IndustrySample1.htm
3. Open the file in your browser.

Notes

  • Type <!DOCTYPE HTML PUBLIC "-//W3C//DTD HTML 4.01 Transitional//EN" "http://www.w3.org/TR/html4/loose.dtd"> in same line.
  • Type the HTML source code between <!-- /region of type each code line in same line --> and <!-- /end region of type each code line in same line --> to the same line.

Output

HTML Select Option, Radio, Checkbox 


HTML Select Option On Click

< back to Learn HTML

Kamis, 29 Mei 2025

Form Website Expense

1. Type this following HTML source code in your web editor:

<!DOCTYPE HTML public "-//W3C//DTD HTML 4.01 Transitional//EN" "http://"><html><head><meta http-equiv="Content-Type" content="text/html;charset=UTF-8"><title>Add Expense</title></head>

 <body><div class="content-wrapper">

<!-- Main content -->

<form id="frm-add-expense">

<h3 class="card-title"><b>Add category</b></h3>
      <label for="sel-year">Expense date</label>

      <select name="sel-year" id="sel-year">
        <option value="2025">2025</option>
        <option value="2026">2026</option>
        <option value="2027">2027</option>
        <option value="2028">2028</option>
        <option value="2029">2029</option>
        <option value="2030">2030</option>
      </select>
      <select name="sel-month" id="sel-month">
        <option value="1">January</option>
        <option value="2">February</option>
        <option value="3">March</option>
        <option value="4">April</option>
        <option value="5">May</option>
        <option value="6">June</option>
        <option value="7">July</option>
        <option value="8">August</option>
        <option value="9">September</option>
        <option value="10">October</option>
        <option value="11">November</option>
        <option value="12">December</option>
      </select>
      <select name="sel-day" id="sel-day">
        <option value="1">1</option>
        <option value="2">2</option>
        <option value="3">3</option>
        <option value="4">4</option>
        <option value="5">5</option>
        <option value="6">6</option>
        <option value="7">7</option>
        <option value="8">8</option>
        <option value="9">9</option>
        <option value="10">10</option>
        <option value="11">11</option>
        <option value="12">12</option>
        <option value="13">13</option>
        <option value="14">14</option>
        <option value="15">15</option>
        <option value="16">16</option>
        <option value="17">17</option>
        <option value="18">18</option>
        <option value="19">19</option>
        <option value="20">20</option>
        <option value="21">21</option>
        <option value="22">22</option>
        <option value="23">23</option>
        <option value="24">24</option>
        <option value="25">25</option>
        <option value="26">26</option>
        <option value="27">27</option>
        <option value="28">28</option>
        <option value="29">29</option>
        <option value="30">30</option>
        <option value="31">31</option>
      </select>
      <br />
      <label for="txt-expense-for">Expense for *</label>
      <input type="text" id="txt-expense-for" name="txt-expense-for" placeholder="Expense for">
      <br />
      <label for="sel-expense-category">Expense category</label>
      <select name="sel-expense-category" id="sel-expense-category">
        <option value="category1">Operating Expenses (OPEX)</option>
        <option value="category2">Non Operating Expenses (NON-OPEX)</option>
      </select>
      <br />
      <label for="sel-expense-sub-category">Expense Sub Category</label>
      <select name="sel-expense-sub-category" id="sel-expense-sub-category">                      
         <option value="subcategory1">Advertising And Marketing</option>
         <option value="subcategory2">Bank Fees</option>
         <option value="subcategory3">Charitable Contributions</option>
         <option value="subcategory4">Client Gifts</option>
         <option value="subcategory5">Credit Fees</option>
         <option value="subcategory6">Contributions</option>
         <option value="subcategory7">Depreciation</option>
         <option value="subcategory8">Education And Training</option>
         <option value="subcategory9">Employee Loans</option>
         <option value="subcategory10">Employee Benefits</option>
         <option value="subcategory11">Insurance</option>
         <option value="subcategory12">Inventory</option>
         <option value="subcategory13">Legal And Professional Services</option>
         <option value="subcategory14">Licenses And Permits</option>
         <option value="subcategory15">Maintenance And Repairs</option>
         <option value="subcategory16">Manufacturing Or Raw Materials</option>
         <option value="subcategory17">Meals And Entertainment</option>
         <option value="subcategory18">Medical And Health Care Expenses</option>
         <option value="subcategory19">Mortgage Interest</option>
         <option value="subcategory20">Moving Expenses</option>
         <option value="subcategory21">Ocategoryffice Supplies</option>
         <option value="subcategory22">Postage And Shipping</option>
         <option value="subcategory23">Printing</option>
         <option value="subcategory24">Real Estate </option>
         <option value="subcategory25">Rent</option>
         <option value="subcategory26">Research And Development (R&amp;D)</option>
         <option value="subcategory27">Retirement And Pension Contributions</option>
         <option value="subcategory28">Security And Parking</option>
         <option value="subcategory29">Software</option>
         <option value="subcategory30">Subcription</option>
         <option value="subcategory31">Taxes</option>
         <option value="subcategory32">Telecommunication</option>
         <option value="subcategory33">Travel And Transportation</option>
         <option value="subcategory34">Utilities</option>
      </select>
    <br />
    <input type="checkbox" value="SupervisorApproval" name="chk-supervisor-approval" id="chk-supervisor-approval"><label for="chk-supervisor-approval">Supervisor Approval</label>
    <input type="checkbox" value="AccountingApproval" name="chk-accounting-approval" id="chk-accounting-approval"><label for="chk-accounting-approval">Accounting Approval</label>
    <br />
    <label for="txt-expense_amount">Expense amount *</label>
    <input type="number" id="txt-expense-amount" name="txt-expense-amount" placeholder="Expense amount">
    <br />
    <label for="txa-exp-descrip">Description </label>
    <textarea rows="3" id="txa-exp-descrip" name="txa-exp-descrip"></textarea>
      <br />
      <button type="submit" class="btn">Add</button>
      </form>
    </div>        
    <!-- /.content-wrapper--></body></html>
2. Save as ExpenseFormSample1.htm
3. Open the file in your browser.

Notes

  • Type <!DOCTYPE HTML PUBLIC "-//W3C//DTD HTML 4.01 Transitional//EN" "http://www.w3.org/TR/html4/loose.dtd"> in same line.
  • Type <input type="text" id="txt-expense-for" name="txt-expense-for" placeholder="Expense for"> in same line.
  • Type <select name="sel-expense-sub-category" id="sel-expense-sub-category"> in same line.
  • Type <input type="checkbox" value="AccountingApproval" name="chk-accounting-approval" id="chk-accounting-approval"><label for="chk-accounting-approval">Accounting Approval</label> in same line.
  • Type <input type="checkbox" value="SupervisorApproval" name="chk-supervisor-approval" id="chk-supervisor-approval"><label for="chk-supervisor-approval">Supervisor Approval</label> in same line.
  • Type <input type="number" id="txt-expense-amount" name="txt-expense-amount" placeholder="Expense amount"> in same line.

Output


< back to Learn HTML

Bibliography

https://www.jotform.com/

Microsoft Office PowerPoint Lesson Topics List

PowerPoint Basics:

PowerPoint Intermediate:

  • Adding Images And Multimedia.
  • Creating Charts And Graphs.
  • Adding Transitions.
  • Mastering Presentations.

PowerPoint Advanced:


Membuat Dokumen Microsoft Office Word 2007

  1. Klik Ribbon Tab File kemudian klik New.

    Klik Ribbon Tab File

    Klik New


  2. Dalam First Column/Left Panel Templates klik Blank and recent, dalam Second Column/Middle Panel Blank and recent, klik Blank document. Dalam Third Column/Right Panel klik tombol Create.

    Dialogue Box New Document

  3. Kemudian akan tampil New Document.
    tampil New Document


Bibliography

ebook Microsoft Office Word Adi Kusrianto
ebook Microsoft Office Word Christopher Lee
https://um.ac.id/ ( university )
https://uma.ac.id/ ( university )
https://www.umm.ac.id/ ( university )
https://www.unimed.ac.id/ ( university )

Selasa, 27 Mei 2025

Learn Internet And Communication

Learn To Using Google Chrome

Learn To Use Latex Document

to learn more about Latex, click on the Learn About Latex List 1 >

Learn To Use Markdown And LightWeight Markup Language

Learn To Use AsciiDoctor

to learn more about AsciiDoctor, click on Study About AsciiDoctor >

Cara Membuka Aplikasi Browser Internet Google Chrome pada Komputer

Ketika Anda sedang mencari cara membuka Aplikasi Browser Internet Google Chrome ketika memakai komputer personal ( Personal Computer ). Berarti Anda sudah membuka halaman website yang tepat untuk mengetahui cara membuka Aplikasi Browser Internet Google Chrome. Di bawah ini merupakan cara agar Anda dapat membuka Aplikasi Browser Internet Google Chrome.

Persiapan

Menyiapkan Microsoft Windows 8.1 di dalam komputer Anda.
  1. Jika Anda memakai komputer pribadi, aplikasi ini bisa ditemukan pada bagian menu Windows/Start ( Windows Start menu ), setelah click pada Start Button.
    Start menu Microsoft Windows

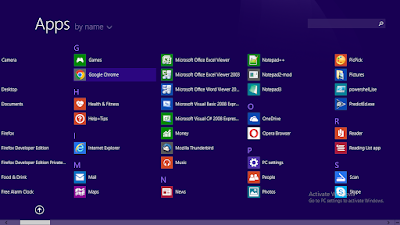
  2. Tombol All Apps ada di pojok kiri bawah dan berbentuk bulat  ( Down Arrow key ). Di bagian "Semua Aplikasi" atau "Apps" atau "All Apps" atau "App List" pada bagian menu Windows/Start, temukan Aplikasi Browser Internet Google Chrome dengan scroll ke kanan pada bagian bawah monitor komputer.
    Apps pada bagian Windows Start Menu

  3. Click Aplikasi Browser Internet Google Chrome.
    Aplikasi Browser Internet Google Chrome pada Windows Start Menu

  4. Kemudian Aplikasi Browser Internet Google Chrome akan tampil.
    Aplikasi Browser Internet Google Chrome

Bibliography

https://monday.com/
https://www.geeksforgeeks.org/
https://www.hadirr.com/
https://www.kantorkita.co.id/

Senin, 26 Mei 2025

Using Highlight JS

1. Type this website source code in website editor:
<!DOCTYPE HTML PUBLIC "-//W3C//DTD HTML 4.01 Transitional//EN" "http://www.w3.org/TR/html4/loose.dtd">
<html>
<head>
<meta http-equiv="Content-Type" content="text/html;charset=UTF-8">
<title>HighlightJS, Display Language Syntax and Line Numbering</title>
<link rel="stylesheet" href="libs/styles/highlight.js-11.5.1/default.min.css">
<link rel="stylesheet" href="libs/styles/hljslanguagedisplayplugin-1.0/hljslanguagedisplayplugin.css">
 <style type="text/css">
    /* for block of numbers */
    .hljs-ln-numbers {
    -webkit-touch-callout: none;
    -webkit-user-select: none;
    -khtml-user-select: none;
    -moz-user-select: none;
    -ms-user-select: none;
    user-select: none;
    text-align: center;
    color: #ccc;
    border-right: 1px solid #CCC;
    vertical-align: top;
    padding-right: 5px;
    /* your custom style here */
width: 2em;
    }
    /* for block of code */
    .hljs-ln-code {}
    .hljs-ln { margin-top: 1em; }
</style>
</head>

<body>
<h1>Example HighlightJS <span id="versionNum"></span></h1>
<h3>Example HighlightJS</h3>
<pre><code class="hljs language-javascript">class TokenTree {
    constructor() {
      /** @type DataNode */
      this.rootNode = newNode();
      this.stack = [this.rootNode];
    }

    get top() {
      return this.stack[this.stack.length - 1];
    }

    get root() { return this.rootNode; }

    /** @param {Node} node */
    add(node) {
      this.top.children.push(node);
    }

    /** @param {string} scope */
    openNode(scope) {
      /** @type Node */
      const node = newNode({ scope });
      this.add(node);
      this.stack.push(node);
    }
    
    &#8230;&#8230;&#8230;
    
</code></pre>

<script src="libs/scripts/highlight.js-11.5.1/highlight.min.js"></script>
<script src="libs/scripts/highlightjs-line-numbers.js-2.9.0/highlightjs-line-numbers.min.js"></script>
<script src="libs/scripts/hljslanguagedisplayplugin-1.0/hljslanguagedisplayplugin.js"></script>
<script language="javascript" type="text/javascript">
hljs.addPlugin(new HLJSLanguageDisplayPlugin());
hljs.highlightAll(); // initialize highlighting
hljs.initLineNumbersOnLoad({
singleLine: true
}); // apply line numbering
</script>
<script language="javascript" type="text/javascript">
document.getElementById("versionNum").innerText=hljs.versionString;
</script>

</body>
</html>
2. Save as simpleHighlightJS.html
3. Open in internet browser.

Output


Notes

  • To see more clear to the screen capture picture, click on the picture.
  • In this post, we are using Highlightjs version 11.5.1. Of course you can use to any version depend to your requirements or your needs.

Bibliography

https://github.com/crpietschmann/hljslanguagedisplayplugin
https://github.com/highlightjs/
https://github.com/wcoder/highlightjs-line-numbers.js
https://www.inmotionhosting.com/
https://medium.com/@hizacharylee/
https://preply.com/

Minggu, 25 Mei 2025

How To Write A Code Block In Latex 2

1. Type this Latex code in Latex editor:

% !TEX TS-program = pdflatex

% !TEX encoding = UTF-8 Unicode


\documentclass[12pt,letterpaper]{article}

\usepackage{fullpage}

\usepackage[top=2.5cm,bottom=2.5cm,left=2.5cm,right=2.5cm,columnsep=30pt]{geometry}

%% latex package to use the Verbatim environment or display verbatim 
\usepackage{fancyvrb}
\usepackage{fvextra}
%% change default font To bold format
\renewcommand{\seriesdefault}{bx}
%% change the bold format To Huge size
\renewcommand{\bfseries}{\Huge{}}

\begin{document}
\subsection*{Notes}
\Large{}
\begin{minipage}{\linewidth}
To use the Verbatim environment or display verbatim you have to add the following line to the preamble of your document: \verb!\usepackage{fancyvrb}! and \verb!\usepackage{fvextra}!
\end{minipage}

\paragraph{}
\hspace{-1.5em}
\begin{minipage}{0.9\linewidth}
For longer (multiline) chunks of fixed-format text and automatic line breaking or wrap text, use the \texttt{\textbackslash{}fvset\{fontsize=\textbackslash{}Large,numberblanklines=false\}}
\texttt{\textbackslash{}begin\{Verbatim\}[breaklines=true, breakanywhere=true,numbers=left,
firstnumber=1]} (note the capital V letter). \\
Include your anything text in the Verbatim environment.
\end{minipage} \\

\noindent{}\raggedright{}
\subsection*{Sample:}
\huge{}
\fvset{fontsize=\Large
,numberblanklines=false
}
\renewcommand{\theFancyVerbLine}{%
\large\arabic{FancyVerbLine}}
\begin{Verbatim}[breaklines=true, breakanywhere=true,numbers=left,firstnumber=1]
% !TEX TS-program = pdflatex
% !TEX encoding = UTF-8 Unicode
\documentclass[12pt,letterpaper]{article}
\begin{document}
\begin{verbatim}
Hello World
\end{verbatim}
\end{document}
\end{Verbatim}

\paragraph{}
\noindent\raggedright{}\hspace{-1.5em} Normal Paragraph\\
\end{document}
2. Save file as CodeHighlightVerbatim2.tex
3. Then build or compile or typeset the Latex code.

Output


Notes

  • Remember the V capital letter in \begin{Verbatim}[breaklines=true, breakanywhere=true] and \end{Verbatim}.
  • To see more clear screen capture picture, click on the picture.


write latex code, verbatim environment

Rabu, 21 Mei 2025

Software Programming Environment Variable

The sample list of Programming Environment Variable and Common Programming Default Path:
Notes Use quotation marks when specifying long filenames or paths with spaces.


to learn about Environment Variable, click Environment variable 1 >

to learn about Top Command Prompt Command list, click Top Command Prompt >

to learn about change a directory in Command Prompt, click Change Directory In Command Prompt

Selasa, 20 Mei 2025

Simple Exception Summary In CSV Format

Exception Summary / Exception Reporting refers to the process of identifying and flagging/point out abnormal or suspicious activities by analyzing a range of events. It involves comparing observed behavior against known normal values to detect anomalies/unexpected/out of range, which can be done manually or automatically using various tools such as Network Behavior Anomaly Detection (NBAD), tracking log analysis, or Security Information and Event Management (SIEM) systems. Anomaly detection requires a baseline of activity for comparison, which is typically established by analyzing collected data over a period of time to determine the average behavior.

Type this CSV file in your CSV editor or Text Editor or Spreadsheet Program (e.g. Microsoft Office Excel) :
sep=;
Region;2006 Exceptions
Northeast;0.0021%
Atlantic;0.0025%
Southeast;0.0026%
North Central;0.0026%
Midwest;0.0020%
Southwest;0.0018%
Mountain West;0.0002%
Northwest;0.0004%
Central;0.0011%

Notes

If you open the above CSV file in several version of Spreadsheet Program, you may get error message or warning message. To fix the problem, you can delete the sep=; line before you open it.


Bibliography

https://www.leapfrogbi.com/
https://www.sciencedirect.com/

Related Post

HTML Arrows

Char Dec Hex Name
8592 2190 &larr; LEFTWARDS ARROW
8593 2191 &uarr; UPWARDS ARROW
8594 2192 &rarr; RIGHTWARDS ARROW
8595 2193 &darr; DOWNWARDS ARROW
8596 2194 &harr; LEFT RIGHT ARROW
8597 2195 UP DOWN ARROW
8616 21A8 UP DOWN ARROW WITH BASE
8658 21D2 &rArr; RIGHTWARDS DOUBLE ARROW
8660 21D4 &hArr; LEFT RIGHT DOUBLE ARROW


Bibliography

https://www.toptal.com/

Related Post

Most Common HTML Entities
Most Common Quotation On HTML Entities

Senin, 19 Mei 2025

English Topics Vocabulary List

Abbreviations
Alphabet
Bird
Boat
Buildings
Car
Clothes
Colour
Directions
Family
Fish
Fruit
Fish
Fruit
Hobby
Insect
Jewelry
Kitchen
Mammal
Musical Instrument
Numbers
Office
Pet
Plant
School
Shape
Sport
Time
Transportation
Universe
Vegetable

Bibliography

https://ltl-school.com/
https://www.woodwardenglish.com/
https://forvo.com/

Table Creole PlantUML About Microsoft Excel Arithmetic Operator

Type this following plantUML source code in your plantUML editor:
@startuml
/' Creole Table PlantUML '/
title
Arithmetic Operator In Microsoft Office Excel Using Creole PlantUML
|= Arithmetic\n Operator |= Symbol |= Example |= Result |
|Addition |+ |10+5 |15 |
|Subtraction |- |10-5 |5 |
|Multiplication |* |10*5 |50 |
|Division |/ |10/5 |2 |
|Exponent |^ |10^5 |100000 |
|Percentage |% |10% |0.10 |
end title
@enduml


Output:


plant uml, unified modelling language, system analyst and design, textual diagram, text to diagram, textual modelling


<< back to  Study About ERD / DFD


Related Post

Minggu, 18 Mei 2025

Memulai Application Microsoft Office Word

Persiapan

  • Menyiapkan Microsoft Windows 8.1 di dalam komputer Anda.
  • Jika Anda belum menginstall Microsoft Office Word 2007, Anda perlu menginstall Microsoft Office Word 2007 pada komputer (computer) Anda.
  1. Klik Start Button atau tekan tombol Windows di keyboard Anda untuk menampilkan Start menu.

    Start menu
  2. Dalam Start menu setelah All Apps button ( Down Arrow key ) yang ada di pojok kiri bawah di click, temukan aplikasi Microsoft Office Word dan click. Welcome Screen muncul dan Microsoft Office Word dimulai.

    Setelah All Apps button ( Down Arrow key )
    Welcome Screen Microsoft Office Word muncul
    Microsoft Office Word dimulai

    Tips: Pada kali pertama Anda memulai Word, Perjanjian Lisensi Perangkat Lunak Microsoft ( Microsoft Software License Agreement ) mungkin muncul.

Untuk keluar dari Word, klik tombol x di sudut kanan atas layar Anda.

Jika Anda membuat perubahan sejak terakhir kali menyimpan dokumen, kotak pesan akan muncul menanyakan apakah Anda ingin menyimpan perubahan. Untuk menyimpan perubahan, klik Yes. Untuk keluar tanpa menyimpan perubahan, klik No. Jika Anda mengklik tombol x secara tidak sengaja, klik Cancel.


Next Microsoft Word GUI Parts >


<< back to Study About Microsoft Office 1


Notes: To see the more clear picture, click on the picture

Jumat, 16 Mei 2025

Google Chrome Extension To Learning

10ten Japanese Reader (Rikaichamp); Offered by Birchill

ADHD Reader; Offered by: lehtuska.com

Basic Calculator; Offered by: brettclapper.com

Beautiful Epub Reader; Offered by: Sparrow

Better Ruler; Offered by: paul

Break Timer; Offered by: tomjwatson

Calculator; Offered by: linangdata.com

Easy Accent Marks; Offered by: Yatin Bayya

Edge: The Web Ruler; Offered by: Andrew Stromme

Emoji Keyboard by JoyPixels®; Offered by: JoyPixels Inc

EPUBReader; Offered by: epubreader

Focus Frame; Offered by: Kunj Patel

Furigana; Offered by: Dusan Halicky

Furiganator; Offered by: Crelier

Google Dictionary (by Google); Offered by: dictionary-extension-dev

Google Docs Dark Mode; Offered by: Ivan Hidalgo

Google Docs Offline; Offered by: google.com

Google Keep Chrome Extension; Offered by: Google

Highlighter for Google Chrome™; Offered by: web-highlighter.pdfwork.com

Markdown Cheatsheet; Offered by: greybax

Markdown Reader; Offered by: md-reader.github.io

Markdown Viewer; Offered by: simov.github.io

Measuremate; Offered by: measuremate.xyz

MultiTabs Markdown Editor; Offered by: Park ChangUk

Night Shift Mode; Offered by: nightshiftmode.com

OpenDyslexic for Chrome; Offered by: abbiecod.es.

Page Marker - Draw on Web; Offered by: pagemarker.org

Photo Zoom Plus; Offered by: Presci Lia

Pinyin Web; Offered by: Silas S. Brown

Protractor; Offered by: ben.burlingham

rikaikun; Offered by: Erek Speed

RSS Feed Reader; Offered by: feeder.co

Scientific Calculator; Offered by: raad.dev

Scribbr Citation Generator; Offered by: www.scribbr.com

Text Editor; Offered by: Sevina

Unicode Converter / ASCII Converter; Offered by: GPTBLOX

View Image Info (properties); Offered by: extfan

Visor: Offered by: softharbour

Weava Highlighter - PDF & Web; Offered by: Weavatools Limited

Web Maker; Offered by: webmaker.app

Word Editor; Offered by: Keller


Bibliography

https://chromewebstore.google.com/

https://www.controlaltachieve.com/

https://www.edutopia.org/


Related Post

Opera And Google Chrome Extensions 1