Search In This Website

Rabu, 30 April 2025

Determinant Matrix In Latex

1. Type this following latex code for drawing Determinant Matrix in Latex editor:
% !TEX TS-program=pdflatex 
% pdflatex DeterminantMatrix.tex
\documentclass{article}
\usepackage{amsmath}
\usepackage{bm}
\usepackage{tgbonum}
\usepackage{tikz}
\usetikzlibrary{matrix, arrows.meta}
\usetikzlibrary{decorations.text}
\usetikzlibrary{scopes}

\usepackage[active,tightpage,pdftex]{preview}
\PreviewEnvironment[{[]}]{tikzpicture}
\setlength\PreviewBorder{0.25pt}

\begin{document}
\boldmath
\tikzset{node style ge/.style={text width=2em, text centered, text depth=1.5ex, text height=3ex, inner sep=0},
    myarrow/.style={->, shorten <=2mm, shorten >=1mm}
    }

\begin{tikzpicture}[baseline=(A-2-1.base)]    
        \matrix (A) [matrix of math nodes, nodes = {node style ge,fill=white}, column sep=1 mm, ampersand replacement=\&, inner sep=1.5pt] 
        { a \& b \& c \& a \& b \\
            d \& e \& f \& d \& e \\
            g \& h \& i \& g \& h \\
        };   

%% write in the left side of Matrix A

% -------------------

\draw(A-3-1.north west) node[above left]{$\det B =\ |B|=$}; 


%%for placement of the 1st sign

% -------------------

 \draw(A-3-1.south west) -- (A-1-3.north east)node[above right=-1.5mm] {$-$};

%%Laplace expansion pattern 1

% -------------------

 \draw[draw=white] (A-3-1) node[above right=-2.2mm,fill=white] {$g$};

 \draw[draw=white] (A-2-2) node[above right=-2.1mm,fill=white] {$e$};

 \draw[draw=white] (A-1-3) node[above right=-2.1mm,fill=white] {$c$};

%%for placement of the 2nd sign

% -------------------

 \draw[myarrow] (A-3-2.south west) -- (A-1-4.north east)node[above right=-1.5mm] {$-$};

%%Laplace expansion pattern 2

% -------------------

 \draw[draw=white] (A-3-2) node[above right=-2.1mm, label={[fill=white!0.5,inner sep=1.5pt]}, fill=white!0.5] {$h$};

 \draw[draw=white] (A-2-3) node[above right=-2.1mm,fill=white!0.5] {$f$};

 \draw[draw=white] (A-1-4) node[above right=-2.1mm,fill=white!0.5] {$a$};

%%for placement of the 3rd sign

% -------------------

 \draw[myarrow] (A-3-3.south west) -- (A-1-5.north east)node[above right=-1.5mm] {$-$};

%%Laplace expansion pattern 3

% -------------------

 \draw[draw=white] (A-3-3) node[above right=-2.1mm,fill=white!0.5] {$i$};

 \draw[draw=white] (A-2-4) node[above right=-2.1mm,fill=white!0.5] {$d$};

 \draw[draw=white] (A-1-5) node[above right=-2.1mm,fill=white!0.5] {$b$};

%%for placement of the 4th sign

% -------------------

 \draw[myarrow] (A-1-1.north west) -- (A-3-3.south east)node[below right=-1.5mm] {$+$};

%%Laplace expansion pattern 4

% -------------------

 \draw[draw=white] (A-1-1) node[above right=-2.1mm,fill=white!0.5] {$a$};

 \draw[draw=white] (A-2-2) node[above right=-2.1mm,fill=white!0.5] {$e$};

 \draw[draw=white] (A-3-3) node[above right=-2.1mm,fill=white!0.5] {$i$};

%%for placement of the 5th sign

% -------------------

 \draw[myarrow] (A-1-2.north west) -- (A-3-4.south east)node[below right=-1.5mm] {$+$};

%%Laplace expansion pattern 5

% -------------------

% \draw[draw=white] (A-1-2) node[above right=-2.1mm,fill=white!0.5,label={[fill=white!0.2,inner sep=0.9pt]}] {$b$};

  \draw[draw=white] (A-1-2) node[above right=-2.1mm,label={[fill=white!0.5,inner sep=1.5pt]},fill=white!0.5] {$b$};

 \draw[draw=white] (A-2-3) node[above right=-2.1mm,fill=white!0.5] {$f$};

 \draw[draw=white] (A-3-4) node[above right=-2.1mm,fill=white!0.5] {$g$};

%%for placement of the 6th sign

% -------------------

 \draw[myarrow] (A-1-3.north west) -- (A-3-5.south east)node[below right=-1.5mm] {$\mathbf{+}$};

%%Laplace expansion pattern 6

% -------------------

 \draw[draw=white] (A-1-3) node[above right=-2.1mm,fill=white!0.5] {$c$};

 \draw[draw=white] (A-2-4) node[above right=-2.1mm,fill=white!0.5] {$d$};

 \draw[draw=white] (A-3-5) node[above right=-2.1mm,fill=white!0.5] {$h$};

%% draw a boundary vertical lines

% -------------------

 \draw[black] (A-1-1.north west) -- (A-3-1.south west);

 \draw[black] (A-1-4.north west) -- (A-3-4.south west);

\end{tikzpicture}

\end{document}

2. Save file as DeterminantMatrix.tex
3. Typeset or Build or Compile.

Output


Related Post

Turn Off The Windows Animation

Objectives: To turn off Microsoft Windows GUI Animation / To turn off Microsoft Windows Workspace Animation.
  1. Click on the Microsoft Windows Search bar. To learn Microsoft Windows Search bar, click .


  2. Type "Adjust the appearance and performance of windows", then open the first result


  3. Tick the option "Animate controls and elements inside windows" to be blank. Click OK button.
  4. Relaunch chrome by closing all browser windows, waiting a few seconds.

How To Write A Code Block In Latex 1

Learning Objectives: For longer (multiline) chunks of fixed-format text and automatic line breaking or wrap text, use the \begin{Verbatim}[breaklines=true, breakanywhere=true] to start the Verbatim environment (note the capital V letter). 


1. Type this following Latex code for typing the source code block in Latex editor:

% !TEX TS-program = pdflatex

% !TEX encoding = UTF-8 Unicode

\documentclass[12pt,letterpaper]{article}

\usepackage{fancyvrb}

\usepackage{fvextra}

\renewcommand{\seriesdefault}{bx}

\renewcommand{\bfseries}{\Huge{}}


\begin{document}

\section{Notes}

\Huge{}

To use the Verbatim environment you have to add the following line to the preamble of your document: \verb!\usepackage{fancyvrb}! and \verb!\usepackage{fvextra}!


\begin{Verbatim}[breaklines=true, breakanywhere=true]


% !TEX TS-program = pdflatex

% !TEX encoding = UTF-8 Unicode

\documentclass[12pt,letterpaper]{article}

\begin{document}

\begin{verbatim}

Hello World

\end{verbatim}

\end{document}


\end{Verbatim}

\end{document}

2. Save file as CodeHighlightVerbatim1.tex

3. then build or typeset or compile the Latex code.


Output

Notes Remember the V capital letter in \begin{Verbatim}[breaklines=true, breakanywhere=true] and \end{Verbatim}.


write latex code, verbatim environment

Bibliography

https://www.overleaf.com/
https://www.sascha-frank.com/

Senin, 28 April 2025

How To Write Latex Accent

Task

  • Create Latex document to be same as to the above picture in one page! Finish the task before you click the Learn more hyperlink on the below!
  • Using the documentclass report.
  • Using the pdflatex typeset or compiler.
  • Use minimalist working package!
  • You can fix from the following Latex source code in the below, if you think you are beginner student.

PlantUML Code About CMS

1. Type this following source code about CMS (Content Management System) in PlantUML Code:

@startuml

/' creately, freeprojectz '/

/' avoid problems with angled crows feet '/

skinparam linetype ortho


(*) --> "Login" as actLogin

actLogin --> "Check User Level And Permissions" as usrLvl


usrLvl --> if "Check Permission" as actChk1 then

--> [true] "Manage Content" as actMngContent

endif


usrLvl --> if "Check Permission" as actChk2 then

--> [true] "Manage Content Type" as actMngCntType

endif


usrLvl --> if "Check Permission" as actChk3 then

--> [true] "Manage Category" as actMngCat

end if


usrLvl --> if "Check Permission" as actChk4 then

--> [true] "Manage Comment" as actMngCmnt

end if


usrLvl --> if "CheckPermission" as actChk5 then

--> [true] "Manage Blogs" as actMngBlogs

end if


actMngContent --> "Logout from the system" as actLogout

actLogout --> (*)


actMngCntType -->actLogout

actLogout --> (*)


actMngCat -->actLogout

actLogout --> (*)


actMngCmnt -->actLogout

actLogout --> (*)


actMngBlogs -->actLogout

actLogout --> (*)

@enduml

2. Save file as cmsActDiaLegacy.plantuml.

3. Build or Compile the source code.

Output


diagram as code, textual modelling

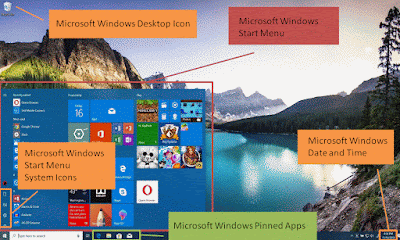
Microsoft Windows 10 GUI Parts

Microsoft Windows 10 GUI ( Graphical User Interface ) Parts, consist of:

  • Microsoft Windows Start Menu.
  • Microsoft Windows Start Button.
  • Microsoft Windows Taskbar.
  • Microsoft Windows Work Area / Microsoft Windows Wallpaper / Microsoft Windows Desktop Background.
  • Microsoft Windows Desktop ( Microsoft Windows Work Area + Microsoft Windows Taskbar ).
  • Microsoft Windows Desktop Icon.
  • Microsoft Windows Notification Area.
  • Microsoft Windows Date and Time.
  • Microsoft Windows Search Bar / Microsoft Windows Search Box.
  • Microsoft Windows Frequent Apps.
  • Microsoft Windows User Account.
  • Microsoft Windows Start Menu Tiles.
  • Microsoft Windows Start Menu Live Tile.
  • Microsoft Windows Start Menu System Icons.
  • Microsoft Windows Task View.
  • Microsoft Windows Pinned Apps.
  • Microsoft Edge Browser.
Microsoft Windows Work Area / Microsoft Windows Wallpaper / Microsoft Windows Desktop Background, Microsoft Edge Browser, Microsoft Windows Start Button, Microsoft Windows Notification Area

Microsoft Windows Search Bar / Microsoft Windows Search Box, Microsoft Windows Task View, Microsoft Windows Notification Area

Microsoft Windows Desktop Icon, Microsoft Windows Start Menu, Microsoft Windows Date and Time, Microsoft Windows Pinned Apps, Microsoft Windows Start Menu System Icons   

Microsoft Windows User Account, Microsoft Windows Frequent Apps, Microsoft Windows Start Menu Live Tile, Microsoft Windows Start Menu Tiles

Notes

  • To see the more clear screenshot, click on the picture.


microsoft windows environment, microsoft windows workspace

Bibliography

https://answers.microsoft.com/
https://blindaccessibilitytips.com/
https://learn.microsoft.com/ ( manual book )
https://support.microsoft.com/ ( manual book )
https://www.digitalcitizen.life/
https://www.informit.com/
https://www.microsoftpressstore.com/ ( ebook )
https://www.pcmag.com/
https://www.pcworld.com/
https://www.techradar.com/

Senin, 14 April 2025

Install SQLite Tools

  1. First, create a new directory such as D:\portable\javaJARruntime\sqlite-tools-win32-x86-3400100\
  2. Second, extract the content of the file downloaded in the previous step to the D:\portable\javaJARruntime\sqlite-tools-win32-x86-3400100\ directory. You should see three programs in the D:\portable\javaJARruntime\sqlite-tools-win32-x86-3400100\ directory as shown below:


  3. Third, type sqlite3 --version and press enter. It’ll return the following output:
    3.40.1 2022-12-28 14:03:47 df5c253c0b3dd24916e4ec7cf77d3db5294cc9fd45ae7b9c5e82ad8197f38a24

Notes

  • Type only font in monospace in command prompt, e.g. sqlite3.
  • To see the more clear screenshot, click on the picture.

Next How To Check Sqlite Version >

Related Post

Number Place Value In Mathematics

Number Place Value is the value of each digit in a number depending on its position. Number Place Value helps us to understand and compare numbers, and make calculations.

Number Place Value helps you to understand the value of each digit within a number. The same digit can have different Number Place Values depending on its position in a number, while a digit can be the same.

Number Place Value have letters on them to represent each position on Millions, Hundred Thousands, Ten Thousands, Thousands, Hundreds, Tens, Ones, decimal point, tenths, hundredths, thousandths and so on.

To separate thousands and more, you are write the numbers with more than four number digits is by separating them into groups of three with comma ( , ) and leaving a space between each group.

To separate the number place value Ones with tenths number, you are write the period of decimal point ( . )  and leaving a space between each group.

For example 

in 362, the 6 ( six ) represents 6 of tens ( T ). But, in 326, the 6 ( six ) represents 6 of ones ( O ).

Number Place Value chart list

Number Place Value chart list like the one below:

2 , 367 , 402 . 960

2 represents 2 Millions place.

3 represents 3 Hundred Thousands place.

6 represents 6 Ten Thousands place.

7 represents 7 Thousands place.

4 represents 4 Hundreds place.

0 represents 0 Ones place.

. represents point.

9 represents tenths place.

6 represents hundredths place.

0 represents thousandths place.


<< Back To Topics: Subject Topics Of Math


Next Number Place Value >


Bibliography

https://thirdspacelearning.com/

https://www.smartick.com/

https://www.splashlearn.com/

Related Post

Long Division In Latex 3

1. Open your Latex editor.
2. type this following latex code in your latex editor for typing a Long Division equation in latex:
% !TEX TS-program = pdflatex
% !TEX encoding = UTF-8 Unicode
%Typeset/Build program
%-LongDivision2.tex--
\documentclass[margin=2mm, preview, varwidth]{standalone}
\usepackage{amsmath}
\usepackage{array}
\usepackage{siunitx}
\usepackage{fourier}

\usepackage{scalerel}

% macro command to type long division
\newcommand{\ldsym}{$\left.\mathstrut\right)$}% unbalanced )
\newlength{\ldwidth}

\newcommand{\longdivide}[2]% #1 = divisor/denominator, #2 = dividend/numerator
{\settowidth{\ldwidth}{\ldsym}
$#1\,\raisebox{2.1pt}{\ldsym}\hspace*{-.75\ldwidth}\overline{
\mathstrut\hspace*{.35\ldwidth}\ #2}$}

\begin{document}
% configuration for digit separator
\sisetup{group-separator={.},group-minimum-digits=3}
\renewcommand\arraystretch{1.2} %specify the vertical stretch

\begin{center}
\begin{tabular}{rr}
% Quotient
$\num{7000000}$ \\
% 5 is Divisor, 35000000 is Dividend
\longdivide{5}{\num{35000000}}\\
\underline{\num{35000000}} &\kern-2.4ex -\\
0
\end{tabular}
\end{center}

\end{document}
3. Save as LongDivision2.tex
4. Build Typeset or Compile the latex code

Output


< Previous Number Place Value 

Next to learn  Vertical Multiply Equation  >

< Previous lesson of latex Equation Long Division In Latex 2

to learn other Latex draw topics, click 
Study About Draw In Latex >>


Related Post

Jumat, 11 April 2025

Tabel Identifikasi Use Case Dalam AsciiDoctor

1. Buka AsciiDoctor editor.
2. Ketik file AsciiDoctor di bawah ini ke dalam AsciiDoctor editor:
= Tabel Identifikasi Use Case
:author: -
:co-author: Tutor Course and After School Course
:revnumber: 1.0
:revdate: -
:doctype: article
:toc:
:icons:
:lang: id
.Identifikasi Use Case
[%header]
|===

|ID|Nama +
Use Case|Deskripsi|Aktor

|UC01
|Login
|Use Case ini menggambarkan +
kegiatan memasukkan data id user +
dan password untuk dapat +
masuk ke dalam sistem.
a|. Admin Inventory
. Admin Pembelian
. Manajer

|UC02
|Update Profil
|Use case ini menggambarkan +
kegiatan memperbaharui atau +
mengubah biodata user seperti +
nama lengkap, nomor telepon, +
e-mail, dan foto profil.
a|. Admin Inventory
. Admin Pembelian
. Manajer

|UC03
|Ubah Password
|Use case ini menggambarkan +
kegiatan mengubah password +
lama menjadi password baru
a|. Admin Inventory
. Admin Pembelian
. Manajer

|UC04
|Manajemen Barang
|Use case ini menggambarkan +
kegiatan melihat data barang, +
menambahkan data barang, +
mengubah data barang dan +
menghapus data.
a|Admin Inventory
|===
3. Simpan dengan nama file TabelIdentifikasiUseCase.asciidoc
4. Jalankan preview atau save as HTML atau PDF.
5. Buka HTML di browser atau PDF di PDF reader.

Notes

Jika Asciidoctor Editor berjalan dengan baik maka akan menghasilkan file output HTML seperti di bawah ini:
<!DOCTYPE html>
<html>
<head><title>Tabel Identifikasi Use Case</title></head>
<body>
<h1>Tabel Identifikasi Use Case</h1>
<table border="1">
<caption>Table 1. Identifikasi Use Case</caption>
<colgroup>
<col style="width: 25%;">
</colgroup>
<thead>
<tr>
<th>ID</th>
<th>Nama<br>
Use Case</th>
<th>Deskripsi</th>
<th>Aktor</th>
</tr>
</thead>
<tbody>
<tr>
<td>UC01</td>
<td>Login</td>
<td>Use Case ini menggambarkan<br>
kegiatan memasukkan data id user<br>
dan password untuk dapat<br>
masuk ke dalam sistem.</td>
<td>
<ol>
<li>
Admin Inventory
</li>
<li>
Admin Pembelian
</li>
<li>
Manajer
</li>
</ol>
</td>
</tr>
<tr>
<td>UC02</td>
<td>Update Profil</td>
<td>Use case ini menggambarkan<br>
kegiatan memperbaharui atau<br>
mengubah biodata user seperti<br>
nama lengkap, nomor telepon,<br>
e-mail, dan foto profil.</td>
<td>
<ol>
<li>
Admin Inventory
</li>
<li>
Admin Pembelian
</li>
<li>
Manajer
</li>
</ol>
</td>
</tr>
<tr>
<td>UC03</td>
<td>Ubah Password</td>
<td>Use case ini menggambarkan<br>
kegiatan mengubah password<br>
lama menjadi password baru</td>
<td>
<ol>
<li>
Admin Inventory
</li>
<li>
Admin Pembelian
</li>
<li>
Manajer
</li>
</ol>
</td>
</tr>
<tr>
<td>UC04</td>
<td>Manajemen Barang</td>
<td>Use case ini menggambarkan<br>
kegiatan melihat data barang,<br>
menambahkan data barang,<br>
mengubah data barang dan<br>
menghapus data.</td>
<td>
Admin Inventory
</td>
</tr>
</tbody>
</table>
</body>
</html>

Output

Tabel Identifikasi Use Case

Table 1. Identifikasi Use Case
ID Nama
Use Case
Deskripsi Aktor
UC01 Login Use Case ini menggambarkan
kegiatan memasukkan data id user
dan password untuk dapat
masuk ke dalam sistem.
  1. Admin Inventory
  2. Admin Pembelian
  3. Manajer
UC02 Update Profil Use case ini menggambarkan
kegiatan memperbaharui atau
mengubah biodata user seperti
nama lengkap, nomor telepon,
e-mail, dan foto profil.
  1. Admin Inventory
  2. Admin Pembelian
  3. Manajer
UC03 Ubah Password Use case ini menggambarkan
kegiatan mengubah password
lama menjadi password baru
  1. Admin Inventory
  2. Admin Pembelian
  3. Manajer
UC04 Manajemen Barang Use case ini menggambarkan
kegiatan melihat data barang,
menambahkan data barang,
mengubah data barang dan
menghapus data.
Admin Inventory

document header, document metadata, document attributes, document structure, low-code application development, software requirement specification document, srs document


Bibliography

Software Engineering;R.S. Pressman et. al.
Analisis Dan Desain Sistem Informasi;Jogiyanto
https://books.google.com/
https://www.researchgate.net/
https://www.scribd.com/

Tabel Identifikasi Aktor Use Case Dalam Markdown

Persiapan: Markdown Editor dan Markdown Reader yang mendukung markdown-it parser dan markdown-it-table-captions plugin (Table caption plugin for markdown-it markdown parser).

1. Buka Markdown Editor.
2. Ketik dokumen markdown di bawah ini pada markdown editor:
<meta name="description" content="Author: Tutor Course and After School Course, Description: menampilkan tabel Identifikasi Aktor Use Case UML (Unified Modelling Language), Rev-Number: 1.0, Language: id">

|ID|Aktor|Deskripsi|
|---|---|---|
|AC01|Admin _Inventory_|Aktor yang dapat mengelola data barang, mengelola data pemasok, mengelola data pelanggan, mengelola data barang masuk, mengelola data barang keluar, mengelola data persediaan barang, dan mengelola data permintaan barang.|
|AC02|Admin Pembelian|Aktor yang dapat melihat dan menyetujui permohonan permintaan barang|
|AC03|Admin Penjualan|Aktor yang dapat melihat dan menyetujui permohonan penjualan barang|
|AC04|Manajer|Aktor yang dapat membuat _user_ baru, memiliki hak akses untuk mengedit dan menghapus _user_, melihat laporan barang masuk, laporan barang keluar, laporan daftar barang, laporan persediaan barang, laporan permintaan barang, dan laporan penjualan barang.|

Table: Identifikasi Aktor
3. Simpan dengan nama file tabelIdentifikasiAktor.md.
4. Jalankan preview  atau save as HTML atau PDF.
5. Buka HTML di browser atau PDF di PDF reader.

Notes

Jika Markdown Editor dan Markdown Converter atau Markdown Compiler untuk parsing Markdown berjalan dengan baik maka akan menghasilkan file output HTML seperti di bawah ini:
<!DOCTYPE html>
<head>
<meta name="description" content="Author: Tutor Course and After School Course, Description: menampilkan tabel Identifikasi Aktor Use Case UML (Unified Modelling Language), Rev-Number: 1.0, Language: id">
</head>
<body>
<table>
<caption>Table: Identifikasi Aktor</caption>
<thead>
<tr>
<th>ID</th>
<th>Aktor</th>
<th>Deskripsi</th>
</tr>
</thead>
<tbody>
<tr>
<td>AC01</td>
<td>Admin <em>Inventory</em></td>
<td>Aktor yang dapat mengelola data barang, mengelola data pemasok, mengelola data pelanggan, mengelola data barang masuk, mengelola data barang keluar, mengelola data persediaan barang, dan mengelola data permintaan barang.</td>
</tr>
<tr>
<td>AC02</td>
<td>Admin Pembelian</td>
<td>Aktor yang dapat melihat dan menyetujui permohonan permintaan barang</td>
</tr>
<tr>
<td>AC03</td>
<td>Admin Penjualan</td>
<td>Aktor yang dapat melihat dan menyetujui permohonan penjualan barang</td>
</tr>
<tr>
<td>AC04</td>
<td>Manajer</td>
<td>Aktor yang dapat membuat <em>user</em> baru, memiliki hak akses untuk mengedit dan menghapus <em>user</em>, melihat laporan barang masuk, laporan barang keluar, laporan daftar barang, laporan persediaan barang, laporan permintaan barang, dan laporan penjualan barang.</td>
</tr>
</tbody>
</table>
</body>
</html>

Output

Table: Identifikasi Aktor
ID Aktor Deskripsi
AC01 Admin Inventory Aktor yang dapat mengelola data barang, mengelola data pemasok, mengelola data pelanggan, mengelola data barang masuk, mengelola data barang keluar, mengelola data persediaan barang, dan mengelola data permintaan barang.
AC02 Admin Pembelian Aktor yang dapat melihat dan menyetujui permohonan permintaan barang
AC03 Admin Penjualan Aktor yang dapat melihat dan menyetujui permohonan penjualan barang
AC04 Manajer Aktor yang dapat membuat user baru, memiliki hak akses untuk mengedit dan menghapus user, melihat laporan barang masuk, laporan barang keluar, laporan daftar barang, laporan persediaan barang, laporan permintaan barang, dan laporan penjualan barang.


lightweight markup syntax, lightweight markup document, lightweight markup language


Bibliography

https://daringfireball.net/projects/markdown/
https://developers.google.com/
https://github.com/
http://stackoverflow.com/
https://www.tutorialspoint.com/

JQuery Selector Short Reference

JQuery Selector


Query Selector Description
$(“*”) It is used to select all the HTML components/tags.
$(“p.demo”) It is used to select p tag elements by using the class name of the p tag.
Use a dot (.) and the class name.
$("#li-with-id") It is used to select tag elements by using the id name of any tag.
Use To select an element with a specific id, write a hash (#) character, the id of the element. a hash (#) and followed by the id element.
$(“:button”) It is used to select the button and input elements.
$(“tr:even”) It is used to select the even <tr> tag elements.
$(“tr:odd”) It is used to select the odd <tr> tag elements.
$(“span:parent”) It is used to select the elements which have a child element associated.
$(“[href]”) It is used to select all elements with href attributes.
$(“:input”) It is used to select all form input elements.


Bibliography

https://jquery.com/ ( manual book )
https://studysection.com/
https://www.freecodecamp.org/

Related Post

Rotate Rowspan Table Cell In HTML, CSS, JS

1. Type this following HTML code in Web editor:

<!DOCTYPE HTML PUBLIC "-//W3C//DTD HTML 4.01 Transitional//EN" "http://www.w3.org/TR/html4/loose.dtd">
<html>
<head>
<style>
th.rotate {
  height: 100%;
  white-space: nowrap;
  vertical-align: middle;
  text-align: center;
}
th.rotate > div {
  transform: 
    translate: (25px, 51px)
    rotate(-90deg);
  width: 1.75em;
  vertical-align: middle;
  margin-left: -100;
  margin-right: -100;
  /* Legacy vendor prefixes that you probably don't need... */

  /* Safari */
  -webkit-transform: rotate(-90deg);

  /* Firefox */
  -moz-transform: rotate(-90deg);

  /* IE */
  -ms-transform: rotate(-90deg);

  /* Opera */
  -o-transform: rotate(-90deg);

  /* Internet Explorer */
  filter: progid:DXImageTransform.Microsoft.BasicImage(rotation=3);
}
th.rotate > div > span {
  padding: 5px 15px;
  vertical-align: middle;
  display: block;
  width: 100%;
  height: 100%;
  direction: rtl;
}
.cellnowrap {white-space:nowrap;}
</style>
</head>
<body>
<table border="1" cellpadding="5" cellspacing="0">
  <tr>
    <th colspan="7">Sawah</th>
    <th colspan="7">Tanah Kering</th>
  </tr>
  <tr>
    <th rowspan="3">Nomor Persil dan Huruf Bagian Persil</th>
    <th rowspan="3" width="1" class="rotate"><div><span>KelasDesa</span></div></th>
    <th colspan="4">Menurut Daftar Perincian</th>
    <th rowspan="3">Sebab Dan tanggal perubahan</th>
    <th rowspan="3">Nomor Persil dan Huruf Bagian Persil</th>
    <th rowspan="3" width="1" class="rotate"><div><span>KelasDesa</span></div></th>
    <th colspan="4">Menurut Daftar Perincian</th>
    <th rowspan="3">Sebab Dan tanggal perubahan</th>
  </tr>
  <tr>
    <th colspan="2">Luas milik</th>
    <th colspan="2">Pajak</th>
    <th colspan="2">Luas milik</th>
    <th colspan="2">Pajak</th>
  </tr>
  <tr>
    <th>ha</th>
    <th nowrap class="cellnowrap">m<sup>2</sup></th>
    <th>Rp</th>
    <th>S</th>
    <th>ha</th>
    <th nowrap class="cellnowrap">m<sup>2</sup></th>
    <th>Rp</th>
    <th>S</th>
  </tr>
  <tr>
    <td></td>
    <td></td>
    <td></td>
    <td></td>
    <td></td>
    <td></td>
    <td></td>
    <td>001/002</td>
    <td></td>
    <td></td>
    <td>1.000</td>
    <td>1.500</td>
    <td></td>
    <td>Jual Beli<br />13 Januari 1990</td>
  </tr>
  <tr>
    <td></td>
    <td></td>
    <td></td>
    <td></td>
    <td></td>
    <td></td>
    <td></td>
    <td></td>
    <td></td>
    <td></td>
    <td></td>
    <td></td>
    <td></td>
    <td></td>
  </tr>
  <tr>
    <td>&nbsp;</td>
    <td>&nbsp;</td>
    <td>&nbsp;</td>
    <td>&nbsp;</td>
    <td>&nbsp;</td>
    <td>&nbsp;</td>
    <td>&nbsp;</td>
    <td>&nbsp;</td>
    <td>&nbsp;</td>
    <td>&nbsp;</td>
    <td>&nbsp;</td>
    <td>&nbsp;</td>
    <td>&nbsp;</td>
    <td>&nbsp;</td>
  </tr>
</table>
<script language="javascript" type="text/javascript">
window.addEventListener('load', function () {
    var rotates = document.getElementsByClassName('rotate');
    for (var i = 0; i < rotates.length; i++) {
        rotates[i].style.height = rotates[i].offsetWidth + 'px';
    }
});
</script>
</body>
</html>
2. Save the file as rotateRowspanTableCell.html
3. To see the output, open the file using browser (e.g. Google Chrome).

Output


< back to Learn HTML


Bibliography

Web and Internet e-books series O'reilly
Web development e-books series Prentice Hall
Web development and Web programming Wrox

Related Post

Kamis, 10 April 2025

HTML Images

1. Type this following HTML code in Web editor:
<!DOCTYPE html PUBLIC "-//W3C//DTD XHTML 1.0 Transitional//EN" "http://www.w3.org/TR/xhtml1/DTD/xhtml1-transitional.dtd">
<html xmlns="http://www.w3.org/1999/xhtml">
<head><meta http-equiv="Content-Type" content="text/html;charset=UTF-8" />
<title>HTML Images</title>
</head>

<body>
<img src="pict/prImage1.jpeg" />
</body>
</html>
2. Save the file as HTMLimages.html
3. To see the output, open the file using browser (e.g. Google Chrome).

HTML Img tag Notes:

  • The <img> HTML element embeds an image into the document.
  • The <img> tag is empty (can never have content), it contains attributes only, and does not have a closing tag. Empty elements in the XHTML or XML family must add the  /> at the end of a tag, but without it they may incorrectly parse the tag or its attributes. HTML user agents also may not recognize the alternate syntax permitted by .
  • src attribute - Specifies the path to the image.
  • for alt attribute, click on the HTML Alternate Text.

Output

< back to Learn HTML

Bibliography

https://developer.mozilla.org/en-US/ (manual book)
https://teamtreehouse.com/library
https://www.netflix.com/
https://www.w3schools.com/
http://www.w3.org/ (manual book)

AsciiDoctor Localization Label Reference

Language : AsciiDoctor Localization Label
English : en
French : fr
German : de
Russian : ru
Italian : it
Spanish : es
Swedish : sv
Japanese : ja
Danish : da
Latin : la


built-in labels, converting to docbook, language tag, lang attribute, asciidoc

Bibliography

https://asciidoctor.org/ ( manual book )

https://docbook.org/ ( manual book )

https://github.com/

https://toronto.edu/ ( university )

https://whatwg.org/ ( manual book )

http://www.iana.org/ ( manual book )

https://www.ietf.org/ ( manual book )

https://www.rfc-editor.org/ ( manual book )

https://www.unesco.org/

https://www.w3.org/ ( manual book )


Menjalankan Microsoft Visual Basic 6

Gunakanlah prosedur di bawah ini untuk memulai Microsoft Visual Basic Classic.

Persiapan : 

  • Menyiapkan Microsoft Windows 8.1.
  • Jika Anda belum menginstall Microsoft Visual Basic 6.0, Anda perlu menginstall Microsoft Visual Basic pada komputer (computer) Anda.
  1. Pada sistem operasi (operating system) Microsoft Windows, klik tombol Start, pada Start Screen, pilih All Apps button ( Down Arrow key ), 

  2. lalu pilih folder Microsoft Visual Basic 6.0 ( atau Microsoft Visual Studio 6.0, Jika Anda menginstall Visual Basic sebagai bagian dari program Microsoft Visual Studio ) > klik icon Programs Microsoft Visual Basic 6.0

  3. Kotak dialog ( Dialogue Box ) New Project muncul.

Bibliography

http://toastytech.com/
https://smkpancakarya.sch.id/ ( school )
https://www.addictivetips.com/
https://www.informit.com/
https://www.computerworld.com/

Selasa, 08 April 2025

English Phrases At The Hospital

English Phrases Used By Hospital Staff:

  • Do you have an appointment?
  • How are you feeling?
  • How can I help you?
  • Is it urgent?
  • Let us adjust your pillows for better support.
  • Let us check your blood sugar levels.
  • Let us make sure your IV ( intravenous ) is functioning properly.
  • May I have your insurance card, please?
  • Please call us if you experience any unusual symptoms.
  • Please fill out this paperwork.
  • Please fill out this registration form.
  • Please follow me to the exam room.
  • Please have a seat in the waiting room.
  • Please make a follow-up appointment with the front-desk.
  • Please undress and put on this gown.
  • Take these medications as directed.
  • The doctor will be with you shortly.
  • The doctor will review your medical test results with you at your next appointment.
  • The doctor would like to order some medical tests.
  • What brings you here today?

English Phrases Used By Doctor:

  • Are you able to sleep at night?
  • Are you feeling any shortness of breath?
  • Can I have a look?
  • Do you have any allergies?
  • Does it hurt when I press here? I am going to take your blood pressure.
  • I am going to give you an injection.
  • I am going to have your blood checked.
  • I am going to prescribe you some ...
  • I want you to see a specialist ( doctor ).
  • Let us take a walk around the hallway.
  • Open your ... , please.
  • We need to take (a/an) ... sample.
  • What are your symptoms?
  • When was your last meal?
  • Where does it hurt?
  • You need to have a ... ( any medical ) test.
  • You should avoid ... for a while.
  • You should avoid ... foods for now.
  • You should stop ...

English Phrases Used By Patients

  • Are there any side effects I should be aware of?
  • Can I do anything to prevent this symptom from happening again?
  • Can I have a copy of medical tests results, please?
  • Can you explain what is going on?
  • Here is a heating pad to help with your pain.
  • How long will it take to recover?
  • I am allergic to ... medication.
  • I am experiencing ... symptoms.
  • I am here for a follow up visit.
  • I have an 8.00 ( a.m. / p.m. ) appointment.
  • I have been having a lot of pain in my ...
  • I think I have caught a ... ( symptoms or condition ).
  • Please use the handrails when walking.
  • What are my treatment options?
  • What should I do to take care of myself at ... (place) ?
english sentences, english line, english phrase, english expression

Bibliography

https://7esl.com/
https://eslbuzz.com/
https://ilmish.com/
https://learningenglishfree.co.uk/
https://www.londonschool.com/