Rabu, 20 November 2024

Get The Shape Position In Microsoft PowerPoint

  1. Type this following Microsoft Office PowerPoint VBA or macro in PowerPoint VBA Editor:
  2. Sub getShapePosition()
    '-- Declare variables
    Dim oPPApp As New PowerPoint.Application
    Dim oShp As PowerPoint.Shape

    '-- Set an object variable to shape that index is 1
    Set oShp = oPPApp.ActivePresentation.Slides(oPPApp.ActiveWindow.Selection.SlideRange.SlideIndex).Shapes(1)
    '-- Print out the Shape position on Immediate window
    Debug.Print oShp.Left
    Debug.Print oShp.Top
    End Sub
  3. Run the above VBA code by click Run > Run Sub/User Form menu.

Related Post


Senin, 18 November 2024

Build Or Compile LaTeX In TexWorks

Requirements

Download, install and configure MiKTeX correctly.

Type A Hello World Latex Document In TeXworks

% !TEX TS-program=pdflatex
% !TEX encoding=UTF8-unicode
\usepackage{amsmath}
\usepackage{mathpazo}

\title{Hello world}
\author{Private Course And Tutor Course}
\date{\today}

\begin{document}

\maketitle
\boldmath
 
Hello world!\\
$ax^{2}+bx+c=0$
\end{document}

Build Or Compile LaTeX In TeXworks

  1. Now at the top of TeXworks you will see a green button ("Compile or Typeset" button) on the first toolbar.
    Notes: Every time you click the green compile button, TeXworks will save the file with the last name it was given. This can be troublesome when you use a template *.tex file your instructor gives you. Before you click the green compile button after opening a new file, click File and Save As from the top TeXworks menu to give the file your own name.
  2. Next to that you will see typesetting drop-down menu to choose the format for typesetting (we’ll choose something like "pdfLaTeX"). 
    Notes: Click on the downward triangle next to typesetting drop-down menu and choose to your apropriate typesetting ( something like "pdfLaTeX+MakeIndex+BibTeX" ).
  3. Then click on the green "Compile" button. You will be asked to save the file and give it a name. Name it test.tex in whatever folder you want to keep your LaTeX files in. After you save a file a new window should open up with a PDF file containing your document.

Output


Notes 

  • To see the more clear screenshot, click on the picture.

Bibliography

https://www.iup.edu/

https://www.overleaf.com/

TeXworks-manual

Related Post

Types Of Angles

Parts of an Angle

The corner point of an angle is called the vertex.
And the two straight sides are called arms / rays.

Type of Angle Description

An Acute Angle is an angle with angle measure less than 90° (between 0° and 90°).
A Right Angle is an angle that measure 90° exactly.
An Obtuse Angle is an angle with angle measure greater than 90° and less than 180°.
A Straight Angle is an angle that measure 180° exactly.
A Reflex Angle is an angle with angle measure greater than 180° (between 180° and 360°).
A Full Rotation Angle / A Complete Angle is an angle that measure 360° exactly.

Positive and Negative Angles

When measuring from a base line:

a positive angle goes counterclockwise (opposite direction that clocks go).
a negative angle goes clockwise.


Bibliography

https://www.etsy.com/
https://www.mathsisfun.com/
https://www.splashlearn.com/
https://mytutorsource.com/
https://www.shutterstock.com/

Related Post

Obtuse Angle In Latex 1a

  1. Type this following latex code in the latex editor:
    % !TEX TS-program=pdflatex
    % !TEX encoding=UTF-8 unicode
    % Description:
    % Obtuse Angle = Detuse Angle = Blunt Angle

    \documentclass[a4paper]{article}
    \usepackage{tikz}
    \usetikzlibrary{calc}
    \usepackage{bm}
    \usepackage[active,tightpage,tikz]{preview}
    \PreviewEnvironment{tikzpicture}
    \setlength\PreviewBorder{0.25pt}


    \begin{document}
    %Requires \usetikzlibrary{calc} in the preamble
    \boldmath
    \begin{tikzpicture}[thick]

    % draw the vertex point / vertex node

    \coordinate (B) at (2,0);

    \coordinate (A) at (0,0);

    \coordinate (C) at (-2,1.5);

    % label the vertex

    \draw [solid, thick] (B)--(A)--(C);

    \draw (A) node[below] {$A$};

    \draw (B) node[below] {$B$};

    \draw (C) node[below left] {$C$};

        % label the angle subtended at p1 by p2 and p3
        \def\angleRadius{30pt}
        % draw the arc
    % draw in Old Version Tikz/PGF   
    %    \draw[red,->,thick] let \p1=(A), \p2=(B), \p3=(C), 
    %        \n1={atan2(\x2-\x1,\y2-\y1)}, \n2={atan2(\x3-\x1,\y3-\y1)} in
    %        ($(\p1)!\angleRadius!(\p2)$) arc (\n1:\n2:\angleRadius);
    % draw in Current Version Tikz/PGF
        \draw[red,->,thick] let \p1=(A), \p2=(B), \p3=(C), 
            \n1={atan2(\y2-\y1,\x2-\x1)}, \n2={atan2(\y3-\y1,\x3-\x1)} in
            ($(\p1)!\angleRadius!(\p2)$) arc (\n1:\n2:\angleRadius);
        % draw the label
        \draw[red] let \p1=(A), \p2=(B), \p3=(C), 
             \n1={atan2(\x2-\x1,\y2-\y1)}, \n2={atan2(\x3-\x1,\y3-\y1)} in
             (\p1)+(\n1/2+\n2/2:\angleRadius) node[above right] {$\alpha$};
    \end{tikzpicture}
    \end{document}
  2. Save file as triangleEquilateral1.tex
  3. Then build or typeset the Latex code.

Output

Related Post

Sabtu, 16 November 2024

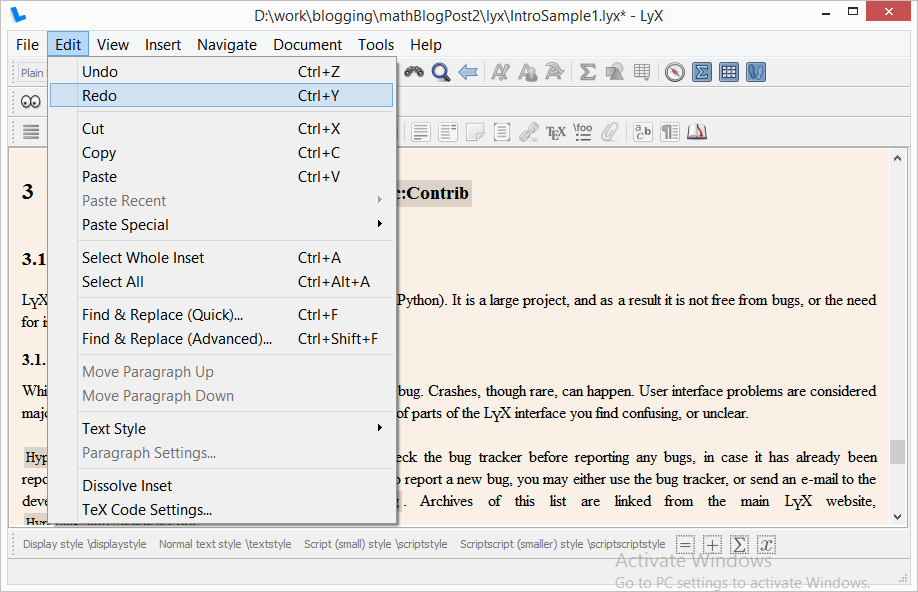
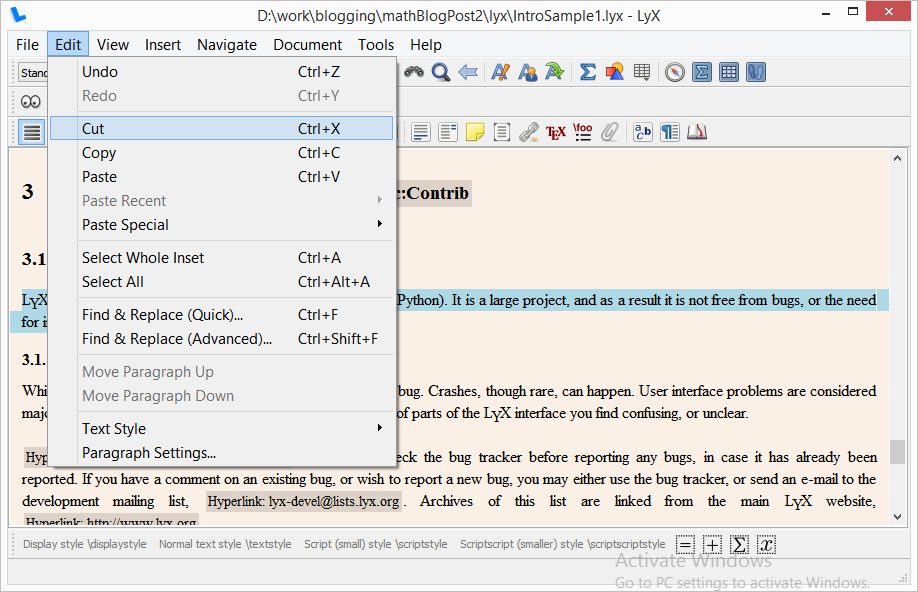
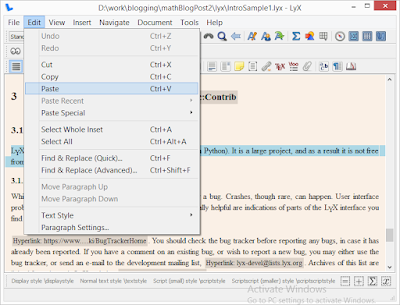
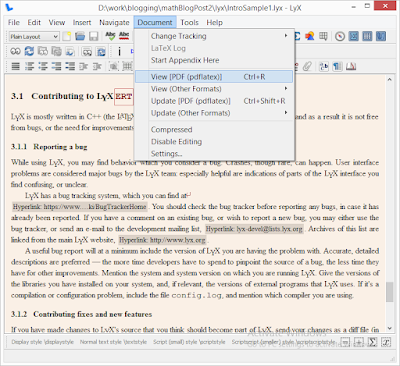
Lyx Menu Tour With Picture

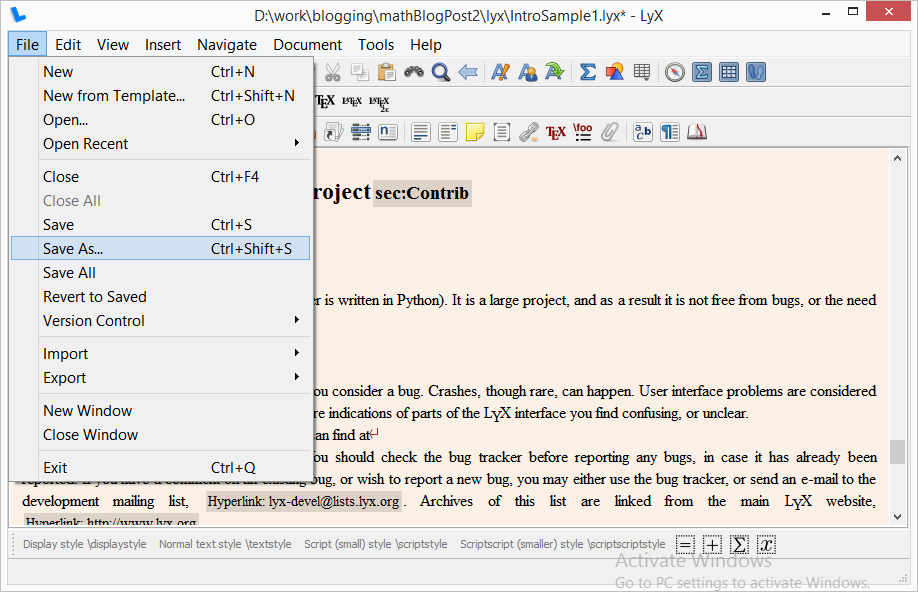
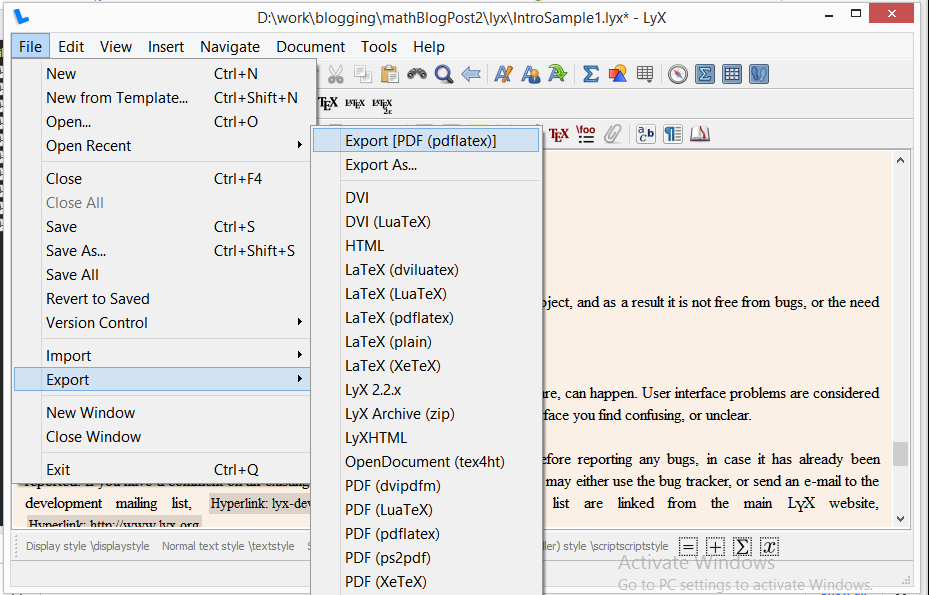
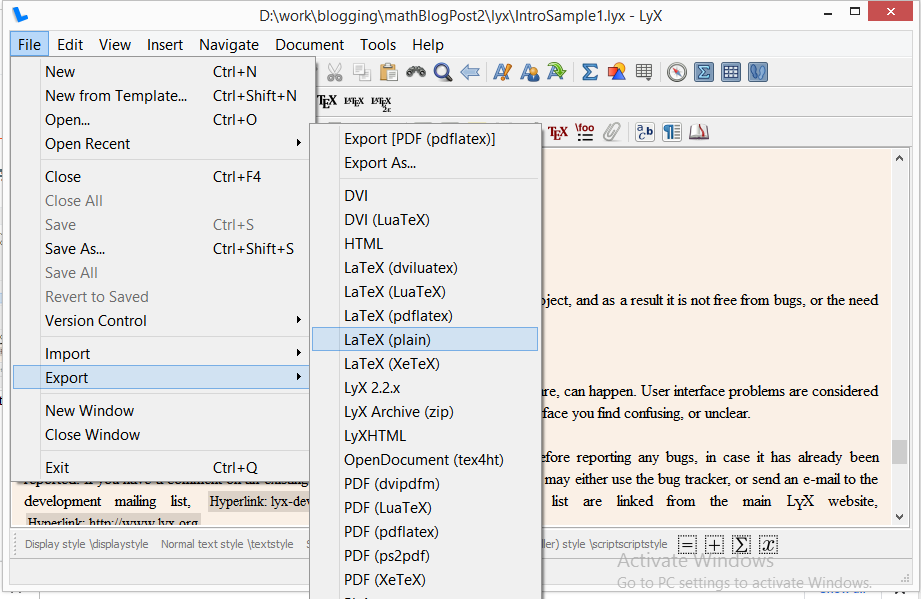
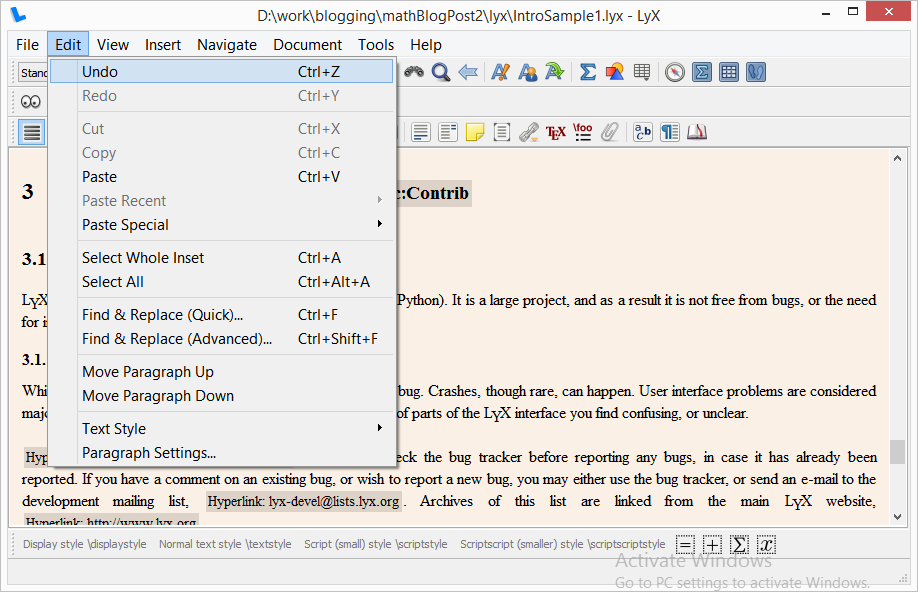
To see the larger Lyx screenshot ( Lyx GUI front end ) and more clear Lyx screenshot ( Lyx GUI front end ), click on the picture.

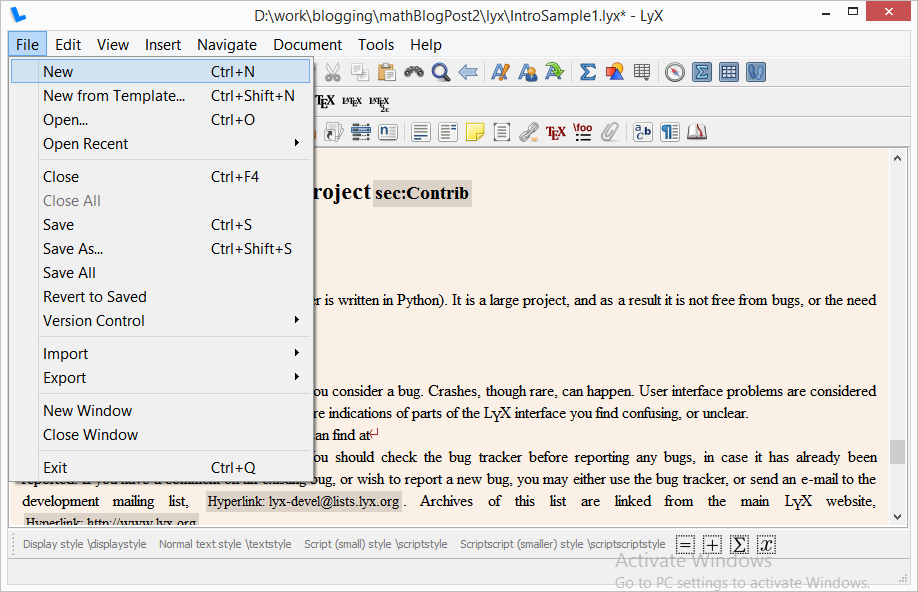
File Menu


Open a new file File New.
Open a new file : File > New.

Save your document with File > Save As ( dialog ).
Export the ready to print document to a format you want, e.g. PDF document : File > Export ( dialog ).

To export Lyx to Latex : File > Export > LaTeX.

Edit Menu

Undo is limited to 100 steps : Edit > Undo.

To get it back after Undo : Edit > Redo.
To cut : Edit > Cut.


View Menu
Document Menu
Insert Menu
Tools Menu
Standard Toolbar


< Previous Lyx Menu Tour

Bibliography

http://latex.org/
https://www.lyx.org/
https://www.troubleshooters.com/


Jumat, 15 November 2024

Draw Equilateral Triangle In Latex

  1. Type this following latex code in the latex editor:
    % !TEX TS-program=pdflatex
    % !TEX unicode=UTF-8 Unicode
    \documentclass[border=5mm]{standalone}
    \usepackage{tgbonum}
    \usepackage{tikz}
    \usetikzlibrary{shapes.geometric}

    \tikzset{
    equilateralTriangle/.style={
    draw,
    shape border rotate=0,
    regular polygon,
    regular polygon sides=3,
    fill=white!20,
    node distance=2cm,
    minimum height=4em,
    thick
    }
    }

    \begin{document}
    \begin{tikzpicture}
    \node[equilateralTriangle]{\textbf{Equilateral Triangle}};
    \end{tikzpicture}
    \end{document}
  2. Save file as triangleEquilateral1.tex
  3. Then build or typeset the Latex code.

Output

equilateral triangle in latex

Related Post

Java Exception Hierarchy

These are Java Class Exception Hierarchy:

  • Throwable
    • Error.
      • AssertionError.
      • IOError.
      • VirtualMachineError.
        • InternalError.
        • OutOfMemoryError
        • StackOverflowError
        • UnknownError
    • Exception
      • IOException.
        • EOFException.
        • FileNotFoundException.
        • MalFormedURLException.
        • ObjectStreamException.
        • UnknownHostException.
      • ReflectiveOperationException.
        • ClassNotFoundException.
      • CloneNotSupportedException.
      • RunTimeException.
        • ArithmeticException.
        • ClassCastException.
        • IllegalArgumentException.
        • IllegalStateException.
        • IndexOutOfBoundsException.
        • NoSuchElementException.
        • NullPointerException.

<< back to Study About Java 1

Related Post

The Pythagorean Theorem

Pythagoras Theorem Formula:


AB is base side / adjacent side
BC is perpendicular side / opposite side
CB is hypotenuse side ( the longest side ).

Hypotenuse2 = Base2 + Perpendicular2
b2  = a + c2 
= 82  + 62 
= 64  + 36
= 100

to learn draw right triangle in latex, click The Pythagorean Theorem In Latex >

<< back to learn the other two dimensional shape, click Two Dimensional Shape 3

Draw Acute Angle In Latex

  1. Type this following latex code in the latex editor:

    % !TEX TS-program=pdflatex

    % !TEX encoding=UTF-8 Unicode


    \documentclass[tikz]{standalone}

    \usepackage{tgbonum}

    \usepackage{arevmath}

    \usepackage{tikz}

    \usetikzlibrary{quotes,angles}

    \begin{document}

    \begin{tikzpicture}[thick]

    \draw (3,0) coordinate (a) node[right] {\textbf{a}}

    -- (0,0) coordinate (b) node[left] {\textbf{b}}

    -- (2,2) coordinate (c) node[above right] {\textbf{c}}

    pic["$\beta$",draw=blue,<->,angle eccentricity=1.3,angle radius=1cm] {angle=a--b--c};

    \end{tikzpicture}


    \end{document}

  2. Save file as acuteAngle1a.tex
  3. Then build or typeset the Latex code.

Output


Related Post

The Pythagorean Theorem In Latex

  1. Type this following latex code in the latex editor:
    % !TEX TS-program=pdflatex
    % !TEX encoding=UTF-8 Unicode
    %
    % File name: triangleTheorem1.tex
    % Description:
    % The Pythagorean Theorem
    %
    % Composer: private course and tutor course
    \documentclass[12pt,a4paper]{report}
    \usepackage{tikz}
    \usepackage{amsmath}
    \usepackage{bm}
    \usepackage[active,tightpage]{preview}
    \PreviewEnvironment{tikzpicture}
    \setlength\PreviewBorder{0.25pt}

    \begin{document}
    \begin{tikzpicture}[scale=3.5,thick]
    % Label the nodes and position
     \coordinate[label=below left:$\textbf{A}$] (A) at (0,0);
     \coordinate[label=below right:$\textbf{B}$] (B) at (1.5,0);
     \coordinate[label=above:$\textbf{C}$] (C) at (1.5,1);
     % Draw the triangle
     \draw (B) -- (A) -- (C) -- cycle;
     % Label the sides
     \node[above] at (0.75,0) {$\textbf{c}$};
     \node[below] at (0.75,0) {\textbf{Adjacent}};
     \node[right] at (1.5,0.5) {\textbf{Opposite}};
     \node[left] at (1.5,0.5) {$\textbf{a}$};
     % Label the angle
     \draw (0.4,0) arc (0:33.69:0.4) node[right,midway] {$\boldsymbol{\theta}$};
     \node[above left] at (0.75,0.5) {\textbf{Hypotenuse}};
     \node[below right] at (0.75,0.5) {$\textbf{b}$};
     % Draw the right angle mark
     \draw (1.30,0) -- (1.30,.2) -- (1.50,0.2);
    \end{tikzpicture}
    \end{document}

  2. Save file as triangleTheorem1.tex
  3. Then build or typeset the Latex code.

Output


<< to learn other two dimensional shape, click Two Dimensional Shape 3

to learn Pythagorean Theorem, click The Pythagorean Theorem >

Related Post

Kamis, 14 November 2024

Pentingnya Kebersihan Lingkungan (IPS) 2

Kegiatan pembersihan lingkungan:

Pembersihan Sampah

Pembersihan Jalan

Pembersihan Taman

Pembersihan Drainase

Pembersihan Trotoar dan Median Jalan

Pembersihan Pasar

Pembersihan dan Pemeliharaan Sarana dan Prasarana lain.

Pengolahan Sampah

Bibliography

https://bandarharjo.semarangkota.go.id/
https://dpu.makassarkota.go.id/
https://infopublik.id/
https://pta-pekanbaru.go.id/
https://sdnungaran1.sch.id/
https://www.antarafoto.com/
https://www.bukitbarisannews.com/
https://www.rri.co.id/

How To Get Active File Path In Notepad 2 Method 1

How To Get Active File Path In Notepad 2 / How To Get Current File Path In Notepad 2 Method 1

  1. click File > Save As menu
    Notepad 2 File Save As
  2. After the Open dialogue box window has opened, then you can get the current file path from "location bar" or "address bar".
    Notepad 2 Open Dialogue Box

Notes

  • "Location bar" or "Address bar" is under "Save As" title bar and in the right side you can see "Search hospital-database" box.
  • In this example "Location bar" is "<< database > hospital-database".

Related Post


To Check Package In Miktex Package Manager Command Prompt

  1. Open a terminal program or command prompt program or command line program
  2. Go to MikTex path, in this example C:\Program Files (x86)\MiKTeX 2.9\miktex\bin\
  3. type C: then press Enter on keyboard.
  4. type cd Program Files (x86)\MiKTeX 2.9\miktex\bin\, press Enter on keyboard
  5. Type this following mpm command on command prompt program window :
    mpm --list

    mpm miktex package manager

  6. then press Enter on keyboard.
Notes:  
  • Type only font in monospace in command prompt, e.g. mpm --list.
  • To see the more clear screenshot, click on the picture.

Rabu, 13 November 2024

Parts Of Fraction In Latex

  • Type this following latex code for drawing Parts Of Fraction using Latex editor:
%! Tex TS-program=pdflatex
% pdflatex PartsOfFraction1prv.tex
\documentclass{report}
\usepackage{tgbonum}
\usepackage{amsmath}

% -------------------
% Each unique / separated page for each tikzpicture
% -------------------
\usepackage[active,tightpage,pdftex,multi]{preview}
\PreviewEnvironment{page}
\setlength\PreviewBorder{3pt}

% bold font for entire document
\renewcommand{\seriesdefault}{bx}
\renewcommand{\boldmath}{\Huge{}}

\begin{document}
\begin{preview}
\Huge{}
$\begin{array}{c}
\text{Parts Of} \\ 
\text{A Fraction}
\end{array}$
\end{preview}

\begin{preview}
\boldmath
$\begin{aligned}
\displaystyle
\dfrac{\mathbf{\textit{a}}}{\mathbf{\textit{b}}}\\
\end{aligned}$
\end{preview}

\begin{preview}
\Huge{}
$\begin{array}{ll}
\textit{a} & \textsf{is numerator} \\ & \textsf{or part}\\\\
\text{fraction } & \textsf{represents}\\
\text{bar} & \textsf{division}\\\\

\textit{b} & \textsf{is denominator} \\ & \textsf{or whole}\\
\end{array}$
\end{preview}
\end{document}
  • Save file as PartsOfFraction1prv.tex
  • then build or typeset the Latex code.

Output


Notes

To see the more clear screenshot, click on the picture.

<< Back to Study About Draw In Latex 2


Related Post

Prime Factor Tree In Latex

  •  Type this following latex code for drawing Prime Factor Tree using Latex editor:
%! TEX TS-program=pdflatex 
% pdflatex primeFactorTree1prv.tex

\documentclass{article}

\usepackage{tikz}

\usepackage{tgbonum}


% -------------------

% Each unique / separated page for each tikzpicture

% -------------------

\usepackage[active,tightpage,pdftex]{preview}

\PreviewEnvironment{tikzpicture}

\setlength\PreviewBorder{0.15pt}


% bold font for entire document

\renewcommand{\seriesdefault}{bx}


\begin{document}


% -------------------

% typing a title

% -------------------

\begin{figure}

\begin{tikzpicture}[thick]

\node{Prime Factor Tree};

\end{tikzpicture}

\end{figure}


\begin{figure}

\begin{tikzpicture}[thick]

% dividend number

\node{120}

child { node[circle, draw=red] {2} } % prime factor number

child { node{60} % dividend number

child { node[circle, draw=red] {2} } % prime factor number

child { node[circle] {30} % dividend number

child {

node[circle, draw=red] {2} % prime factor number

}

child { node[circle] {15} % dividend number

child { node[circle, draw=red] {3}} % prime factor number

child { node[circle, draw=red] {5} } % prime factor number

}

}

};

\end{tikzpicture}

\end{figure}

\end{document}

  • save file as primeFactorTree1prv.tex
  • then build or typeset the Latex code.

Output


Prime Factor Tree


Related Post

Lyx Menu Tour

File Menu

  • Open a new file : File > New.
  • Save your document with File > Save As ( dialog ).
  • Export the ready to print document to a format you want, e.g. PDF document : File > Export ( dialog ).
  • To export Lyx to Latex : File > Export > LaTeX.

Edit Menu

  • Undo is limited to 100 steps : Edit > Undo.
  • To get it back after Undo : Edit > Redo.
  • To cut : Edit > Cut.
  • To copy : Edit > Copy.
  • To paste : Edit > Paste.
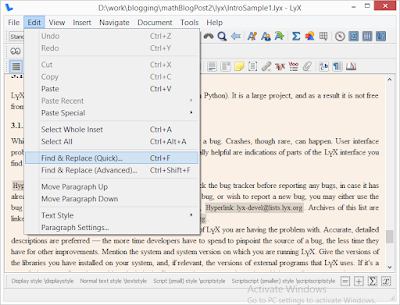
  • To search : Edit > Find & Replace ( dialog ).
  • To edit character formatting* : Edit > Text Style > Customized ( dialog ).
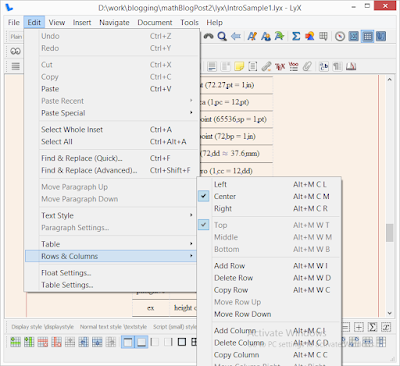
  • To edit row and columns in table and matrix : Edit > Rows & Columns.

View Menu

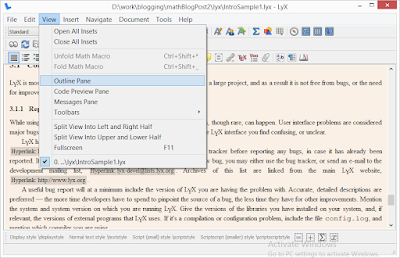
  • To display the table of contents and other document parts in a separate window : View > Outline Pane.
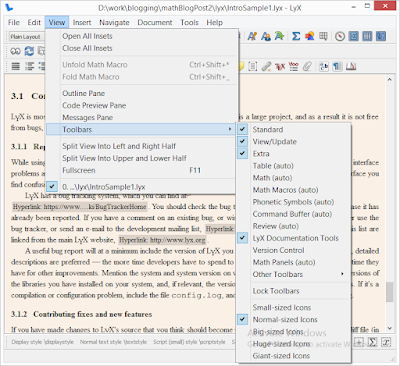
  • To display toolbars: View > Toolbars.

Document Menu

  • LYX will open a PDF-viewer program displaying your document as it will look when view in PDF reader : Document > View.
  • To changing to other document classes : Document > Settings ( dialog ).
  • To insert document preamble : Document > Settings > LaTeX Preamble ( dialog ).

Insert Menu

  • To insert math : Insert > Math > Inline Formula ( Ctrl+M ).
  • To insert table of contents : Insert > List / TOC > Table of Contents.
  • To include a BibTEX file : Insert > List / TOC > BibTeX Bibliography.
  • To insert reference :  Insert > Citation.
  • To insert label : Insert > Label.
  • To insert Footnotes : Insert > Footnote.
  • To insert table : Insert > Table.
  • To insert picture : Insert > Graphics.
  • Margin notes can be added : Insert > Marginal Note.

Tools Menu

To configure Lyx : Tools > Preferences.

Standard Toolbar

To add heading / section and other environment  : The Environment choice box is located on the left end of the standard toolbar.

* character formatting:
  • Font Family: Roman, Sans Serif, Typewriter
  • Font Series: Bold
  • Font Shape : Italic.
  • Font Size : tiny, 

Bibliography

http://latex.org/
https://www.lyx.org/
https://tex.stackexchange.com/

add, place, insert, get, put, menu bar, show

Selasa, 12 November 2024

Latex Package List

Latex Package To Handle Table:

Latex Package To Handle Math And Science Equation

Latex Package To Handle Unicode

Latex Package To Handle Graphic

Latex Package To Handle The Box

Latex Package To Handle Bullet And Numbering

Latex Package To Handle Bibliography and Citations

Latex Package To Handle Column

Bibliography

https://www-sop.inria.fr/
https://ctan.org/

How to Check Apache HTTP Server Version

Requirement:

you need to have XAMPP or Apache HTTP server installed and configured correctly first, in this example: XAMPP 1.6.7 ( Apache 2.2.9 and PHP 5.2.6 )

To print the Apache version

  1. Open a terminal program or command prompt program or command line program
  2. Go to XAMPP path, in this example D:\softRun\xampp-win32-1.6.7\apache\bin\
  3. type D: then press Enter on keyboard.
  4. type cd softRun\xampp-1.6.7\apache\bin, press Enter on keyboard
  5. Type this following Apache httpd command on command prompt program window :
    httpd -version
  6. then press Enter on keyboard.

Sample Output


 to print the more detailed of Apache version

  1. Open a terminal program or command prompt program or command line program
  2. Go to XAMPP path, in this example D:\softRun\xampp-win32-1.6.7\apache\bin\
  3. type D: then press Enter on keyboard.
  4. type cd softRun\xampp-win32-1.6.7\apache\bin, press Enter on keyboard
  5. Type this following Apache httpd command on command prompt program window :
    httpd -V
  6. then press Enter on keyboard. 

Notes:

  • Use this tutorial sample according to your needs and your requirement.
  • type httpd -help to other command manual help.

Bibliography

https://phoenixnap.com/

Related Post

Sabtu, 09 November 2024

Draw A Cartesian Coordinate In Latex 1

  • Open the Latex editor
  • Type this following latex code in your Latex editor: 
%! TEX TS-program=pdflatex
%! TEX encoding=utf-8
\documentclass[12pt,titlepage]{report}
\usepackage[utf8]{inputenc}
\usepackage{amsmath}
\usepackage{amsfonts}
\usepackage{amssymb}
\usepackage{fouriernc}
\usepackage{tikz}
\usepackage{xcolor}
\usepackage{pgfplots}
\usepackage[active,tightpage,pdftex]{preview}
\PreviewEnvironment[{[]}]{tikzpicture}
\setlength\PreviewBorder{0.25pt}
\author{private course and after school tutor}

\begin{document}

% -------------------

% title

% -------------------

\begin{figure}


\begin{tikzpicture}
\draw (0,0) node [anchor=center] {\Huge{Koordinat}};
\draw (0,-1) node [anchor=center] {\Huge{ Cartesius}};
\end{tikzpicture}
\end{figure}

% -------------------

% step 1

% -------------------

\begin{figure}

\begin{tikzpicture}%[->]

%draw gridline

\draw[help lines,opacity=.25] (-5,-5) grid (5,5);


% -------------------

%draw 0,0 node

% -------------------

\draw (0,0) node [anchor=north east, font=\bfseries] {$0$};


% -------------------

% draw axes line

% -------------------

\draw[-latex,thick,font=\bfseries] (-4.5,0) -- (4.5,0) node [anchor=north] {\large{$\mathsf{sumbu\ x}$}};

\draw[-latex,thick] (0,-4) -- (0,4) node [anchor=west] {\large{$\mathsf{sumbu\ y}$}};


% -------------------

% draw axes label

% -------------------

\foreach \i in {1, ..., 3} \draw(\i,2.5pt) -- +(0,-5pt) node [anchor=north, font=\bfseries] {\large{$\i$}} (-\i,2.5pt) -- +(0,-5pt) node [anchor=north, font=\bfseries,fill=white] {\large{$-\i$}} (2.5pt,\i) -- + (-5pt,0) node [anchor=east, font=\bfseries] {\large{$\i$}} (2.5pt,-\i) -- + (-5pt,0) node [anchor=east, font=\bfseries, fill=white] {\large{$-\i$}};

\end{tikzpicture}

\end{figure}

\end{document}

  • save file as koordinatKartesius1.tex
  • Typeset or Build.

Output

Notes To see the more clear picture, click on the picture.


Various Other Posts