Search In This Website

Menampilkan postingan yang diurutkan menurut tanggal untuk kueri environment. Urutkan menurut relevansi Tampilkan semua postingan

Rabu, 05 November 2025

Study About Tikz In Latex

Introduction About Tikz

  • Setting Up The Environment In Latex
  • tikzpicture Environment And tikz Command
  • Draw A Straight Path
  • Grid Path Construction
  • Help Lines Construction

Design Principles

  • Specifying Coordinates
  • Specifying Points
  • Coordinate Transformation System

Drawing

Actions On Paths

Drawing Options

Key-Value Syntax for Graphic Parameters


Rabu, 01 Oktober 2025

Latex Problem Underfull And Overfull

Underfull Problem In Latex

Several Underfull Warning in Latex can fix by this following Latex statement:
  • when inside normal environment:
    \parbox{\linewidth}{\raggedright  your text here }
  • when using multiline paragraph inside float environment (e.g. itemize list, caption, etc.)
    \parbox[t]{\linewidth}{\raggedright  your text here }

Notes

  • you can change t (top) pos parameter with the c for center and b for bottom.
  • you can change raggedright to raggedleft.

Overfull Problem In Latex

Several Overfull Warning in Latex can fix by this following Latex statement:
\begin{minipage}[t]{\linewidth}
your text here
\end{minipage}

Notes

Sometimes you meet to fix the problem by interchange.between parbox and minipage.


Bibliography

https://upy.ac.id/ (university)
https://www.jhu.edu/ (university)
https://www.rochester.edu/ (university)
https://www.overleaf.com/
https://support.lenovo.com/ ( hardware )
https://www.asus.com/ ( hardware )

Minggu, 28 September 2025

Set The JAVA_HOME variable In Microsoft Windows 8

From step 1 to step 10, you can study at the Set Up A Java Development Kit In Microsoft Windows 8 With Picture
  1. Let us locate the directory where the JDK is installed on our system, and note down the path to this directory.
  2. Open the Start menu and click "All apps" down arrow button in the bottom-left corner.
  3. Scroll through the list of apps and click "Control Panel" on the "Windows System".
  4. The Control Panel will appear on the screen.
  5. Under "View by:" on the right side, click "Category", 
  6. After then select the “System and Security” section.
  7. then select the System section on the right side.
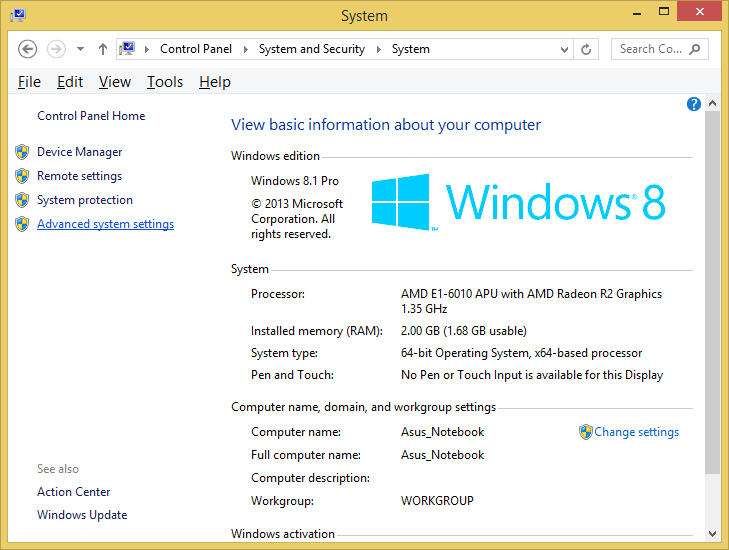
  8. In the System window, click on Advanced System Settings on the left sidebar.
  9. In the System Properties window (Advanced tab):
  10. Click the Environment Variables button.

Add JAVA_HOME Variable In Microsoft Windows 8

This following step to add JAVA_HOME variable:
  1. Under the System Variables section, click a New button to create a new one.


  2. In the Variable Name field, type JAVA_HOME.


  3. In the Variable Value field, enter the path to our JDK installation directory (e.g., in this post C:\runtime\Java\jdkX.X.X_XX\). Then press OK button.


Add %JAVA_HOME% To The Path Of Windows Environment Variable

This following step to add %JAVA_HOME% to the Windows Environment Variable:
  1. In the System Properties window, select the Path variable under the System Variables section. Click Edit button, 


  2. and add %JAVA_HOME%\bin to the list of paths if it’s not already there. Click OK  button.


  3. Click OK  button to apply the changes and restart the computer to ensure the changes take effect.


Check %JAVA_HOME% Has Installed Successfully

  1. Start Command Prompt window then use the following command to check the %JAVA_HOME% has been added correctly.


  2. echo %JAVA_HOME%. You should see the path to your JDK (or JRE) installation location without bin folder.


after this you can follow and practise this optional step below according to your condition:

Edit JAVA_HOME

  1. Under the System Variables section, found JAVA_HOME variable, click Edit button to modify the existing variable.


  2. change the Variable Value field with enter the path to our JDK installation directory (e.g., in this post C:\runtime\Java\jdkX.X.X_XX\ ). Then press OK button.


NOTES: 


<< back to  Study About Java 1

Bibliography

https://www.asus.com/ ( hardware )
https://www.codecademy.com/
https://www.youtube.com/@ProgrammingKnowledge
https://docs.oracle.com/ ( manual ebook )

Senin, 22 September 2025

Set Up A Java Development Kit In Microsoft Windows 8 With Picture

  1. Let’s locate the directory where the Java executable is installed in our system, and note down the path to this directory.

    Locate the directory of the Java executable folder
    Locate the directory of the Java executable folder
  2. Open the "Start menu" and click "All apps" down arrow button in the bottom-left corner.

    Start Menu Windows opened
    Start Menu Windows opened

     "All apps" down arrow button in the bottom-left corner.

  3. Scroll through the list of apps and click "Control Panel" on the "Windows System".

    Scroll through the list of apps
    Scroll through the list of apps then click "Control Panel" on the "Windows System"

  4. The Control Panel will appear on the screen.

    Control Panel opened
    Control Panel opened
  5. Under "View by:" on the right side,  click "Category", 

    Under "View by:",  click "Category",
    Under "View by:",  click "Category", 
  6. After then select the “System and Security” section.

    select the “System and Security” section
    select the “System and Security” section
  7. then select the “System” section on the right side.

    then select the “System” section on the right side.
    then select the “System” section on the right side.
  8. In the System window, click on Advanced System Settings on the left sidebar.

    click on Advanced System Settings on the left sidebar
  9. After In the System Properties window (Advanced tab):

    click Advanced tab
  10. Click the Environment Variables button.

    click the Environment Variables button.
  11. Under the System Variables section, find Path variable.

    find and click Path variable in the middle
    find and click Path variable in the middle
  12. Click Edit button to modify the existing variable, or New button to create a new one, if the Path variable is not exist.

    Click the Edit button or click the New button. In the Variable Name field, ensure you enter Path
    Click the Edit button or click the New button.
  13. In the Variable Name field, ensure you enter Path.  In the Variable Value field, add the path of our Java installation directory (e.g., "C:\runtime\Java\jdk1.6.0_21\bin"). Click OK button on the Edit System Variable window, to apply the changes.

    Enter Variable name, enter Variable value, then click OK button
    Enter Variable name, enter Variable value, then click OK button
  14. Click OK button again, click OK button again in System Properties window.

    Click OK button on the Environment Variables window.
    Click OK button on the Environment Variables window.

    Click OK button again in System Properties window
  15. And restart the computer to ensure the changes take effect.

    Click Start button > click Power Options button on the right top corner > click Restart
    Click Start button > click Power Options button
    on the right top corner > click Restart

Notes


jdk, java sdk, software development kit, application, programming, install

<< back to Study About Java 1


Bibliography

https://www.youtube.com/@OSTechHelp
https://www.youtube.com/@YTRtutorial
Java Ebook Oracle Press
Java Ebook Pearson Publisher

Minggu, 17 Agustus 2025

Kind Of Latex Environment

These list are common LaTeX Environments:

Math Environments:

  • equation: For numbered equations.
  • equation*: For unnumbered equations.
  • align: For aligned multi-line equations.
  • gather: For unaligned equations, centered.
to learn write equation*, click Turn Off The Latex Equation Auto Numbering >

List Environments:

  • itemize: Creates bulleted lists.
  • enumerate: Creates numbered lists.
  • description: For labeled lists.

Table Environments:

  • table: For floating tables with captions.
  • tabular: To create tables without floating.

Text Formatting Environments:

  • quote: For quoted texts, usually with indentation.
  • verbatim: For preserving formatting, useful for code or commands.

Figure Environments:

  • figure: Used for floating figures with captions.
  • subfigure: To create subfigures within a figure.

Specialized Environments:

  • theorem: For stating theorems or propositions.
  • proof: Unnumbered proof environment, often with a box at the end.

Kamis, 31 Juli 2025

VBA PPT Short Reference Sheet 1

Application Object In Microsoft VBA PowerPoint

Determines the working environment is PowerPoint or not:
Debug.Print Application Is PowerPoint.Application 'In PowerPoint will Prints: True

Selection Object In Microsoft VBA PowerPoint

The PowerPoint.ActiveWindow.Selection object in VBA contains whatever the user has selected.

The PowerPoint.ActiveWindow.Selection.Type properties in VBA consist of:

  • shapes = ppSelectionShapes
  • slides = ppSelectionSlides
  • text = ppSelectionText
  • nothing at all = ppSelectionNone

Creates Object Variables And Assign References ( Object Model )

Dim ppAppObj As PowerPoint.Application
Dim ppPresObj As PowerPoint.Presentation
Dim ppSlideObj As PowerPoint.Slide
Dim ppShapeObj As PowerPoint.Shape
'Assign Active Slide to Variable
Set ppSlideObj = Application.ActiveWindow.View.Slide
'Assign slide by Index to Variable
Set ppSlideObj = ActivePresentation.Slides(1)

Bibliography

https://learn.microsoft.com/ ( manual ebook )

https://www.autovbax.com/

http://www.pptalchemy.co.uk/

https://www.vbaplanet.com/

PowerPoint;Cengage

Microsoft PowerPoint;Microsoft Press

Kamis, 24 Juli 2025

How to Creating A JAR File Using the Command Line

Prerequisites

Before you begin, ensure you have the following tools on your system:
  • Java Development Kit (JDK) installed and configured in your system's PATH. You must download JDK from the official Java website, if you don't have JDK. JDK is required for compiling Java code (javac) and running JAR files (java).
    If you want to learn default Java Path For Windows And Linux Environment, click Default Java Path Environment >
    You must setup PATH environment, click Set The JAVA_HOME variable >
    To check the Java version, click How To Check Your Java Version >
  • A Text Editor, for example Notepad: To write your Java code and potentially to write a manifest file.
  • A Terminal or Command Prompt: To execute compilation and JAR creation commands.

Assumption

  • Ensure you have a Java class with a main method ( after You compiled a Java source code File ), which serves as the entry point for your Java simple application (JAR) or Java simple program (JAR). You can use this Java exercise, click Hello World In Java and then you must compile the Java Program, click How To Compile Java 1.
  • Ensure you understand to using Text Editor and a Terminal or Command Prompt. If you are not understand to using Text Editor and Command Prompt, read Notes below.

The Steps

1. First we navigate to the root directory of your Java class files project directory. In this example the directory is D:\demo\java\GettingStarted\HelloWorld.

navigate to the root directory
of your Java class files project directory

list your root directory
of your Java class files project directory

2. Create a Manifest File: Open your Text Editor and then create a text file (e.g., manifest.txt) and add the Main-Class entry. Make sure there's a newline at the end of the Main-Class line. The full contents Of Manifest.txt example:
Main-Class: helloWorld
Class-Path: helloWorld.jar

Notepad program show

Type Manifest.txt example contents

3. Save file As Manifest.txt in directory D:\demo\java\GettingStarted\HelloWorld\.

click File > Save As menu

Navigate to D:\demo\java\GettingStarted\HelloWorld\.
And then type Manifest.txt in File name box.

click Save button

file Manifest.txt has saved

4. Create the JAR File
Now, use the jar command to package your compiled .class file(s) and the manifest file (if applicable) into a single .jar file, for example:
jar cvfm helloWorld.jar helloWorld helloWorld.class
The options and arguments used in this command are: 
-c: Creates a new archive.
-v: Provides verbose output, listing the files as they are added.
-f: Specifies the filename of the JAR archive (helloWorld.jar).
-m: Specifies the manifest file to use (manifest.txt).

Create the JAR File

The JAR file has created

5. Run the Executable JAR
If you created an executable JAR, you can run it directly from the Command Prompt:
java -jar helloWorld.jar
You should see the output: Hello World

Run the Executable JAR

The Executable JAR has succeed to run

Notes


<< back to  Study About Java 1

Bibliography

https://docs.oracle.com/ ( manual ebook )
https://www.cmu.edu/ ( university )
https://www.helsinki.fi/ ( university )
https://www.coursera.org/
https://www.iitk.ac.in/ ( university )
https://www.ntu.edu.sg/ ( university )

Minggu, 20 Juli 2025

Latihan FPB Dalam Dokumen Latex Preview

1. Open the Latex editor
2. Type this following Latex code in your Latex editor:

% !TEX TS-program = pdflatex


%% File Description:

%% GCD (Great Common Divisor)

%% using Prime Factorization Division Method Table


\documentclass{article}

%% Loading the package

%------------------------

\usepackage{bookman}

\usepackage{array}

\usepackage{multirow}

\usepackage{makecell}

\usepackage{amsmath}

\usepackage{amsthm}

\usepackage{bm}

\usepackage{fullpage}

%------------------------


%% custom theorem environment

%---------------------------

%% define theorem style

\newtheoremstyle{definition}

 {\topsep} % Space above

 {\topsep} % Space below

 {} % Body font

 {} % Indent amount

 {\bfseries} % Theorem head font

 {.} % Punctuation after theorem head

 {.5em} % Space after theorem head

 {} % Theorem head spec ( can be left empty, meaning `normal` )


\theoremstyle{definition}

%\redeclaretheorem[style=normalhead]{theorem}

%% define theorem environment

\newtheorem{theorem}{Langkah}[section]

%---------------------------


%% custom table properties

%---------------------------

%% resize row height

%% use one of this command below:

%\setlength\extrarowheight{2.5pt}

\renewcommand{\arraystretch}{2}

%% resize border width can be more thick or thin

\setlength{\arrayrulewidth}{1.5pt}

%% resize space between columns and border

\setlength{\tabcolsep}{5pt}

%% new centering column type

\newcolumntype{P}[1]{>{\centering\Large{}\arraybackslash}p{#1}}

%---------------------------


%% custom preview package

\usepackage[active,floats,tightpage,multi]{preview}

\setlength\PreviewBorder{0.25pt}

\PreviewEnvironment{minipage}

%---------------------------


\begin{document}

\Large{}

\begin{minipage}{0.5\linewidth}

\section{Menentukan FPB}

Menentukan Faktor Persekutuan Terbesar (FPB) dari dua bilangan.\\[-0.75em]


Marilah kita menentukan FPB dari masalah sebagai berikut:\\

\end{minipage}


\begin{minipage}{0.5\linewidth}

\textbf{Contoh:}\\[-0.5em]


Pak Yudi memiliki 12 apel dan 18 jeruk. Apel dan jeruk tersebut akan dimasukkan ke dalam kantong plastik. Berapa kantong plastik yang dibutuhkan, jika setiap kantong berisi apel dan jeruk dengan jumlah yang sama?\\

\end{minipage}


\begin{minipage}{0.5\linewidth}

\textbf{Jawab:}\\[-0.5em]


\begin{theorem} % Langkah 1

Menentukan faktorisasi prima dari bilangan-bilangan itu:

\end{theorem}

\end{minipage}


\begin{minipage}{0.5\linewidth}

\centering

\hspace{1em}

\begin{minipage}{0.25\linewidth}

$$\begin{array}{|r}

\llap{\textbf{2}~~~~} \textbf{12} \\ \hline

\llap{\textbf{2}~~~~~~} \textbf{6} \\ \hline

\llap{\textbf{3}~~~~~~} \textbf{3} \\ \hline

\textbf{1} \\

\end{array}$$

\end{minipage}

\qquad\qquad

\begin{minipage}{0.25\linewidth}

$$

\begin{array}{|r}

\llap{\textbf{2}~~~~} \textbf{18} \\ \hline

\llap{\textbf{3}~~~~~~} \textbf{9} \\\hline

\llap{\textbf{3}~~~~~~} \textbf{3} \\ \hline

\textbf{1} \\

\end{array}

$$

\end{minipage}\bigskip

\end{minipage}


\begin{minipage}{0.5\linewidth}

\bigskip

Faktorisasi prima dari 12 adalah \\$12 = 2 \times 2 \times 3 = \mathbf{2^{2}} \times \mathbf{3}$\\

Faktorisasi prima dari 18 adalah \\$18 = 2 \times 3 \times 3 = \mathbf{2} \times \mathbf{3^{2}}$\\

\end{minipage}


\begin{minipage}{0.5\linewidth}\smallskip

\begin{theorem} %Langkah 2

Mengambil faktor yang sama dari bilangan-bilangan itu.

\end{theorem}

\hspace{0.75em} Mengambil faktor 2 dari $\textbf{2}^{\textbf{2}}$,\ $\textbf{2}$\\

\indent\hspace{0.75em} Mengambil faktor 3 dari $\textbf{3}$,\ $\textbf{3}^{\textbf{2}}$\\

\end{minipage}


\begin{minipage}{0.5\linewidth}

\indent\hspace{0.75em} FPB dari 12 dan 18 adalah\\

\indent\hspace{0.75em} 2 $\boldsymbol\times$ 3 = 6 \\[-0.5em]


Jadi, kantong plastik yang diperlukan adalah 6 buah. Setiap kantong plastik memuat 2 apel dan 3 jeruk. %, seperti terlihat pada gambar berikut.\hfill\\

\end{minipage}

\end{document}

3. Save Latex code file as mFPB1prvw.tex

4. Then build or typeset the Latex code file.
5. Then you can see the output below.

Output


greatest common divisor, gcd, faktor persekutuan terbesar

Related Post

Senin, 14 Juli 2025

How To Check Tomcat Version

Check (JSP / Java Server Pages) Apache Tomcat Server Version Using the Microsoft Windows Command Line 
  1. Open your Command Line or Terminal. If you want to learn how to open Command Line, click How To Launch Command Prompt In Windows 8.
  2. Type the command:
    D:
    to change drive to drive D: ( you can change to the other drive depend to your Apache Tomcat server installation drive address )


  3. Type the command:
    CHDIR D:\softRun\xampp-win32-1.7.4\tomcat\lib
    to change folder location to Apache Tomcat Server address.
  4. Type the command:
    java -cp catalina.jar org.apache.catalina.util.ServerInfo
    then press Enter on keyboard.
Its output contains the Apache Tomcat Server version number, build date, computer specification and JVM version and JVM Vendor.

Notes

  • If you do not have your JAVA_HOME directory included in your PATH environment variable, you need to include the path to your Java SDK path (for example C:\runtime\Java\jdk1.8.0_66\ directory) in the JAVA_HOME environment variable. To learn to setup JAVA_HOME environment variable click Set The JAVA_HOME variable. Then (<java-home>/bin directory) on PATH environment variable. Then you must setup JDK ( Java Development Kit ) in Set Up A Java Development Kit In Microsoft Windows 8 With Picture.
  • The Apache Tomcat in D:\softRun\xampp-win32-1.7.4\tomcat\lib is just example, you can use the other Apache Tomcat.

<< back to Study About Java 1

Jumat, 04 Juli 2025

Typing Chinese Pinyin ( Accent Character ) In Latex

Exercise

  • You must use UTF-8 encoding in Latex file!
  • Add the required documentclass on the Latex source code below. Configure the default for all document to 12 pt. click this link to get the hint https://beldnlat147.blogspot.com/2024/02/latex-preamble-font-size.html. Of course you can search the other way to clear the exercise.
  • Add necessary line break for each line.
  • Save the Latex document as typingChinesePinyin.tex in your device.
  • Add gkai or gbsn font to CJK environment ( Simplified Chinese Character ).
  • Add bkai or bsmi font to CJK environment ( Traditional Chinese Character ).
  • 我要付钱 ( Simplified Chinese Character ) means "I want to pay in English".
  • 我要出錢 ( Traditional Chinese Character ) means "I want to pay in English".
  • 我要付款 ( Traditional Chinese Character ) means "I want to pay in English".
  • 這麼受人敬仰呢 ( Traditional Chinese Character ) means want to "Why a person is so high respect?".
  • Student can create a Latex document that formats like the text shown in below to type accent character ( chinese pinyin ).
WǒYāo
FùQián
我要
ㄨㄛˇ ㄧㄠˋ ㄈㄨˋ ㄑㄧㄢˊ
WǒYāoChūQián
出錢
ㄨㄛˇ ㄧㄠˋ ㄔㄨ ㄑㄧㄢˊ
WǒYāoFùKuǎn

ㄨㄛˇ ㄧㄠˋ ㄈㄨˋ ㄎㄨㄢˇ
Zhè Me Shòu Rén Jìng Yǎng Ne ?
這麼受人敬仰呢?
ㄓㄜˋㄇㄜ˙ ㄕㄡˋ ㄖㄣˊ ㄐㄧㄥˋ ㄧㄤˇ ㄋㄜ˙ ?

Type this following latex code in Latex editor:
% !TEX TS-program = pdflatex
% !TEX encoding = UTF-8
\usepackage[utf8]{inputenc} % Required for inputting international characters
\usepackage{CJKutf8} % Required for input Chinese Japanese Korean characters

%% Combining or Modifier Grave Accent
\DeclareUnicodeCharacter{0300}{\hspace{-1ex}\`{ }}

%% Combining or Modifier Acute Accent
\DeclareUnicodeCharacter{0301}{\hspace{-1ex}\'{ }}

%% Combining or Modifier Macron Accent (a bar over the letter)
\DeclareUnicodeCharacter{0304}{\hspace{-1ex}\={ }}

%% Combining or Modifier Caron Accent (háček ("v") over the letter)
\DeclareUnicodeCharacter{030C}{\hspace{-1ex}\v{ }}

%% Combining Dot Above Accent (dot over the letter for zhuyin or BoPoMoFo)
\DeclareUnicodeCharacter{0307}{\hspace{-1ex}\.{ }}

\begin{document}
\noindent
WǒYāoFùQián  \\
\begin{CJK*}{UTF8}{gbsn} % Simplified Chinese Character
我要付钱
ㄨㄛˇ ㄧㄠˋ ㄈㄨˋ ㄑㄧㄢˊ
\end{CJK*}\\
WǒYāoChūQián\\
\begin{CJK*}{UTF8}{bsmi} % Traditional Chinese Character
我要出錢
ㄨㄛˇ ㄧㄠˋ ㄔㄨ ㄑㄧㄢˊ
\end{CJK*}
WǒYāoFùKuǎn\\
\begin{CJK*}{UTF8}{bsmi}
我要付款
ㄨㄛˇ ㄧㄠˋ ㄈㄨˋ ㄎㄨㄢˇ
\end{CJK*}\\
\begin{CJK*}{UTF8}{bsmi} % Traditional Chinese Character
Zhè Me Shòu Rén Jìng Yǎng Ne ?
這麼受人敬仰呢?
ㄓㄜˋㄇㄜ˙ ㄕㄡˋ ㄖㄣˊ ㄐㄧㄥˋ ㄧㄤˇ ㄋㄜ˙ ?
\end{CJK*}\\
\end{document}


Bibliography

https://en.wikibooks.org/
https://illinois.edu/ ( university )
https://www.chineseclass101.com/
https://www.cmu.edu/ ( university )
https://www.nyu.edu/ ( university )
https://yorku.ca/ ( university )

Related Post