Search In This Website

Menampilkan postingan yang diurutkan menurut relevansi untuk kueri path. Urutkan menurut tanggal Tampilkan semua postingan

Senin, 05 Mei 2025

Set Up The Python In Microsoft Windows 8 With Picture

Set Up The Python Path variable In Microsoft Windows 8

  1. Let’s locate the directory where the Python executable is installed in our system, and note down the path to this directory.

    Locate the directory of the Python executable folder
    Locate the directory of the Python executable folder

  2. Open the "Start menu" and click "All apps" down arrow button in the bottom-left corner.

    Start Menu Windows opened

  3. Scroll through the list of apps and click "Control Panel" on the "Windows System". The Control Panel will appear on the screen.

    Scroll through the list of apps 1
    Scroll through the list of apps 1


    Scroll through the list of apps 2
    Scroll through the list of apps 2


    click "Control Panel" on the "Windows System"
    click "Control Panel" on the "Windows System"


    Control Panel opened
    Control Panel opened

    • Under "View by:",  click "Category", 

      Under the "View by:",  click "Category"

    • then select the “System and Security” section.

      select the “System and Security” section

    • then select the “System” section on the right side.

      then select the “System” section on the right side.

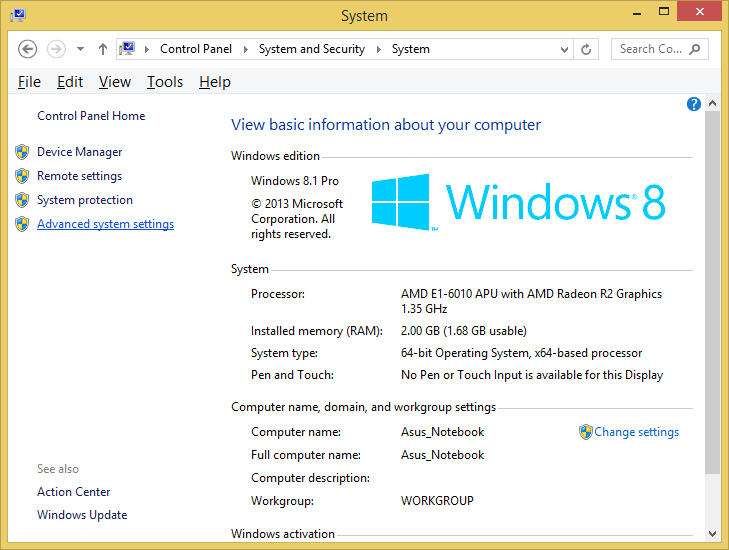
  4. In the System window, click on Advanced System Settings on the left sidebar.

    click on Advanced System Settings on the left sidebar

  5. In the System Properties window (Advanced tab):

    click Advanced tab

    • Click the Environment Variables button.

      click the Environment Variables button.

    • Under the System Variables section, find Path variable.
      find and click Path variable in the middle

    • Click Edit button to modify the existing variable, or New button to create a new one, if the Path variable is not exist.
      Click the Edit button or click the New button.
    • In the Variable Name field, ensure you enter Path.
      Enter Variable name, enter Variable value, then click OK button

      In the Variable Value field, add the path of our Python installation directory (e.g., "C:\Program Files\Python\pythonXX").
    • Click OK button on the Edit System Variable window, to apply the changes.
  6. Click OK button again, click OK button again in System Properties window, and restart the computer to ensure the changes take effect.

    Click OK button on the Environment Variables window


    Click OK button again in System Properties window


    Click Start button > click Power Options button
    on the right top corner > click Restart

Notes

  • In the step 1 to open CommandPrompt, click How To Launch Command Prompt
  • After step 6 from above, then you can check to the "Set The Python Path Variable Via The Command Line" in the step 4 below. After finish, you can go to the next lesson.

Set The Python Path Variable Via The Command Line


WARNING use the step "Set Up The Python Path variable In Microsoft Windows 8" from above, if you have Microsoft Windows Environment Variables Path more than 1024 characters!

If you would prefer to set the Python Path Variable via the command line, and your Microsoft Windows Environment Variables Path is less than 1024 characters, follow this below step  :
  1. Open Command Prompt (make sure you "Run as administrator" with right click mouse, so you're able to add a system environment variable).

    Open the "Start menu" and click "All apps" down arrow button
     in the bottom-left corner.


    Find and hover the Command Prompt


    right click mouse on Command Prompt, then click "Run as administrator"

  2. Set the value of the environment variable to your Python installation path as follows:
    setx /m PATH "C:\Program Files\Python\pythonXX"

    type setx /m PATH "C:\Program Files\Python\pythonXX"

  3. Close and start Command Prompt window again to reload the environment variables and restart the computer to ensure the changes take effect.

    Close the Command Prompt window


    Click Start button > click Power Options button
    on the right top corner > click Restart

  4. After restart the Microsoft Windows. Use the step 1 again to open Command Prompt window. Then use the following command to check the path of your Python installation been added correctly.
    echo %PATH%

    type echo %PATH%

Notes: 
  • Be aware if you have Microsoft Windows Environment Variables Path over than 1024 characters when assigning contents to a variable using setx, it can result in loss of data previously held by the target variable.
  • If the Path variable or Expandable Environment-Variable Strings %PATH% is exist and not empty then you can add semicolon ( ; ) and then put the directory where the Python executable is installed in our system.
  • Be aware If You running the command with an existing variable without double quotes (" "), Expandable Environment-Variable Strings %PATH% and semicolon ( ; ) can be removes any variable references.
  • Only administrators account can change the Environment Variable.
  • Non standard Command Prompt or PowerShell may not running well.
  • XX is the python version.
  • You can place the installed Python inside the no matter folder that able to execute your Python script and compile your Python script, for example "C:\Program Files\Python\pythonXX".


Bibliography

Introduction to computation and programming using Python : with application to computational modeling and understanding data;John V. Guttag;The MIT Press
Python;Abhishek Singh
Python;David Beazley;O'Reilly
Python Crash Course;Eric Matthes;No Starch Press
Python Crash Course;Erick Myers
Python;Dr. Joseph Teguh Santoso, S.Kom., M.Kom
Python;Jubilee Enterprise;Elex Media Komputindo
Python;Budi Raharjo;Informatika
Python for Everybody;Dr. Charles Russell Severance, et. al.
Python for Scientists;John M. Stewart, et. al.
Quick Python;David Matuszek;Routledge
https://superuser.com/
https://support.microsoft.com/en-us
https://www.bleepingcomputer.com/

Kamis, 01 Agustus 2024

Set Up The Python In Microsoft Windows 8

Set Up The Python Path variable In Microsoft Windows 8

  1. Let’s locate the directory where the Python executable is installed in our system, and note down the path to this directory.
  2. Open the "Start menu" and click "All apps" down arrow button in the bottom-left corner.
  3. Scroll through the list of apps and click a "Control Panel" on the "Windows System". The Control Panel will appear on the screen.
    • Under "View by:",  click "Category", 
    • then select the “System and Security” section.
    • then select the “System” section on the right side.
  4. In the System window, click on Advanced System Settings on the left sidebar.
  5. In the System Properties window (Advanced tab):
    • Click the Environment Variables button.
    • Under the System Variables section, find Path variable.
    • Click Edit button to modify the existing variable, or New button to create a new one, if the Path variable is not exist..
    • In the Variable Name field, enter Path. 
      In the Variable Value field, add the path to our Python installation directory (e.g., "C:\Program Files\Python\pythonXX")  to the list of paths if it’s not already there.
    • Click OK to apply the changes.
  6. Click OK again, click OK again in System Properties window, and restart the computer to ensure the changes take effect.

Set The Python Path Variable Via The Command Line

Notes

WARNING use the step "Set Up The Python Path variable In Microsoft Windows 8" from above, if you have Microsoft Windows Environment Variables Path more than 1024 characters!

If you would prefer to set the Python Path Variable via the command line:
  1. Open Command Prompt (make sure you "Run as administrator" with right click mouse, so you're able to add a system environment variable).
  2. Set the value of the environment variable to your Python installation path as follows:
    setx /m PATH "C:\Program Files\Python\pythonXX"
  3. Close and start Command Prompt window again to reload the environment variables then use the following command to check the it's been added correctly and restart the computer to ensure the changes take effect.
  4. Then use the following command to check the path to your Python installation been added correctly.  Then you should see the path to your Python installation.
    echo %PATH%
Notes: 
  • Be aware if you have Microsoft Windows Environment Variables Path over than 1024 characters when assigning contents to a variable using setx, it can result in loss of data previously held by the target variable like in this screencapture picture article post.
  • If the Path variable or Expandable Environment-Variable Strings %PATH% is exist and not empty then you can add semicolon ( ; ) and then put the directory from the Python executable is installed in our system.
  • Be aware If You running the command with an existing variable without double quotes (" "), Expandable Environment-Variable Strings %PATH% and semicolon ( ; ) can be removes any variable references.
  • Only administrators account can change the Environment Variable.
  • Non standard Command Prompt or PowerShell may not running well.
  • XX is the python version.
  • You can place the installed Python inside the no matter folder that able to execute your Python script and compile your Python script, for example "C:\Program Files\Python\pythonXX".


Bibliography

https://www.python.org/ ( manual ebook )
https://realpython.com/
https://superuser.com/
https://support.microsoft.com/en-us ( manual ebook )
https://learn.microsoft.com/ ( manual ebook )
https://winaero.com/
https://www.bleepingcomputer.com/
https://www.ionos.co.uk/
https://www.itechtics.com/
https://www.liquidweb.com/

install, setup, installation, python setup and usage, using python on windows, environment variable


Related Post

Senin, 09 September 2024

VB Classic Open Path In Explorer

Add the following Controls and then set the properties for these following objects:

Object Control Property Value
Form Name frmOpenExplorerByPath
Form Caption Open Explorer By Path
TextBox Name txtPath
TextBox Text txtPath
CommandButton Name cmdAddAppPathToTextBox
CommandButton Caption &App.Path
CommandButton Name cmdOpenInExplorer1
CommandButton Caption Open In Explorer &1
CommandButton Name cmdOpenInExplorer2
CommandButton Caption Open In Explorer &2
CommandButton Name cmdOpenInExplorer3
CommandButton Caption Open In Explorer &3

Type this Visual Basic classic source code in Visual Basic Studio Code window:
Option Explicit
Private Declare Function ShellExecute Lib "shell32.dll" Alias "ShellExecuteA" (ByVal hWnd As Long, ByVal lpOperation As String, ByVal lpFile As String, ByVal lpParameters As String, ByVal lpDirectory As String, ByVal nShowCmd As Long) As Long

Private Sub cmdAddAppPathToTextBox_Click()
txtPath.Text = App.Path
If Right(txtPath.Text, 1) <> "\" Then txtPath.Text = txtPath.Text & "\"
txtPath.ToolTipText = txtPath.Text
End Sub

Private Sub cmdOpenInExplorer_Click()
' Show Windows file explorer based on the file path,
' If not it will open new windows file explorer based on the file path
If txtPath.Text = "" Then
MsgBox "Text Path is empty, please press the App.Path button"
Exit Sub
End If
ShellExecute hWnd, "open", txtPath.Text, 0, 0, 1
End Sub

Private Sub cmdOpenInExplorer2_Click()
' Show Windows file explorer based on the file path,
' If not it will open new windows file explorer based on the file path
' It will focus to the windows file explorer
If txtPath.Text = "" Then
MsgBox "Text Path is empty, please press the App.Path button"
Exit Sub
End If
ShellExecute hWnd, "Explore", txtPath.Text, vbNullString, vbNullString, 1
End Sub

Private Sub cmdOpenInExplorer3_Click()
' Show Windows file explorer based on the file path,
' if not it will open new windows file explorer based on the file path.
' It will focus to the windows file explorer.
' if the path is folder then it will go to the parent path and select the folder.
If txtPath.Text = "" Then
MsgBox "Text Path is empty, please press the App.Path button"
Exit Sub
End If
Shell "explorer.exe /select, " & txtPath.Text, vbNormalFocus
End Sub

Private Sub Form_Load()
txtPath.Text = ""
End Sub

Private Sub Form_Unload(Cancel As Integer)
Set frmOpenPath = Nothing
End Sub

Bibliography:

Introduction to Programming Using Visual Basic;Pearson.
Learning Visual Basic .NET: Introducing the Language, .NET Programming & Object Oriented Software Development;O'Reilly Media
Programming with Microsoft Visual Basic;Cengage Learning.
Visual Basic in Easy Steps;In Easy Steps Limited.

Related Post:

Minggu, 01 Juni 2025

Some Of Information Technology Default Path

to see Command Prompt Default Installation Path and Most Common Default Installation Path, click Command Prompt Path And Most Common Program
to see ImageMagick Default Installation Path, Check ImageMagick Version
to see Java Default Installation Path, click 
to see Notepad Default Installation Path, click Notepad Path
to see PHP Default Path, click PHP Local Server Folder Location
to see Python Default Installation Path, 
Ruby Default Installation Path, click 


Notes:

  • Some old Windows version has limited path lengths to hundred characters. This meant that paths longer than this would not resolve and errors would result. In the latest versions of Windows, this limitation can be expanded to approximately ten thousand characters.


using windows, python full installation path


Senin, 22 April 2024

How To Get Active File Path In Notepad 2

How To Get Active File Path In Notepad 2 / How To Get Current File Path In Notepad 2

These are several methods that you can choose one based on your requirement:

Method 1

  1. click File > Save As menu
  2. after the Open dialogue box window has opened, then you can get the current file path from "location bar" or "address bar".

Method 2

  1. click Edit > Copy to Clipboard > Full Path Name menu
  2. then you can get the full path name from clipboard.

Method 3

  1. click Tools > Run Command...
  2. after Run dialogue box window has opened, then you can get the full path name from "Open edit box".

Method 4

  1. click File > Properties...
  2. after Properties dialogue box window has opened, then you can get the directory/folder path from "Location: Read-only Text Boxes".
Method 5
  1. click File > Browse... menu
  2. On the Metapath dialogue box, right click
  3. then click Copy Path Name right click menu/context menu.
Method 6
  1. click File > Favorites > Add Current File... menu.
  2. then click File > Favorites > Manage... menu.
  3. after the Microsoft (Windows) File Explorer window has opened, find the file on the "File And Folder List pane/File And Folder List area" (right side of Microsoft (Windows) File Explorer).
  4. then right click on the current file, then click "Open File Location" right click menu/context menu.
  5. then you can get the current file path from "location bar" or "address bar".
NOTES: this method will be work on the current version of Microsoft Windows ( not the old version ).

Method 7
  1. click File > Open Containing Folder menu.
  2. after the Microsoft (Windows) File Explorer window has opened, you can get the current file path from "location bar" or "address bar".


Bibliography:

https://learn.microsoft.com/
https://howtogeek.com/
https://en.softonic.com/
https://download.cnet.com/

Related Post:

Notepad2 Edit Menu

Notepad 2 Edit SubMenu

Notepad 2 File Menu

Regex Implementation in Notepad2 Text Editor - part 1

Notepad3 AutoCompleteFillUpChars Settings With Spacebar and Enter

Current Directory In Command Prompt

Bagian File Explorer

File Explorer Keyboard Shortcuts 1

Study About Microsoft Office 1

Selasa, 26 September 2023

Path In Visual Basic 1

Give you the current exe path.

Programming Language: Visual Basic 6

App.Path


Give you the Microsoft Office Software Path Installed.

Programming Language: Microsoft Office Visual Basic Application

Application.Path


Give You The Document Path.

Programming Language: Microsoft Office Visual Basic Application

ActivePresentation.Path

ActiveWorkbook.Path

ActiveDocument.Path

path, location, address, folder, directory

Bibliography:

Mastering VBA for Microsoft Office

https://stackoverflow.com/

Related Post:

Senin, 16 Juni 2025

Latex Soal Konduktor IPA SMP

Hierarchical File Structure

  • folder 20151618ipaSMP1
    • Gambar1.tex
    • Gambar2.tex
    • Gambar3.tex
    • Gambar4.tex
    • pbhs2015KalorKonduktor.tex
    • soal2015KalorKonduktor.tex
  • 20151618ipaSMP1.tex

Guide

1. Open the Latex editor
2. Create a new file
3. Type this following Latex code in your Latex editor:
\documentclass[../20151618ipaSMP1.tex]{subfiles}

\begin{document}
% picture 1
\begin{tikzpicture}[>=latex,scale=1.5]
% draw conduction ball
\node[nodeball] (P1) at (0,0) {P};
\node[nodeball] (R1) at (2.5, 0) {R};
\node[nodepoint] (NP1) at (1, 0) {};
\node[nodepoint] (NP2) at (1.5, 0) {};

% draw arrow line for interaction force
\path[->, very thick] (P1) edge node[below]{} (NP1);
\path[<-, very thick] (NP2) edge node[below]{} (R1);
\end{tikzpicture}
\end{document}
4. Save as picture1.tex
5. Create a new file
6. Type this following Latex code in your Latex editor:
\documentclass[../20151618ipaSMP1.tex]{subfiles}

\begin{document}
% picture 2
\begin{tikzpicture}[>=latex,scale=1.5]
% draw conduction ball
\node[nodeball] (P2) at (4.3, 0) {P};
\node[nodeball] (T1) at (5.3, 0) {T};
\node[nodepoint] (NP3) at (3.3, 0) {};
\node[nodepoint] (NP4) at (6.3, 0) {};

% draw arrow line for interaction force
\path[lthickarrow] (NP3) edge node[below]{} (P2);
\path[rthickarrow] (T1) edge node[below]{} (NP4);
\end{tikzpicture}
\end{document}
7. Save as picture2.tex
8. Create a new file
9. Type this following Latex code in your Latex editor:
\documentclass[../20151618ipaSMP1.tex]{subfiles}

\begin{document}
% picture 3
\begin{tikzpicture}[>=latex,scale=1.5]
% draw conduction ball
\node[nodeball] (S1) at (0, -1) {S};
\node[nodeball] (R2) at (2.5, -1) {R};
\node[nodepoint] (NP5) at (1, -1) {};
\node[nodepoint] (NP6) at (1.5, -1) {};

% draw arrow line
\path[rthickarrow] (S1) edge node[below]{} (NP5);
\path[lthickarrow] (NP6) edge node[below]{} (R2);
\end{tikzpicture}
\end{document}
10. Save as picture3.tex
11. Create a new file
12. Type this following Latex code in your Latex editor:
\documentclass[../20151618ipaSMP1.tex]{subfiles}

\begin{document}
% picture 4
\begin{tikzpicture}[>=latex,scale=1.5]
\node[nodeball] (Q1) at (3.3, -1) {Q};
\node[nodeball] (S1) at (4.3, -1) {S};
\node[nodepoint] (NP7) at (2.3, -1) {};
\node[nodepoint] (NP8) at (5.3, -1) {};

\path[lthickarrow] (NP7) edge node[below]{} (Q1);
\path[rthickarrow] (S1) edge node[below]{} (NP8);
\end{tikzpicture}
\end{document}
13. Save as picture4.tex
14. Create a new file
15. Type this following Latex code in your Latex editor:
\documentclass[../20151618ipaSMP1.tex]{subfiles}

\begin{document}
Perhatikan gambar interaksi bola konduktor bermuatan di bawah ini!

\begin{figure}[h!]
\centering
   \subfile{Picture1.tex}
\caption*{Gambar 1}
\label{fig:Gambar1}
\end{figure}

\begin{figure}[h]
\centering
\subfile{Picture2.tex}
\caption*{Gambar 2}
\label{fig:Gambar2}
\end{figure}

\begin{figure}[h]
\centering
\subfile{Picture3.tex}
\caption*{Gambar 3}
\label{fig:Gambar3}
\end{figure}

\begin{figure}[h!]
\centering
\subfile{Picture4.tex}
\caption*{Gambar 4}
\label{fig:Gambar4}
\end{figure}

Jika bola konduktor P bermuatan positif maka gaya interaksi yang terjadi ketika bola P didekatkan bola S, dan bola R didekatkan bola Q berturut-turut adalah ...

\begin{flushleft}
\begin{enumerate}
\renewcommand{\labelenumi}{\Alph{enumi}.}
\item P\textemdash S tarik-menarik dan R{\textemdash}Q tarik-menarik.\\
\item P\textemdash S tarik-menarik dan R{\textemdash}Q tolak-menolak.\\
\item P\textemdash S tolak-menolak dan R{\textemdash}Q tarik-menarik.\\
\item P\textemdash S tolak-menolak dan P\textemdash Q tarik-menarik.\\
\end{enumerate}
\end{flushleft}
\end{document}
16. Save as soal2015KalorKonduktor.tex
17. Create a new file
18. Type this following Latex code in your Latex editor:
\documentclass[../20151618ipaSMP1.tex]{subfiles}

\begin{document}
Jika bola konduktor P bermuatan positif maka:
\begin{itemize}
\item Pada gambar 1 terjadi tarik-menarik, jika P bermuatan positif maka R bermuatan negatif.
\item Pada gambar 2 terjadi tolak-menolak, jika P bermuatan positif maka T bermuatan positif.
\item Pada gambar 3 terjadi tarik-menarik, jika R bermuatan negatif maka S bermuatan positif.
\item Pada gambar 4 terjadi tolak-menolak, jika S bermuatan positif maka Q bermuatan positif.
\end{itemize}

Jadi, gaya interaksi yang terjadi adalah:
\begin{itemize}
\item Bola P bermuatan positif didekatkan dengan bola S bermuatan positif maka tolak-menolak.
\item Bola R bermuatan negatif didekatkan dengan bola Q bermuatan positif maka tarik-menarik.
\end{itemize}
\end{document}
19. Save as pbhs2015KalorKonduktor.tex
20. Create a new file
21. Type this following Latex code in your Latex editor:

\documentclass[a4paper, 12pt]{article}


\usepackage{tikz}

\usetikzlibrary{arrows.meta}

\usepackage{amsmath}

\usepackage{fourier}

\usepackage{subfiles}

\usepackage{subcaption}

\usepackage{graphicx}

\usepackage{fullpage}

\title{Soal Kalor - Konduktor - IPA SMP}

\author{After School Course and Tutor Course}

\date{}


\tikzset{

nodeball/.style={draw, circle, inner sep=0pt, outer sep=0pt, minimum width=0.5cm, fill=white, rounded corners=1, minimum size=1cm, thick},

nodepoint/.style={circle, inner sep=0pt, outer sep=0pt, minimum width=0cm, rounded corners=1, minimum size=0cm},

rthickarrow/.style={very thick, arrows={-latex}},

lthickarrow/.style={very thick, arrows={latex-}}

}


\begin{document}

\maketitle


\LARGE{}


\section*{Soal}

\subfile{20151618ipaSMP1/soal2015KalorKonduktor.tex}


\section*{Pembahasan}

\subfile{20151618ipaSMP1/pbhs2015KalorKonduktor.tex}

\end{document}

22. Save as 20151618ipaSMP1.tex
23. Build or Compile this file.
24. Open the output in PDF reader, such as Adobe Reader.

Output


go to Soal Konduktor - IPA SMP >


Bibliography

https://latex-tutorial.com/
https://www.learnlatex.org/
https://www.overleaf.com/


Senin, 25 November 2024

Draw A Cartesian Coordinate In Latex 2

  • Open the Latex editor
  • Type this following latex code in your Latex editor:
    % !TEX TS-program=pdflatex
    % !TEX encoding=utf-8
    \documentclass[12pt,titlepage]{report}
    % Loading the package
    %---------------------------
    \usepackage[utf8]{inputenc}
    \usepackage{amsmath}
    \usepackage{amsfonts}
    \usepackage{amssymb}
    \usepackage{fouriernc}
    \usepackage{bm}
    \usepackage{tikz}
    \usepackage{xcolor}
    \usepackage{pgfplots}
    \pgfplotsset{compat=1.18}
    \usepackage[active,tightpage,pdftex]{preview}
    \PreviewEnvironment[{[]}]{tikzpicture}
    \setlength\PreviewBorder{0.25pt}
    %---------------------------

    \author{private course and after school tutor}


    \begin{document}
    % -------------------
    % step 2
    % -------------------
    \begin{figure}
    \begin{tikzpicture}%[->]
    %draw gridline
    \draw[help lines,opacity=.25] (-5,-5) grid (5,5);

    % -------------------
    %draw 0,0 node
    % -------------------
    \draw (0,0) node [anchor=north east, font=\bfseries] {$0$};

    % -------------------
    % draw axes line
    % -------------------
    \draw[-latex,thick,font=\bfseries] (-4.5,0) -- (4.5,0) node [anchor=north] {\large{$\mathsf{sumbu\ x}$}};
    \draw[-latex,thick] (0,-4) -- (0,4) node [anchor=west] {\large{$\mathsf{sumbu\ y}$}};

    % -------------------
    % draw coordinate plane quadrant 1
    % -------------------
    \boldmath

    \path[draw=black, ultra thick, text=black] (1,2) node[anchor=south west, font=\bfseries] {Quadrant I};
    \path[draw=black, ultra thick, text=black] (1,1.5) node[anchor=south west, font=\bfseries] {(+,\ +)};

    % -------------------
    % draw coordinate plane quadrant 2
    % -------------------
    \path[draw=black, ultra thick, text=black] (-3.8,2) node[anchor=south west, font=\bfseries] {Quadrant II};
    \path[draw=black, ultra thick, text=black] (-3.8,1.5) node[anchor=south west, font=\bfseries] {($\mathbf{-}$,\ +)};

    % -------------------
    % draw coordinate plane quadrant 3
    % -------------------
    \path[draw=black, ultra thick, text=black] (-4,-2) node[anchor=south west, font=\bfseries] {Quadrant III};
    \path[draw=black, ultra thick, text=black] (-4,-2.5) node[anchor=south west, font=\bfseries] {($\mathbf{-,\ -}$)};

    % -------------------
    % draw coordinate plane quadrant 4
    % -------------------
    \path[draw=black, ultra thick, text=black] (1,-2) node[anchor=south west, font=\bfseries] {Quadrant IV};
    \path[draw=black, ultra thick, text=black] (1,-2.5) node[anchor=south west, font=\bfseries] {($\mathbf{+,\ -}$)};

    % -------------------
    % draw axes label
    % label 1 (horizontal right), label 2 (horizontal left), label 3 (vertical up), label 4 (vertical down)
    % -------------------
    \foreach \i in {1, ..., 3} \draw(\i,2.5pt) -- +(0,-5pt) node [anchor=north, font=\bfseries] {\large{$\mathrm{\i}$}} (-\i,2.5pt) -- +(0,-5pt) node [anchor=north, font=\bfseries,fill=white] {\large{$\mathrm{-\i}$}} (2.5pt,\i) -- + (-5pt,0) node [anchor=east, font=\bfseries] {\large{$\mathrm{\i}$}} (2.5pt,-\i) -- + (-5pt,0) node [anchor=east, font=\bfseries, fill=white] {\large{$\mathrm{-\i}$}};
    \end{tikzpicture}
    \end{figure}
    \end{document}


  • save file as koordinatKartesius2.tex
  • Typeset or Build.
  • Output

    Notes To see the more clear picture, click on the picture.


    Related Post

Senin, 22 September 2025

Set Up A Java Development Kit In Microsoft Windows 8 With Picture

  1. Let’s locate the directory where the Java executable is installed in our system, and note down the path to this directory.

    Locate the directory of the Java executable folder
    Locate the directory of the Java executable folder
  2. Open the "Start menu" and click "All apps" down arrow button in the bottom-left corner.

    Start Menu Windows opened
    Start Menu Windows opened

     "All apps" down arrow button in the bottom-left corner.

  3. Scroll through the list of apps and click "Control Panel" on the "Windows System".

    Scroll through the list of apps
    Scroll through the list of apps then click "Control Panel" on the "Windows System"

  4. The Control Panel will appear on the screen.

    Control Panel opened
    Control Panel opened
  5. Under "View by:" on the right side,  click "Category", 

    Under "View by:",  click "Category",
    Under "View by:",  click "Category", 
  6. After then select the “System and Security” section.

    select the “System and Security” section
    select the “System and Security” section
  7. then select the “System” section on the right side.

    then select the “System” section on the right side.
    then select the “System” section on the right side.
  8. In the System window, click on Advanced System Settings on the left sidebar.

    click on Advanced System Settings on the left sidebar
  9. After In the System Properties window (Advanced tab):

    click Advanced tab
  10. Click the Environment Variables button.

    click the Environment Variables button.
  11. Under the System Variables section, find Path variable.

    find and click Path variable in the middle
    find and click Path variable in the middle
  12. Click Edit button to modify the existing variable, or New button to create a new one, if the Path variable is not exist.

    Click the Edit button or click the New button. In the Variable Name field, ensure you enter Path
    Click the Edit button or click the New button.
  13. In the Variable Name field, ensure you enter Path.  In the Variable Value field, add the path of our Java installation directory (e.g., "C:\runtime\Java\jdk1.6.0_21\bin"). Click OK button on the Edit System Variable window, to apply the changes.

    Enter Variable name, enter Variable value, then click OK button
    Enter Variable name, enter Variable value, then click OK button
  14. Click OK button again, click OK button again in System Properties window.

    Click OK button on the Environment Variables window.
    Click OK button on the Environment Variables window.

    Click OK button again in System Properties window
  15. And restart the computer to ensure the changes take effect.

    Click Start button > click Power Options button on the right top corner > click Restart
    Click Start button > click Power Options button
    on the right top corner > click Restart

Notes


jdk, java sdk, software development kit, application, programming, install

<< back to Study About Java 1


Bibliography

https://www.youtube.com/@OSTechHelp
https://www.youtube.com/@YTRtutorial
Java Ebook Oracle Press
Java Ebook Pearson Publisher