Search In This Website

Menampilkan postingan yang diurutkan menurut tanggal untuk kueri version. Urutkan menurut relevansi Tampilkan semua postingan

Rabu, 13 Mei 2026

Membuat Daftar Buku Dengan Ajax

Tujuan Pembelajaran

  • Menerapkan HTTPRequest dengan memanfaatkan file "books.xml". 
  • Menampilkan data buku-buku dari file XML ke dalam table HTML.

Rencana Pembelajaran

Menerapkan HTTPRequest dengan melibatkan:
  • Satu file HTML (listbooks.html) + JavaScript (listbooks.js).
  • Satu file XML (books.xml).
  • Menggunakan "Code Editor - Compiler & IDE by Rhythm Software" di Android smartphone, selanjutnya akan disebut Code Editor saja.

Klik link "baca selengkapnya" di bawah ini untuk membaca dan mempraktikkan langkah-langkah praktik:

Selasa, 12 Mei 2026

Simple Ecommerce Website Navigation Diagram In Plant UML

Simple Ecommerce Website Navigation Diagram Or Simple Ecommerce Website Structure Or Simple Ecommerce Site Map

E-commerce Website Navigation Diagram similar to E-commerce Website Structure similar to E-commerce Website Site Map use to help each user ( for example consumer, customer, seller, etc ) to find all required pages to work in e-commerce activity.

This following e-commerce website navigation diagram example in PlantUML file ( save as ecommerceNavigationDiagram.puml ). You can use plantuml editor or text editor
/' License: 
 Creately Desktop - End User License Agreement (EULA)  
 PlantUML is GNU General Public License as published by the Free Software Foundation, either version 3 of the License.
'/
@startwbs
*(a) Home
**(b) "view\n products"
**(c) Login
***(g) profile
***(h) settings
**(d) shop now
**(e) view cart
**(f) checkout
*** Login
****(i) payment
@endwbs


Minggu, 29 Maret 2026

Study About PHP MySql In Android

Preparation

Requirements: Android Smartphone 6


MySQL CRUD ( Create Read Update Delete )

  • Create Table MySQL
  • Insert Data 
  • Read Data
  • Update Data
  • Delete Data
  • Export SQL Script

How To Check PHP Version

Mengubah Konfigurasi Server 

List All Enabled PHP Extension

HTML Editor

visual studio code extension

URL Address PHP MySQL Local Server 2


URL Address PHP MySQL Local Server 1


Foundation To PHP

Commonly Used HTML Tags

HTML White Space 1

HTML ASCII Codes

PHP Data Types

PHP - XAMPP

Hello World PHP XAMPP

How to Check Apache HTTP Server Version

PHP Forms

Memasang CKEditor


PHP Database 

PHP Bind Param


PHP Dependency Management

How To Check Your Composer Version


PHP Error And Exception

PHP Common Error


<< go to Learn Android Apps Development

Selasa, 27 Januari 2026

Running 'AWebServer Http Apache PHP Sql' ( MySql server )

Learning Objectives:

  • Setup and running an MySQL (MariaDb Sql Server) local server using 'AWebServer Http Apache PHP Sql'.
  • Setup and running a 'HiSQL' MySql client app. Then connect to MySQL server. Open MySQL server connection.
  • Prepare an Android Smartphone from version 6.


<< Previous lesson Running 'AWebServer Http Apache PHP Sql' ( PHP web server )


    Setup And Running An MySQL (MariaDb Sql Server) Local Server 

    1. You must start the 'Apache' web server as explained in the previous lesson, on the link above.
    2. At the top row ( green bar ). In the third tab (MariaDb Sql Server). Click 'Start' button on the 'Service' row.

    3. After your 'MariaDb SQL Server' started. 

    Setup And Running A 'HiSQL' MySql Client App

    1. Open the HiSQL app.

    2. Create a 'MySQL' connection.

    3. Input 'Server Host/IP' and 'Port' based on 'Address' on step 3. Input 'Username' and 'Password' based on step 3. 

    4. To Connect a 'MySQL' connection. Click the 3 dots and select 'Connect' menu item.

    5. To Open a 'MySQL' connection. Click the connection IP on the connection row if needed. In this example, our IP is 192.168.0.2 on the connection row. 

    6. After connection opened. 


    Running AWebServer Http Apache PHP Sql

    Learning Objectives:

    • Setup and running an Apache, PHP local web server using 'AWebServer Http Apache PHP Sql'.
    • Prepare an Android Smartphone from version 6.

    1. Open Google Play Store.
    2. Download AWebServer app on your Android device by click 'Install' button.

    3. After your download and installation has finished. Open the AWebServer app. 

    4. If you have not purchased AWebServer, tap 'Continue to app' in the top right corner. 

    5. tap 'Maybe later'. 

    6. In the first tab (Web Server). Click 'Start' button on the 'Service' row.

    7. After 'Start' button pressed.

    8. Open web browser, for example Opera browser. Type 'http://192.168.0.2:8080' without single quotes.


    Minggu, 28 September 2025

    Set The JAVA_HOME variable In Microsoft Windows 8

    From step 1 to step 10, you can study at the Set Up A Java Development Kit In Microsoft Windows 8 With Picture
    1. Let us locate the directory where the JDK is installed on our system, and note down the path to this directory.
    2. Open the Start menu and click "All apps" down arrow button in the bottom-left corner.
    3. Scroll through the list of apps and click "Control Panel" on the "Windows System".
    4. The Control Panel will appear on the screen.
    5. Under "View by:" on the right side, click "Category", 
    6. After then select the “System and Security” section.
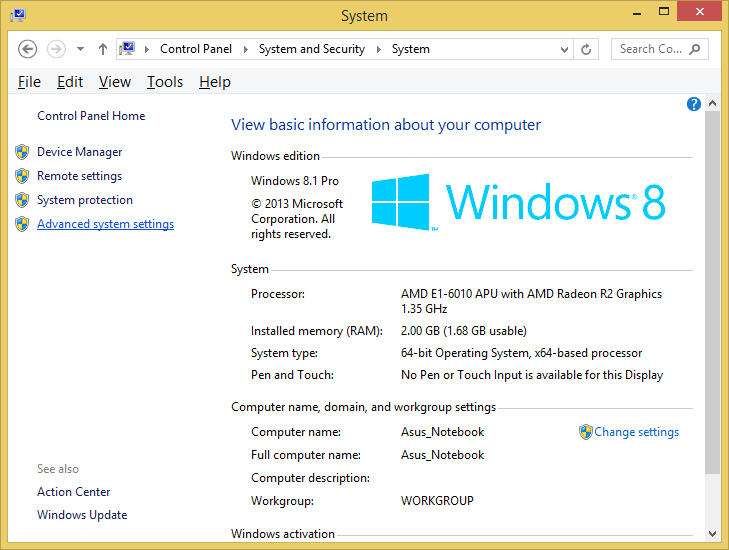
    7. then select the System section on the right side.
    8. In the System window, click on Advanced System Settings on the left sidebar.
    9. In the System Properties window (Advanced tab):
    10. Click the Environment Variables button.

    Add JAVA_HOME Variable In Microsoft Windows 8

    This following step to add JAVA_HOME variable:
    1. Under the System Variables section, click a New button to create a new one.


    2. In the Variable Name field, type JAVA_HOME.


    3. In the Variable Value field, enter the path to our JDK installation directory (e.g., in this post C:\runtime\Java\jdkX.X.X_XX\). Then press OK button.


    Add %JAVA_HOME% To The Path Of Windows Environment Variable

    This following step to add %JAVA_HOME% to the Windows Environment Variable:
    1. In the System Properties window, select the Path variable under the System Variables section. Click Edit button, 


    2. and add %JAVA_HOME%\bin to the list of paths if it’s not already there. Click OK  button.


    3. Click OK  button to apply the changes and restart the computer to ensure the changes take effect.


    Check %JAVA_HOME% Has Installed Successfully

    1. Start Command Prompt window then use the following command to check the %JAVA_HOME% has been added correctly.


    2. echo %JAVA_HOME%. You should see the path to your JDK (or JRE) installation location without bin folder.


    after this you can follow and practise this optional step below according to your condition:

    Edit JAVA_HOME

    1. Under the System Variables section, found JAVA_HOME variable, click Edit button to modify the existing variable.


    2. change the Variable Value field with enter the path to our JDK installation directory (e.g., in this post C:\runtime\Java\jdkX.X.X_XX\ ). Then press OK button.


    NOTES: 


    << back to  Study About Java 1

    Bibliography

    https://www.asus.com/ ( hardware )
    https://www.codecademy.com/
    https://www.youtube.com/@ProgrammingKnowledge
    https://docs.oracle.com/ ( manual ebook )

    Senin, 22 September 2025

    Set Up A Java Development Kit In Microsoft Windows 8 With Picture

    1. Let’s locate the directory where the Java executable is installed in our system, and note down the path to this directory.

      Locate the directory of the Java executable folder
      Locate the directory of the Java executable folder
    2. Open the "Start menu" and click "All apps" down arrow button in the bottom-left corner.

      Start Menu Windows opened
      Start Menu Windows opened

       "All apps" down arrow button in the bottom-left corner.

    3. Scroll through the list of apps and click "Control Panel" on the "Windows System".

      Scroll through the list of apps
      Scroll through the list of apps then click "Control Panel" on the "Windows System"

    4. The Control Panel will appear on the screen.

      Control Panel opened
      Control Panel opened
    5. Under "View by:" on the right side,  click "Category", 

      Under "View by:",  click "Category",
      Under "View by:",  click "Category", 
    6. After then select the “System and Security” section.

      select the “System and Security” section
      select the “System and Security” section
    7. then select the “System” section on the right side.

      then select the “System” section on the right side.
      then select the “System” section on the right side.
    8. In the System window, click on Advanced System Settings on the left sidebar.

      click on Advanced System Settings on the left sidebar
    9. After In the System Properties window (Advanced tab):

      click Advanced tab
    10. Click the Environment Variables button.

      click the Environment Variables button.
    11. Under the System Variables section, find Path variable.

      find and click Path variable in the middle
      find and click Path variable in the middle
    12. Click Edit button to modify the existing variable, or New button to create a new one, if the Path variable is not exist.

      Click the Edit button or click the New button. In the Variable Name field, ensure you enter Path
      Click the Edit button or click the New button.
    13. In the Variable Name field, ensure you enter Path.  In the Variable Value field, add the path of our Java installation directory (e.g., "C:\runtime\Java\jdk1.6.0_21\bin"). Click OK button on the Edit System Variable window, to apply the changes.

      Enter Variable name, enter Variable value, then click OK button
      Enter Variable name, enter Variable value, then click OK button
    14. Click OK button again, click OK button again in System Properties window.

      Click OK button on the Environment Variables window.
      Click OK button on the Environment Variables window.

      Click OK button again in System Properties window
    15. And restart the computer to ensure the changes take effect.

      Click Start button > click Power Options button on the right top corner > click Restart
      Click Start button > click Power Options button
      on the right top corner > click Restart

    Notes


    jdk, java sdk, software development kit, application, programming, install

    << back to Study About Java 1


    Bibliography

    https://www.youtube.com/@OSTechHelp
    https://www.youtube.com/@YTRtutorial
    Java Ebook Oracle Press
    Java Ebook Pearson Publisher

    Kamis, 11 September 2025

    PHP Common Error

    Error Message

    Apache PHP Error Message 404

    [an error occurred while processing this directive] The requested URL was not found on this server. If you entered the URL manually please check your spelling and try again. [an error occurred while processing this directive]

    or maybe you found some error message ( Error 404 ) like this:

    Object not found!

    The requested URL was not found on this server. If you entered the URL manually please check your spelling and try again.

    If you think this is a server error, please contact the webmaster.

    Error 404

    localhost

    Apache/version.number (Win bitNumber) OpenSSL/version.number PHP/version.number

    Symptom

    Using Apache and PHP then you want open your website or your website project.

    Solution

    • Type the right URL address, because file or directory maybe moving in the different place.
    • Upload the missing file in the right place.

    << back to Study About PHP 1

    Kamis, 04 September 2025

    Install Dynamic-Link Library (DLL)

    To Register Or Install Dynamic Link Library (DLL) Using regsvr32

    The basic syntax of regsvr32 is:
    regsvr32 [path_to_dll_file]
    1. Open your Microsoft Windows Command Line As Administrator. To learn how to open Microsoft Windows Command Prompt, click
      How To Launch Command Prompt
      or
      How To Launch Command Prompt In Windows 8
    2. Once the elevated Command Prompt is open ( Open As Administrator ), you can register the DLL. Go To dll file directory.Type CD "\Program Files (x86)\Common Files\Data Dynamics\ActiveReports Pro\" and press Enter.

    3. Type this in the Command Prompt:
      C:\Windows\SysWOW64\regsvr32.exe arpro2.dll
    4. Then you can see the successful output.

    Notes

    • Quotation Marks: Use double quotation marks (") around the path and filename if there are any spaces in the file path.
    • Different between 64-bit than 32-bit: On a 64-bit Windows system, there are two versions of regsvr32.exe. The 64-bit version is located in C:\Windows\System32, and the 32-bit version is in C:\Windows\SysWOW64. You need to use the correct version of regsvr32 for the DLL you are trying to register.


    Jumat, 29 Agustus 2025

    Certain Content In The Database Has Been Disabled In Microsoft Access

    1. After you open the Microsoft Office Access Database.
    2. Then you see the Message Bar consist of "Certain content in the database has been disabled" is displayed on Microsoft Office Access.


    3. On the Message Bar, click Options.

    4. Choose Enable this content.
    5. Then click OK button.


    Bibliography

    https://www.fmsinc.com/
    https://support.microsoft.com/

    Related Post