Search In This Website

Kamis, 31 Juli 2025

VBA PPT Short Reference Sheet 1

Application Object In Microsoft VBA PowerPoint

Determines the working environment is PowerPoint or not:
Debug.Print Application Is PowerPoint.Application 'In PowerPoint will Prints: True

Selection Object In Microsoft VBA PowerPoint

The PowerPoint.ActiveWindow.Selection object in VBA contains whatever the user has selected.

The PowerPoint.ActiveWindow.Selection.Type properties in VBA consist of:

  • shapes = ppSelectionShapes
  • slides = ppSelectionSlides
  • text = ppSelectionText
  • nothing at all = ppSelectionNone

Creates Object Variables And Assign References

Dim pptPP As Presentation
Dim pptSld As PowerPoint.Slide
Dim pptShp As PowerPoint.Shape
'Assign Active Slide to Variable
Set pptSld = Application.ActiveWindow.View.Slide
'Assign slide by Index to Variable
Set pptSld = ActivePresentation.Slides(1)

Bibliography

https://learn.microsoft.com/ ( manual ebook )

https://www.autovbax.com/

http://www.pptalchemy.co.uk/

https://www.vbaplanet.com/

PowerPoint;Cengage

Microsoft PowerPoint;Microsoft Press

Fungsi MIN Pada Excel

Fungsi MIN Pada Microsoft Excel

Fungsi MIN digunakan untuk menampilkan nilai atau angka minimum (terkecil) yang terdapat dalam suatu sel/range atau beberapa sel/range data. Bentuk penulisan fungsi adalah sebagai berikut,
=MIN(number1;number2; ...)

Penjelasan argumen fungsi MIN.

Keterangan
number
dapat berupa angka/bilangan, sel atau range yang berisi angka atau nilai logika. Excel mengizinkan Anda untuk mengisi argumen maksimal sebanyak 255.

Fungsi MINA Pada Microsoft Excel

Fungsi MINA digunakan untuk menampilkan nilai terkecil dari sekelompok data tanpa mengabaikan jenis data teks atau logika. Bentuk penulisan fungsi adalah sebagai berikut,
=MINA(value1;value2; ...)
Keterangan
value
dapat berupa angka/bilangan, sel atau range yang berisi angka, teks atau nilai logika. Jika nilai logika diisi dengan TRUE, Excel memberi nilai 1 dan jika nilai logika diisi dengan FALSE, Excel akan memberi nilai 0. Anda diizinkan untuk mengisi sampai dengan 255 argumen.

Studi kasus berikut disajikan data yang diperlihatkan dalam gambar.dan table berikut ini:

ABCDEFGHIJKL
3  DATA MIN DATA  MIN DATA  MIN
4  0.10 =MIN(B4:B16)  15.00 =MIN(F4:F16)  15.00 =MIN(J4:J16)
5  0.85  27.00  27.00 
6  0.41 MINA 15.50 MINA 15.50 MINA
7  0.47 =MINA(B4:B16) 10.00 =MINA(F4:F16) 10.00 =MINA(J4:J16)
8  0.80  8.00   8.00  
9  0.70  7.00   7.00  
10 0.78  6.00   6.00  
11 0.70  5.00   5.00  
12 0.99  10.99  10.99 
13 0.07  12.00  12.00 
14 KOSONG  TRUE   FALSE 
15 0.75  15.00  15.00 
16 0.50  25.50  25.50 

Soal:

  • Input data di kolom B, dari B3 sampai dengan B16, seperti dalam tabel di atas.
  • Tulislah fungsi MIN di kotak cell D4, H4 dan L4.
  • Tulislah fungsi MINA di kotak cell D7, H7 dan L7


Related Post

Rabu, 30 Juli 2025

How To Check Python GTK Version

Prerequisites:

  1. Install Python. In this example using Python 2.7.13
  2. Install PythonGTK.

Tutorial

1. Open Command Prompt.
2. Running your Python interactive console / Python interpreter / Python shell by typing python.

3. Typing :
import pygtk
import gtk
print(gtk.pygtk_version)
print(gtk.gtk_version)
4. Then for print(gtk.pygtk_version) you get output similar to this :
(2, 24, 0)
5. Then for print(gtk.gtk_version) you get output similar to this :
(2, 24, 10)


<< back to Study About Python

Study About Python

Getting Started


Ribbon UI XML Namespace

You need to save the Custom Ribbon UI file in your office document (.xlsm, .docm, .pptm)

Use "Custom UI Editor For Microsoft Office", "Office RibbonX Editor" to make editing more easier.

You can use another XML (eXtensible Markup Language) editor, for example "Microsoft XML Notepad", "Oxygen XML Editor", "Alova XML Spy", "Liquid XML Studio" or other text editor and IDE for your option with XML plugin.

Microsoft Office 2007 Custom Ribbon UI Namespace

<customUI xmlns="http://schemas.microsoft.com/office/2006/01/customui">

file: customUI.xml
folder: \customUI

Microsoft Office 2010 Custom Ribbon UI Namespace

<customUI xmlns="http://schemas.microsoft.com/office/2009/07/customui">
file: customUI14.xml
folder: \customUI

Microsoft Office 2010 Custom Ribbon UI DTD Schema

<Relationship Id="R43c63e08ca974dfc" Type="http://schemas.microsoft.com/office/2006/relationships/ui/extensibility" Target="customUI/customUI.xml"/>
file: .rels
folder: _rels

Bibliography

https://bettersolutions.com/index.htm
https://learn.microsoft.com/ ( manual ebook )
https://officeoneonline.com/index.html
https://vba.co.id/
https://www.brightcarbon.com/
http://www.pptalchemy.co.uk/

CSV Schema File

  • A CSV (Comma Separated Value) schema file defines the structure of your data.
  • Common file name for CSV Schema is schema.ini
  • CSV Schema File is commonly using in ODBC Data Source Administrator

schema.ini example:

[CartoonCharacter.csv]
ColNameHeader=True
Format=CSVDelimited(;)
MaxScanRow=17
CharacterSet=OEM
DecimalSymbol=.
Col1="No" Float Width 3
Col2="Cartoon Name" Text Width 21
Col3="Description" Text Width 20
Save file as schema.ini

*.csv file example:

No;Cartoon Name;Description
1.;Bluey;Cartoon Character 1
2.;Peppa Pig;Cartoon Character 2
3.;Gudetama;Cartoon Character 3
4.;Mofusand;Cartoon Character 4
5.;Elsa;Cartoon Character 5
6.;Anna;Cartoon Character 6
7.;Spongebob Squarepants;Cartoon Character 7
8.;Finn;Cartoon Character 8
9.;Jake;Cartoon Character 9
10.;Minions;Cartoon Character 10
11.;Lightning McQueen;Cartoon Character 11
12.;Paw Patrol Pups;Cartoon Character 12
13.;Ladybug;Cartoon Character 13
14.;Tom;Cartoon Character 14
15.;Jerry;Cartoon Character 15
16.;CocoMelon;Cartoon Character 16
Save file as CartoonCharacter.csv

Bibliography

NoteTab Menu 1

File menu, Edit menu, Search menu, View menu, Modify menu, Document Menu, Favorites menu, Tools menu, Help menu.


<< back to Learn Notepad++


<< back to  Learn Microsoft Windows ( Road Map )


Related Post

Notepad 2 Edit SubMenu


Jumat, 25 Juli 2025

AsciiDoctor Block Content

AsciiDoctor Block Content consist of: Blockquote Block, Comment Block, Delimited Passthrough Blocks

AsciiDoctor Quoted Block (Blockquote) Example

If the quote or excerpt is more than one paragraph, place the text between delimiter lines consisting of four underscores (____).

AsciiDoctor Syntax Quote Block
[quote,attribution,citation title and information]
____
Quote or excerpt text
____

AsciiDoctor Example Quote Block
[quote,Monty Python and the Holy Grail]
____
Dennis: Come and see the violence inherent in the system. Help! Help! I'm being repressed!

King Arthur: Bloody peasant!

Dennis: Oh, what a giveaway! Did you hear that? Did you hear that, eh? That's what I'm on about! Did you see him repressing me? You saw him, Didn't you?
____

AsciiDoctor Example Quote Block Output


AsciiDoctor Comment Block Example

AsciiDoctor Comment Block is defined by a text that’s prefixed by one or more . 
consists of an arbitrary number of text lines bounded on either side by //// four slash delimiter lines.

//// 
A comment block.

Notice it's a delimited block.
////
or you can type AsciiDoctor Comment Block:
[comment]
--
Notice it's a comment block
--

AsciiDoctor Example Block

AsciiDoctor Block Content or AsciiDoctor Block Macro is defined by a single line that matches the block macro syntax.
The opening and closing delimiter in AsciiDoctor Block Content must match exactly, both in length and in sequence of characters.

====
Here's a sample AsciiDoc document:
====

AsciiDoctor Delimited Passthrough Block

A passthrough block is delimited by four plus signs (++++).

++++
<del>strike this</del> is marked as deleted.
++++


Bibliography

https://docs.asciidoctor.org/
https://www.adoc-studio.app/
https://www.udemy.com/

How To Check AsciiDoctor Gem Dependencies

How To Check AsciiDoctor Has Installed Locally

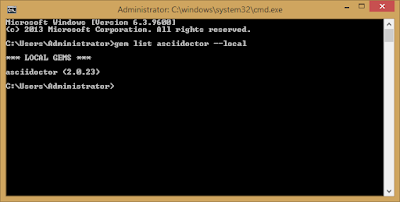
Syntax: gem list <ruby-gem-name> --local

1. Open Command Prompt.

2. Type gem list asciidoctor --local

3. Press Enter on keyboard.

Step 2 and Step 3 To Check AsciiDoctor Has Installed Locally


How To Check AsciiDoctor Ruby Gem Dependencies

Syntax: gem dependency <ruby-gem-name> --reverse-dependencies --local

1. Open Command Prompt.

2. Type gem dependency asciidoctor --reverse-dependencies --local

3. Press Enter on keyboard.

4. Sample Output:

Gem asciidoctor-2.0.23

  concurrent-ruby (~> 1.1.0, development)

  cucumber (~> 3.1.0, development)

  erubi (~> 1.10.0, development)

  haml (~> 6.1.0, development)

  minitest (~> 5.22.0, development)

  nokogiri (~> 1.13.0, development)

  rake (~> 12.3.0, development)

  slim (~> 4.1.0, development)

  tilt (~> 2.0.0, development)

Step 2 To Check AsciiDoctor Ruby Gem Dependencies

Step 3 After Press Enter on keyboard


<< back to Study About AsciiDoctor


<< back to Study About Ruby


<< back to Study About Java 1


Bibliography

https://guides.rubygems.org/ ( manual ebook )

https://rubygems.org/

https://www.ruby-lang.org/  ( manual ebook )

Study About Ruby

Getting Started


Kamis, 24 Juli 2025

How to Creating A JAR File Using the Command Line

Prerequisites

Before you begin, ensure you have the following tools on your system:
  • Java Development Kit (JDK) installed and configured in your system's PATH. You must download JDK from the official Java website, if you don't have JDK. JDK is required for compiling Java code (javac) and running JAR files (java).
    If you want to learn default Java Path For Windows And Linux Environment, click Default Java Path Environment >
    You must setup PATH environment, click Set The JAVA_HOME variable >
    To check the Java version, click How To Check Your Java Version >
  • A Text Editor, for example Notepad: To write your Java code and potentially to write a manifest file.
  • A Terminal or Command Prompt: To execute compilation and JAR creation commands.

Assumption

  • Ensure you have a Java class with a main method ( after You compiled a Java source code File ), which serves as the entry point for your Java simple application (JAR) or Java simple program (JAR). You can use this Java exercise, click Hello World In Java and then you must compile the Java Program, click How To Compile Java 1.
  • Ensure you understand to using Text Editor and a Terminal or Command Prompt.

The Steps

1. First we navigate to the root directory of your Java class files project directory. In this example the directory is D:\demo\java\GettingStarted\HelloWorld.

navigate to the root directory
of your Java class files project directory

list your root directory
of your Java class files project directory

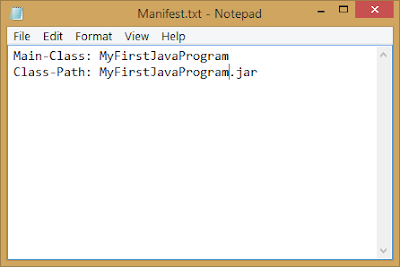
2. Create a Manifest File: Open your Text Editor and then create a text file (e.g., manifest.txt) and add the Main-Class entry. Make sure there's a newline at the end of the Main-Class line. The full contents Of Manifest.txt example:
Main-Class: helloWorld
Class-Path: helloWorld.jar

Notepad program show

Type Manifest.txt example contents

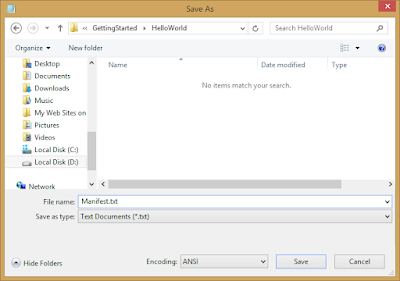
3. Save file As Manifest.txt in directory D:\demo\java\GettingStarted\HelloWorld\.

click File > Save As menu

Navigate to D:\demo\java\GettingStarted\HelloWorld\.
And then type Manifest.txt in File name box.

click Save button

file Manifest.txt has saved

4. Create the JAR File
Now, use the jar command to package your compiled .class file(s) and the manifest file (if applicable) into a single .jar file, for example:
jar cvfm helloWorld.jar helloWorld helloWorld.class
The options and arguments used in this command are: 
-c: Creates a new archive.
-v: Provides verbose output, listing the files as they are added.
-f: Specifies the filename of the JAR archive (helloWorld.jar).
-m: Specifies the manifest file to use (manifest.txt).

Create the JAR File

The JAR file has created

5. Run the Executable JAR
If you created an executable JAR, you can run it directly from the Command Prompt:
java -jar helloWorld.jar
You should see the output: Hello World

Run the Executable JAR

The Executable JAR has succeed to run

Notes


<< back to  Study About Java 1

Bibliography

https://docs.oracle.com/ ( manual ebook )
https://www.cmu.edu/ ( university )
https://www.helsinki.fi/ ( university )
https://www.coursera.org/
https://www.iitk.ac.in/ ( university )
https://www.ntu.edu.sg/ ( university )

How To Launch Notepad In Windows 8

1. Click the Start button to open the "Start menu"
Start Menu
2. and click "All apps" down arrow button in the bottom-left corner.
All apps shown

3. Scroll through the list of apps and click mouse to the "Notepad" on the "Windows Accessories". The Notepad program will appear on the screen.

click on the Notepad program

Notepad program show


Rabu, 23 Juli 2025

Command Prompt Path And Most Common Program

Command Prompt Path / Terminal Path And The Most Common Command Prompt Program

Alternative Command Prompt Path to running Command Prompt:
  • %windir%\system32\cmd.exe /k
  • "C:\Windows\SysWOW64\cmd.exe" /k
  • "C:\Windows\System32\cmd.exe" /k
To learn about open Microsoft Windows Command Prompt, click:
Then you can type one of this following example of Command Prompt Program with common arguments:
  • Running Apache HTTP Server
    • C:\Program Files\Apache Software Foundation\Apache<version>\httpd.exe
  • Running A 32 bit Java Application Class
    • C:\Program Files (x86)\Java\jdk<version>\bin\java -cp . mainClassName
  • Running A 64 bit Java Application Class
    • C:\Program Files\Java\jdk<version>\bin\java -cp . mainClassName
  • Running A PlantUML Java Software (JAR)
    • C:\Program Files\Java\jdk<version>\bin\java -jar "C:\Program Files\PlantUML\plantuml.jar"
  • Login To 32 bit MySQL Command Prompt
    • C:\Program Files (x86)\MySQL\MySQL Server <version>\bin\mysql -u root -p
  • Login To 64 bit MySQL Command Prompt
    • C:\Program Files\MySQL\MySQL Server <version>\bin\mysql -u root -p
  • Running A 32 bit NodeJS Application Main File / NodeJS Application Script
    • C:\Program Files (x86)\nodejs\node app.js
  • Running A 64 bit NodeJS Application Main File / NodeJS Application Script
    • C:\Program Files\nodejs\node app.js
  • Running PHP Server
    • C:\Program Files\PHP\PHP -S localhost:8000
  • Executing PHP Files
    • C:\Program Files\PHP\PHP -f "php_script_name.php"
  • Running Python Script File Using Current User Account ( method 1 )
    • %USERPROFILE%\AppData\Local\Microsoft\WindowsApps\python.exe "python_script_name.py"
  • Running Python Script File Using Current User Account ( method 2 )
    • C:\Users\<username>\AppData\Local\Programs\Python\Python<version>\python.exe "python_script_name.py"
  • Running Python Script File Using Current User Account ( method 3 )
    • C:\Python<version>\python.exe "python_script_name.py"
  • Running Python Script File Using All User Account
    • C:\Program Files\Python<version>\python "python_script_name.py"
  • Running XAMPP Shell Command Prompt
    • C:\xampp\xampp_shell.bat
  • Running SumatraPDF with certain page
    • C:\Program Files (x86)\SumatraPDF\SumatraPDF.exe -page <pageNo> <file_path\file.pdf>

 << back to  Learn Microsoft Windows ( Road Map )

Bibliography

https://dev.mysql.com/ ( manual ebook )
https://docs.oracle.com/ ( manual ebook )
https://docs.python.org/ ( manual ebook )
https://httpd.apache.org/ ( manual ebook )
https://idcloudhost.com/
https://itpln.ac.id/ ( university )
https://learn.microsoft.com/ ( manual ebook )
https://nodejs.org/ ( manual ebook )
https://stackoverflow.com/
https://www.apachefriends.org/ ( manual ebook )
https://www.dell.com/
https://www.digitalocean.com/
https://www.php.net/ ( manual ebook )
https://www.sumatrapdfreader.org/ ( manual ebook )

Selasa, 22 Juli 2025

Healthy Food Menu In JList Java

Healthy Food Menu In JList Java Programming

1. Type this following java programming code on your java programming IDE:
import java.awt.Font;
import javax.swing.JFrame;
import javax.swing.JList;
import javax.swing.DefaultListModel;
import javax.swing.JScrollPane;
import javax.swing.SwingUtilities;
import javax.swing.ListSelectionModel;

public class simpleJList1 extends JFrame {
// constructor
public simpleJList1() {
    // configure JList
  listmodel = new DefaultListModel();
  list1 = new JList(listmodel);
  list1.setSelectionMode(ListSelectionModel.SINGLE_SELECTION);
  list1.setFont(new Font("Tahoma", Font.PLAIN, 14));
  
  // Adding new items using addElement method of the DefaultListModel class
  ((DefaultListModel) list1.getModel()).addElement("Beans, Nut, Nut Butters, And Seeds");
  ((DefaultListModel) list1.getModel()).addElement("Calcium Fortified Plant Milks And Yogurts");
  ((DefaultListModel) list1.getModel()).addElement("Choline Foods");
  ((DefaultListModel) list1.getModel()).addElement("Fruits");
  ((DefaultListModel) list1.getModel()).addElement("Hemp, Flax, And Chia Seeds ");
  ((DefaultListModel) list1.getModel()).addElement("Legumes");
  ((DefaultListModel) list1.getModel()).addElement("Nutritional Yeast");
  ((DefaultListModel) list1.getModel()).addElement("Seaweed");
  ((DefaultListModel) list1.getModel()).addElement("Spinach, Sprouted Plant, And Vegetables");
  ((DefaultListModel) list1.getModel()).addElement("Tofu And Tempe");
  ((DefaultListModel) list1.getModel()).addElement("Whole Grains, Cereals, And Pseudocereals");

  // add JList to JScrollPane
  scroll1 = new JScrollPane(list1);
      
  // add JScrollPane to JFrame container
  getContentPane().add(scroll1);
      
  // configure JFrame
  this.setDefaultLookAndFeelDecorated(false);
  this.setLocationRelativeTo(null);
  this.setDefaultCloseOperation(JFrame.EXIT_ON_CLOSE);
  this.pack();
  this.setVisible(true);
}

public static void main (String[] args) {
  SwingUtilities.invokeLater(new Runnable() {
@Override
public void run() {
simpleJList1 prog = new simpleJList1();
}
});
}

//Define Swing components
private JList list1;
// input parameter using DefaultListModel
private DefaultListModel listmodel;
// container JScrollPane if JList content is too long
private JScrollPane scroll1;
}
2. Save as  simpleJList1.java.
3. Compile and run Java source code from above.
javac simpleJList1.java
java -cp . simpleJList1

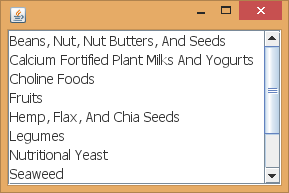
Result

JList in Java Swing Component

<< back to Study About Java 1

Bibliography

http://auckland.ac.nz/ ( university )
https://mkyong.com/
https://teamtreehouse.com/
https://www.codejava.net/
https://www.healthline.com/
https://www.siloamhospitals.com/

Senin, 21 Juli 2025

Restaurant Menu List In Web Page

These are restaurant menu list in webpage exercise :
1. Open your web editor.
2. Type this following Webpage source code in your web editor:
<!DOCTYPE HTML PUBLIC "-//W3C//DTD HTML 4.01 Transitional//EN" "http://www.w3.org/TR/html4/loose.dtd">
<html>
<head>
  <title>Restaurant Menu Unordered List In Web Page</title>
</head>
<body>
<ul>
  <li>Ayam Bakar</li>
  <li>Ayam Goreng</li>
  <li>Ayam Gulai</li>
  <li>Ayam Panggang</li>
  <li>Bakmie Ayam</li>
  <li>Bakmie Goreng</li>
  <li>Bihun Goreng</li>
  <li>Batagor</li>
  <li>Bubur Ayam</li>
  <li>Cireng</li>
  <li>Gulai Kambing</li>
  <li>Ikan Bakar</li>
  <li>Ikan Panggang</li>
  <li>Ikan Goreng</li>
  <li>Kentang Goreng</li>
  <li>Kentang Rebus</li>
  <li>Nasi Campur</li>
  <li>Nasi Goreng</li>
  <li>Pepes Ikan</li>
  <li>Roti Bakar</li>
  <li>Salad</li>
  <li>Sapi Bakar</li>
  <li>Sapi Panggang</li>
  <li>Sapi Goreng</li>
  <li>Sereal</li>
  <li>Sop Jagung</li>
  <li>Sop Wortel</li>
  <li>Soto Ayam</li>
  <li>Telur Dadar</li>
  <li>Tumis Bayam</li>
  <li>Tumis Brokoli</li>
  <li>Tumis Jamur</li>
  <li>Tumis Kangkung</li>
</ul>
</body>
</html>
3. Save as your webpage source code as restaurantmenu1.html
4. Open in your internet browser.

Output ( similar like this )

Restaurant Menu List In Web Page

Notes

To see the more clear picture, click on the picture.


HTML source code, internet webpage, website page

Bibliography

https://codegym.cc/
https://tantri.id/
https://www.dicoding.com/
https://www.halodoc.com/
https://www.nestle.co.id/
https://www.unileverfoodsolutions.co.id/

Minggu, 20 Juli 2025

Netbeans IDE Parts With Picture 2

 The following list are Netbeans IDE parts list:

  1. Title Bar;
  2. Menu Bar;
  3. Quick Launch Bar And Toolbar;
  4. Reference Bar / Reference Tab;
  5. Status Bar;


  1. The Design Button;
  2. Assist Icons;
  3. The Palette Window / The UI (User Interface) Design Palette Panel;
  4. Selected Component / Selected Control;
  5. The Inspector Window / The Inspector Panel;
  6. Design Area / UI (User Interface) Design Board;
  7. The Component Properties Window;

<< back to   Netbeans IDE parts


Bibliography

https://bunghatta.ac.id/ ( university )
https://docs.oracle.com/ ( manual ebook )
https://www.sethi.org/
https://telkomuniversity.ac.id/ ( university )
https://www.helsinki.fi/ ( university )
https://www.auckland.ac.nz/ ( university )
https://netbeans.apache.org/tutorial/ ( manual ebook )

Latihan FPB Dalam Dokumen Latex Preview

1. Open the Latex editor
2. Type this following Latex code in your Latex editor:

% !TEX TS-program = pdflatex


%% File Description:

%% GCD (Great Common Divisor)

%% using Prime Factorization Division Method Table


\documentclass{article}

%% Loading the package

%------------------------

\usepackage{bookman}

\usepackage{array}

\usepackage{multirow}

\usepackage{makecell}

\usepackage{amsmath}

\usepackage{amsthm}

\usepackage{bm}

\usepackage{fullpage}

%------------------------


%% custom theorem environment

%---------------------------

%% define theorem style

\newtheoremstyle{definition}

 {\topsep} % Space above

 {\topsep} % Space below

 {} % Body font

 {} % Indent amount

 {\bfseries} % Theorem head font

 {.} % Punctuation after theorem head

 {.5em} % Space after theorem head

 {} % Theorem head spec ( can be left empty, meaning `normal` )


\theoremstyle{definition}

%\redeclaretheorem[style=normalhead]{theorem}

%% define theorem environment

\newtheorem{theorem}{Langkah}[section]

%---------------------------


%% custom table properties

%---------------------------

%% resize row height

%% use one of this command below:

%\setlength\extrarowheight{2.5pt}

\renewcommand{\arraystretch}{2}

%% resize border width can be more thick or thin

\setlength{\arrayrulewidth}{1.5pt}

%% resize space between columns and border

\setlength{\tabcolsep}{5pt}

%% new centering column type

\newcolumntype{P}[1]{>{\centering\Large{}\arraybackslash}p{#1}}

%---------------------------


%% custom preview package

\usepackage[active,floats,tightpage,multi]{preview}

\setlength\PreviewBorder{0.25pt}

\PreviewEnvironment{minipage}

%---------------------------


\begin{document}

\Large{}

\begin{minipage}{0.5\linewidth}

\section{Menentukan FPB}

Menentukan Faktor Persekutuan Terbesar (FPB) dari dua bilangan.\\[-0.75em]


Marilah kita menentukan FPB dari masalah sebagai berikut:\\

\end{minipage}


\begin{minipage}{0.5\linewidth}

\textbf{Contoh:}\\[-0.5em]


Pak Yudi memiliki 12 apel dan 18 jeruk. Apel dan jeruk tersebut akan dimasukkan ke dalam kantong plastik. Berapa kantong plastik yang dibutuhkan, jika setiap kantong berisi apel dan jeruk dengan jumlah yang sama?\\

\end{minipage}


\begin{minipage}{0.5\linewidth}

\textbf{Jawab:}\\[-0.5em]


\begin{theorem} % Langkah 1

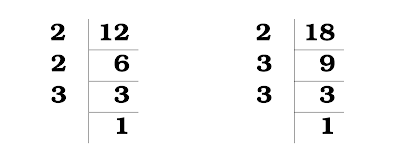
Menentukan faktorisasi prima dari bilangan-bilangan itu:

\end{theorem}

\end{minipage}


\begin{minipage}{0.5\linewidth}

\centering

\hspace{1em}

\begin{minipage}{0.25\linewidth}

$$\begin{array}{|r}

\llap{\textbf{2}~~~~} \textbf{12} \\ \hline

\llap{\textbf{2}~~~~~~} \textbf{6} \\ \hline

\llap{\textbf{3}~~~~~~} \textbf{3} \\ \hline

\textbf{1} \\

\end{array}$$

\end{minipage}

\qquad\qquad

\begin{minipage}{0.25\linewidth}

$$

\begin{array}{|r}

\llap{\textbf{2}~~~~} \textbf{18} \\ \hline

\llap{\textbf{3}~~~~~~} \textbf{9} \\\hline

\llap{\textbf{3}~~~~~~} \textbf{3} \\ \hline

\textbf{1} \\

\end{array}

$$

\end{minipage}\bigskip

\end{minipage}


\begin{minipage}{0.5\linewidth}

\bigskip

Faktorisasi prima dari 12 adalah \\$12 = 2 \times 2 \times 3 = \mathbf{2^{2}} \times \mathbf{3}$\\

Faktorisasi prima dari 18 adalah \\$18 = 2 \times 3 \times 3 = \mathbf{2} \times \mathbf{3^{2}}$\\

\end{minipage}


\begin{minipage}{0.5\linewidth}\smallskip

\begin{theorem} %Langkah 2

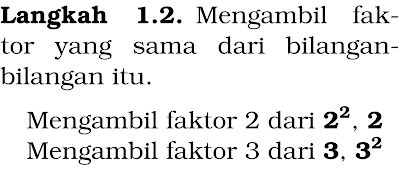
Mengambil faktor yang sama dari bilangan-bilangan itu.

\end{theorem}

\hspace{0.75em} Mengambil faktor 2 dari $\textbf{2}^{\textbf{2}}$,\ $\textbf{2}$\\

\indent\hspace{0.75em} Mengambil faktor 3 dari $\textbf{3}$,\ $\textbf{3}^{\textbf{2}}$\\

\end{minipage}


\begin{minipage}{0.5\linewidth}

\indent\hspace{0.75em} FPB dari 12 dan 18 adalah\\

\indent\hspace{0.75em} 2 $\boldsymbol\times$ 3 = 6 \\[-0.5em]


Jadi, kantong plastik yang diperlukan adalah 6 buah. Setiap kantong plastik memuat 2 apel dan 3 jeruk. %, seperti terlihat pada gambar berikut.\hfill\\

\end{minipage}

\end{document}

3. Save Latex code file as mFPB1prvw.tex

4. Then build or typeset the Latex code file.
5. Then you can see the output below.

Output