Search In This Website

Menampilkan postingan yang diurutkan menurut relevansi untuk kueri microsoft PowerPoint. Urutkan menurut tanggal Tampilkan semua postingan

Kamis, 04 April 2024

Study About Microsoft Office 1

Study About Microsoft Office 1 ( Microsoft Office Word, Microsoft Office Excel, Microsoft Office PowerPoint )

Microsoft Windows, Microsoft Office Word, Microsoft Office Excel, Microsoft Office PowerPoint

These are topic study list about Microsoft Office 1 ( Microsoft Office Word, Microsoft Office Excel, Microsoft Office PowerPoint )

Microsoft Office Word

Menjalankan Microsoft Office Word ( Microsoft Windows 10, Microsoft Office Word 2007 )

Memulai Application Microsoft Office Word ( Microsoft Windows 8, Microsoft Office Word 2007 )

Start Microsoft Office Word Application in English ( Microsoft Windows 8, Microsoft Office Word 2007 )

Microsoft Word GUI Parts

Ribbon In Microsoft Word

Ribbon In Microsoft Word With Picture

Ribbon File Pada Microsoft Office Word

Ribbon File In Microsoft Word With Picture

Membuat Dokumen Microsoft Office Word 2007

Fungsi Menu Pada Microsoft Word 1

Menu Save As Di Microsoft Word

Keyboard Shortcuts For Navigating In Microsoft Office Word

Mengubah Ukuran Font Pada Microsoft Word ( Download Gratis )

Belajar Mengetik Heading Di Microsoft Office Word

Jenis Section Break Dalam Microsoft Word

Section Break Next Page Dalam Microsoft Word ( Download Gratis )

Font Simbol Matematika Di Microsoft Word 1

Microsoft Word Equations 1

Microsoft Office Equation Field

Microsoft Word Modern Equation Structures

Find Microsoft Word AutoSave Recover Location

    How to Change the Paper Size in Microsoft Word


    Daftar Pelajaran Microsoft Office Word >

    Microsoft Excel Terms 1

    Microsoft Excel Terms 2

    Microsoft Excel Terms 3

    Microsoft Excel GUI Parts

    Ribbon Yang Ada Di Microsoft Office Excel

    Keyboard Shortcuts For Navigating In Excel Cells

    Microsoft Excel Function Categories

    Some Of Microsoft Excel Function

    Contoh Rumus Excel 1

    Fungsi MIN Pada Excel


    Microsoft Office Excel Lesson Topics List >

    Topic About Microsoft Excel >


    Microsoft Office PowerPoint

    Ribbon Yang Ada Di Microsoft Office PowerPoint

    Ribbon Home Pada Microsoft PowerPoint 

    Powerpoint Text Alignment 

    Learn PowerPoint Classic Workspace


    Topic About Microsoft PowerPoint >


    Others

    Show The Developer Tab Of The Microsoft Office Word 

    Show The Developer Tab Of The Microsoft Office Excel

    Show The Developer Tab Of The Microsoft Office PowerPoint

    Declare Variables As Excel Object 1 ( VBA / Macro )

    VBA Microsoft Excel 1 ( VBA / Macro )

    Disable Excel Configuration With VBA ( VBA / Macro )

    VBA Excel Loop Through Columns ( VBA / Macro )

    Travel Through Microsoft Word Objects

    VBA Word 1 ( VBA / Macro )

    Path In Visual Basic 1 ( VBA / Macro )

    Get The Shape Position In Microsoft PowerPoint ( VBA / Macro )

    VBA PPT Short Reference Sheet 1 ( VBA / Macro )


    Microsoft Windows

    Microsoft Windows Desktop

    File Explorer Keyboard Shortcuts 1


    ms excel, ms office excel, microsoft office excel, spreadsheet, computer desktop application, menu command, program, menu item, software, menu bar, apps

    Sabtu, 02 Maret 2024

    Powerpoint Text Alignment

    Microsoft Powerpoint Classic Text Alignment

    To align the text in the Microsoft Office PowerPoint Classic, follow these steps:

    Microsoft Office PowerPoint Classic Horizontal Alignment

    1. Select the textbox or the shapes.
    2. Click Format menu > Alignment,
    3. then choose:
      1. Left = left alignment.
      2. Center = center alignment.
      3. Right = right alignment.
      4. Justify = justify alignment.

    Microsoft Office PowerPoint Classic Vertical Alignment

    1. Select the textbox or the shapes.
    2. Click "Format" menu > Autoshape or "Format" menu > Textbox,
    3. then click Text Box tab
    4. then on "Text anchor point" combo box choose:
      1. Top = top alignment.
      2. Middle = middle alignment.
      3. Bottom = bottom alignment.
      4. Top Centered = top centered alignment.
      5. Middle Centered = middle centered alignment.
      6. Bottom Centered = bottom centered alignment.
    5. then click OK button.

    Microsoft Powerpoint Modern Text Alignment

    To align the text in the Microsoft Office PowerPoint Modern, follow these steps:

    Microsoft Office PowerPoint Modern Horizontal Alignment

    1. Select the textbox or the shapes.
    2. Click Home ribbon > Paragraph group
    3. then choose:
      1. Align Left = left alignment.
      2. Center =  center alignment.
      3. Align Right = right alignment.
      4. Justify = justify alignment.

    Microsoft Office PowerPoint Modern Vertical Alignment

    1. Select the textbox or the shapes.
    2. Click Home ribbon > Paragraph group
    3. then click Align Text.
    4. then choose:
      1. Top = top alignment.
      2. Middle = middle alignment.
      3. Bottom = bottom alignment.
    To see result example, click this result example on Instagram.


    Bibliography:

    Microsoft PowerPoint Step by Step. Joan Preppernau.
    PowerPoint For Dummies. Doug Lowe
    https://support.microsoft.com/ ( manual ebook )
    https://zebrabi.com/

    Microsoft Office, Ms PowerPoint, MsPowerPoint, presentation

    Related Post

    Selasa, 03 Desember 2024

    Ribbon Yang Ada Di Microsoft Office PowerPoint

    Ribbon Yang Ada Di Microsoft Office PowerPoint 2007:

    Tab yang ditampilkan pada Microsoft Office Ribbon secara default adalah Ribbon Tab Menu Home, Ribbon Tab Menu Insert, Ribbon Tab Menu Design, Ribbon Tab Menu Animations, Ribbon Tab Menu Slide Show, Ribbon Tab Menu Review, Ribbon Tab Menu View.

    Ribbon Group Yang Ada Di Microsoft Office PowerPoint Ribbon Tab Menu Home: Clipboard, Font, Paragraph, Drawing, Editing.

    Pelajaran yang menggunakan Ribbon Tab Menu Home:


    Ribbon Group Yang Ada Di Microsoft Office PowerPoint Ribbon Tab Menu Insert: Tables, Illustrations, Links, Text, Media Clips.

    Ribbon Group Yang Ada Di Microsoft Office PowerPoint Ribbon Tab Menu Design: Page Setup, Themes, Background.

    Ribbon Group Yang Ada Di Microsoft Office PowerPoint Ribbon Tab Menu Animations: Preview, Animations, Transition to This Slide.

    Ribbon Group Yang Ada Di Microsoft Office PowerPoint Ribbon Tab Menu Slide Show: Start Slide Show, Set Up, Monitors.

    Ribbon Group Yang Ada Di Microsoft Office PowerPoint Ribbon Tab Menu Review: Proofing, Comments, Protect.

    Ribbon Group Yang Ada Di Microsoft Office PowerPoint Ribbon Tab Menu View: Presentation Views, Show/Hide, Zoom, Color/Grayscale, Window, Macros.


    Rabu, 02 Oktober 2024

    Show The Developer Tab Of The Microsoft Office PowerPoint

    To show the Microsoft Office PowerPoint Ribbon Classic (2007) Developer tab, follow these steps:
    1. First, open the Microsoft Office PowerPoint application;
    2. Click the Microsoft Office PowerPoint Office button and select PowerPoint Options button to show the PowerPoint Options dialog box;
    3. Select the Popular option;
    4. In the right list box, check the Show Developer tab in the Ribbon;
    5. Click OK button to close the PowerPoint Options dialog box.
    To show the Microsoft Office PowerPoint Ribbon Modern Developer tab, follow these steps:
    1. First, open the Microsoft Office PowerPoint application;
    2. Click the File tab in the Ribbon, and you will view backstage view;
    3. Click the Options button at left bar;
    4. Then the PowerPoint Options dialog pops up;
    5. Click the Customize Ribbon button at left bar;
    6. In the right side of the Word Options dialog box; please select Main Tabs from the Customize the Ribbon drop down menu;
    7. In the Main tab box, click the Developer item checkbox;
    8. Go to the bottom and click the Ok button to close this dialog.

    Bibliography

    https://support.microsoft.com/en-gb/
    https://wordaddins.com/
    https://www.addintools.com/

    Related Post

    Kamis, 29 Mei 2025

    Microsoft Office PowerPoint Lesson Topics List

    PowerPoint Basics:

    PowerPoint Intermediate:

    • Adding Images And Multimedia.
    • Creating Charts And Graphs.
    • Adding Transitions.
    • Mastering Presentations.

    PowerPoint Advanced:


    Jumat, 17 November 2023

    Ribbon Home Pada Microsoft PowerPoint

    Fungsi Ribbon Home Pada Microsoft Office PowerPoint:


    Ribbon Home Pada Microsoft Office PowerPoint
    Ribbon Home Pada Microsoft Office PowerPoint


    Clipboard > Paste:

    Clipboard > Copy : Menggandakan objek yang dipilih.

    Clipboard > Cut :

    Clipboard > Format Painter :

    Slides > New Slide : Menyisipkan / menambahkan slide baru.

    Slides > Layout : Menentukan tata letak slide.

    Slides > Reset : Menata ulang ukuran, posisi, dan format slide.

    Slides > Delete : Menghapus slide.

    Font > Font : Mengatur jenis huruf.

    Font > Font Size : Mengatur ukuran huruf sesuai yang diinginkan.

    Font > Increase Font Size : Memperbesar ukuran huruf.

    Font > Decrease Font Size : Memperkecil ukuran huruf.

    Font > Clear All Formatting : Menghapus seluruh format teks.

    Font > Font Color : Mengatur warna huruf.

    Font > Change Case : Mengatur huruf besar (kapital) / huruf kecil.

    Font > Character Spacing : Mengatur spasi di setiap karakter huruf.

    Font > Text Shadow : Memberikan bayangan di belakang huruf.

    Font > Strikethrough : Memberi tanda coret atau garis di tengah teks.

    Font > Underline : Memberikan garis bawah pada teks.

    Font > Italic : Memiringkan teks.

    Font > Bold : Menebalkan teks.

    Paragraph > Bullets : Memberikan tanda “bullet” pada tiap paragraf yang diinginkan.

    Paragraph > Numbering : Memberikan tanda berupa penomoran pada tiap paragraf yang diinginkan.

    Paragraph > Increase List Level : Menggeser baris paragraf ke kanan.

    Paragraph > Decrease List Level : Menggeser baris paragraf ke kiri.

    Paragraph > Line Spacing : Mengatur jarak antar baris pada tiap paragraf.

    Paragraph > Text Direction : Merubah orientasi teks sesuai yang diinginkan.

    Paragraph > Align Text : Merubah posisi teks secara vertikal.

    Paragraph > Columns : Merubah teks menjadi 2 kolom / lebih sesuai keinginan.

    Paragraph > Justify : Mengatur rata teks pada paragraf.

    Paragraph > Align Text Right : Mengatur rata kanan pada teks dalam paragraf.

    Paragraph > Center : Mengatur rata tengah pada teks dalam paragraf.

    Paragraph > Align Text Left : Mengatur rata kiri pada teks dalam paragraf.

    Drawing > Shapes : Membuat gambar / bentuk.

    Drawing > Quick Styles

    Drawing > Shape Fill : Memberi warna pada objek.

    Drawing > Shape Outline : Memberi warna pada bingkai.

    Drawing > Shape Effects : Memberi efek pada objek yang dipilih.

    Drawing > Shape Fill : Memberi warna pada objek.

    Editing > Find : Mencari kata tertentu dalam suatu file tertentu.

    Editing > Replace : Mengganti kata tertentu dalam suatu file.

    Editing > Select : Memilih objek dalam suatu file.


    Notes

    Click on the picture to see the clearer picture.


    << back to Study About Microsoft Office 1


    Bibliography:

    https://support.microsoft.com/ ( manual ebook )

    https://tirto.id/

    https://www.ablebits.com/

    https://www.customguide.com/

    https://www.datanumen.com/

    https://www.homeandlearn.co.uk/

    https://seputarmicrosoft.blogspot.com/

    https://www.extendoffice.com/

    https://uma.ac.id/ ( university )

    https://regitacahy.wordpress.com/


    ms powerpoint, ms office, mspowerpoint, microsoft office powerpoint,

     Related Post:

    Kamis, 31 Juli 2025

    VBA PPT Short Reference Sheet 1

    Application Object In Microsoft VBA PowerPoint

    Determines the working environment is PowerPoint or not:
    Debug.Print Application Is PowerPoint.Application 'In PowerPoint will Prints: True

    Selection Object In Microsoft VBA PowerPoint

    The PowerPoint.ActiveWindow.Selection object in VBA contains whatever the user has selected.

    The PowerPoint.ActiveWindow.Selection.Type properties in VBA consist of:

    • shapes = ppSelectionShapes
    • slides = ppSelectionSlides
    • text = ppSelectionText
    • nothing at all = ppSelectionNone

    Creates Object Variables And Assign References ( Object Model )

    Dim ppAppObj As PowerPoint.Application
    Dim ppPresObj As PowerPoint.Presentation
    Dim ppSlideObj As PowerPoint.Slide
    Dim ppShapeObj As PowerPoint.Shape
    'Assign Active Slide to Variable
    Set ppSlideObj = Application.ActiveWindow.View.Slide
    'Assign slide by Index to Variable
    Set ppSlideObj = ActivePresentation.Slides(1)

    Bibliography

    https://learn.microsoft.com/ ( manual ebook )

    https://www.autovbax.com/

    http://www.pptalchemy.co.uk/

    https://www.vbaplanet.com/

    PowerPoint;Cengage

    Microsoft PowerPoint;Microsoft Press

    Rabu, 20 November 2024

    Get The Shape Position In Microsoft PowerPoint

    1. Type this following Microsoft Office PowerPoint VBA or macro in PowerPoint VBA Editor:
    2. Sub getShapePosition()
      '-- Declare variables
      Dim oPPApp As New PowerPoint.Application
      Dim oShp As PowerPoint.Shape

      '-- Set an object variable to shape that index is 1
      Set oShp = oPPApp.ActivePresentation.Slides(oPPApp.ActiveWindow.Selection.SlideRange.SlideIndex).Shapes(1)
      '-- Print out the Shape position on Immediate window
      Debug.Print oShp.Left
      Debug.Print oShp.Top
      End Sub
    3. Run the above VBA code by click Run > Run Sub/User Form menu.


    Related Post


    Sabtu, 21 September 2024

    Microsoft Office Word Lesson Topics List

    Getting Started 

    * Start Microsoft Office Word Application
    * New Document
    * Identify the components of the Microsoft Office Word interface
    * Zoom In-Out
    * Scroll
    * Go To

    Start Microsoft Office Application, click Start Microsoft Office Word Application in English ( Microsoft Windows 8, Microsoft Office Word 2007 ) >

    Identify the components of the Microsoft Office Word interface, click:

    Manage Documents

    * Save Document
    * Opening a Document
    * Closing Document
    * Preview Documents
    * Printing Documents

    These are lesson that you can learn from the Manage Documents in Microsoft Office Word Lesson from above:

    Editing Documents

    * Typing
    * Insert text and paragraphs
    * Undo and Redo
    * Select Text
    * Delete And Backspace Text
    * Find and replace text
    * Insert symbols and special characters

    to learn Insert symbols and special characters, click:

    Format Text And Paragraphs

    * Setting Text Fonts
    * Change Text Case
    * Change Text Color
    * Text Alignments
    * Indent Paragraphs
    * Set Line Spacing and Paragraph Spacing
    * Borders and Shades
    * Set Tabs
    • Apply formatting by using Format Painter
    • Apply Built-In Styles To Text
    • Clear formatting

    These are lesson that you can learn from the Manage Documents in Microsoft Office Word Lesson from above:

    Create And Modify Lists

    * Format paragraphs as numbered and bulleted lists
    * Change bullet characters and number formats
    * Define custom bullet characters and number formats
    * Increase and decrease list levels
    * Restart and continue list numbering
    * Set starting number values

    Format Document Pages

    * Adjust Page Margins And Set Up Document Pages
    * Insert and modify headers and footers
    * Configure page background elements
    * Add Page Numbers
    * Insert Page Breaks
    * Insert Blank Page
    * Cover Pages
    * Page Orientation

    to Adjust Page Margins And Other Page Setup, click How to Change the Paper Size in Microsoft Word

    Working With Tables

    * Create a Table
    * Rows & Columns
    * Move a Table
    * Resize a Table
    * Merging Cells
    * Split a Table
    * Split Cells
    * Add Formula
    * Borders & Shades

    Create And Manage Reference Tables

    * Table of Contents
    * Table of Index
    * Table of Author
    * Table of Picture

    Use Graphics: Insert illustrations, Text Boxes and Other Objects

    * Insert Shapes
    * Insert Pictures
    * Insert Text Boxes
    * Insert Equations

    Use Graphics: Modify graphic elements

    * Position objects
    * Wrap text around objects
    * Add alternative text to objects for accessibility
    * Modify Equations

    Collaborating On Documents

    * Modify user information
    * Share a document
    * Work with comments
    * Compare document changes
    * Review a Document
    * Merge document changes


    Related Post

    Selasa, 04 Juni 2024

    Microsoft Excel Terms 1

    These following terms you will be find in Microsoft Office Excel :

    Microsoft Office Excel Cells are the basic building blocks of a worksheet. Every worksheet is made up of thousands of rectangles, which are called cells. A cell is the intersection of a row and a column. In other words, it is where a row and column meet.

    Microsoft Office Excel Columns are identified by letters (A, B, C).

      to learn about Microsoft Excel columns, click on Microsoft Excel Terms 2 >

    Microsoft Office Excel Rows are identified by numbers (1, 2, 3).

    Microsoft Office Excel Cell Address is based on its column and row. In the example below, the selected cell intersects column C and row 5, so the cell address is C5.

    Microsoft Office Excel Cell Range is a larger group of cells. Microsoft Office Excel Range is a block of two or more cells.

    Microsoft Office Excel Range Reference or Address is represented by the address of the upper left cell and the lower right cell separated with a colon. For example, the range A1:C2 includes 6 cells from A1 through C2. A cell range that included cells A1, A2, B1, B2, C1, C2.

      to learn about Microsoft Excel Range Reference / Range Address, click on Microsoft Excel Terms 3 >

    Microsoft Office Excel Enter Mode is used to:

    • enter the data.
    • enter the formula.
    • type the reference directly in the cell or in the formula bar, or click the cell you want to refer to.
    Microsoft Office Excel Edit mode is used to:

    • edit the data.
    • edit the formula.
    • type the reference directly in the cell or in the formula bar, or click the cell you want to refer to.
    • Select the reference in the formula, and then select another cell or range on the sheet.
    • To include more or fewer cells in a reference, drag the color-coded border of the cell or range.

    The copied cell(s) have a dashed box around them.

    Paste Options In Excel:
    • Paste (Standard) The standard paste option is the most commonly used and is the default action when you press `Ctrl+V` or click the ‘Paste’ button. It copies the content, formatting, and comments from the source cells and pastes them into the destination cells.
    • Paste Formulas
      When you need to copy formulas from one cell to another, the ‘Paste Formulas’ option comes in handy. This option pastes only the formulas without any formatting or values.
    • Paste Values
      Sometimes, you may want to paste only the values from a cell, discarding any underlying formulas.
    • Paste Formats
      If you want to apply the formatting from one cell to another without copying the content.
    • Transpose
      The ‘Transpose’ option is particularly useful when you need to switch the orientation of your data from rows to columns or vice versa.

    Bibliography:

    https://www.ablebits.com/
    https://edu.gcfglobal.org/en/
    https://macabacus.com/
    https://support.microsoft.com/ ( manual ebook )

    Related Post


    Rabu, 16 Juli 2025

    Belajar Mengetik Heading Di Microsoft Office Word

    Praktikan langkah mengetik heading dan menambahkan heading di Microsoft Office Word:

    1. Membuka Microsoft Office Word.


    2. Pastikan View Anda adalah Print Layout View. Jika belum, untuk mengubah tampilan, temukan tombol View pada Ribbon Tab Word dan klik tombol View itu. Kemudian, temukan pada bagian Ribbon Group Label Document Views di kiri, klik Print Layout button.


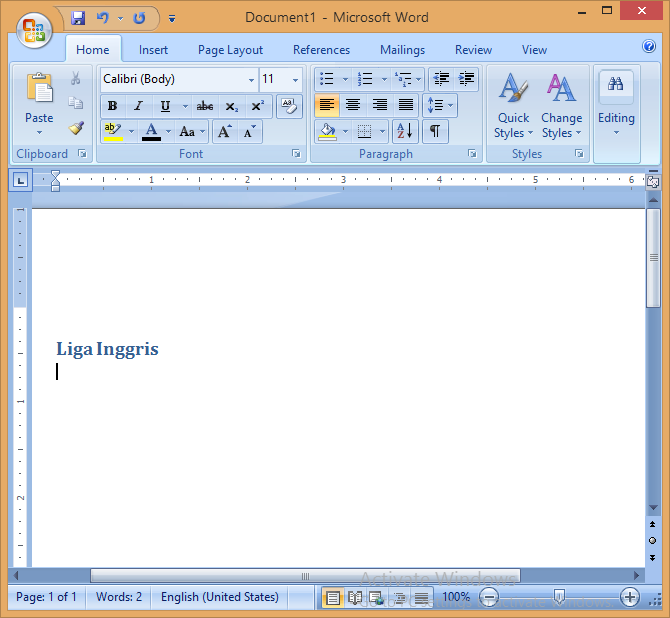
    3. Ketik "Liga Inggris" tanpa tanda kutip ganda.


    4. Pilih dan menyoroti teks tersebut. Tekan dan tahan tombol Shift pada keyboard dan gunakan tombol Panah Kanan pada keyboard untuk memperpanjang blok hingga semua teks diseleksi.


    5. Lalu klik Ribbon Tab Home > Quick Styles ( mungkin Anda tidak melihat ini jika layar Anda cukup luas ) > Heading 1 pada Ribbon Group Styles untuk mengganti format ke Heading 1.


    6. Tekan Panah Kanan, lalu tekan Enter pada keyboard.


    7. Ketik "Liverpool" tanpa tanda kutip ganda.


    8. Lalu ketik daftar lain nama liga sepak bola di dunia di bawah ini :


      • Brighton diketik sebagai format Normal.
        Arsenal diketik sebagai format Normal.
        Aston Villa diketik sebagai format Normal.
        Chelsea diketik sebagai format Normal.
      • Liga Spanyol diketik sebagai format Heading 1.
        Barcelona diketik sebagai format Normal.
        Celta diketik sebagai format Normal.
        Espanyol diketik sebagai format Normal.
        Las Palmas diketik sebagai format Normal.
        Villarreal diketik sebagai format Normal.
      • Liga Italia diketik sebagai format Heading 1.
        Bologna diketik sebagai format Normal.
        Como diketik sebagai format Normal.
        Milan diketik sebagai format Normal.
        Empoli diketik sebagai format Normal.
        Udinese diketik sebagai format Normal.
      • Liga Jerman diketik sebagai format Heading 1.
        Augsburg diketik sebagai format Normal.
        Bremen diketik sebagai format Normal.
        Bochum diketik sebagai format Normal.
        Leipzig diketik sebagai format Normal.
        Dortmund diketik sebagai format Normal.
      • Liga Indonesia diketik sebagai format Heading 1.
        Arema diketik sebagai format Normal.
        Borneo Samarinda diketik sebagai format Normal.
        Persebaya diketik sebagai format Normal.
        Persib diketik sebagai format Normal.
        Semen Padang diketik sebagai format Normal.
    9. Simpan dengan nama file HeadingLigaBola.docx


    10. Dan hasil dari langkah di atas akan ditampilkan seperti di bawah ini:


    Bibliography

    https://www.cnnindonesia.com/
    https://edu.gcfglobal.org/
    https://internusa.com/
    https://business.tutsplus.com/
    https://support.microsoft.com/ ( manual ebook )

    list, bullet list, bulletlist, unorderedlist, unordered list

    Related Post

    Jumat, 14 Juni 2024

    Keyboard Shortcuts For Navigating In Excel Cells

    Keyboard Shortcuts For Navigating In Microsoft Office Excel Cells

    To do this

    Press

    Move one cell to the previous cell in a worksheet

    Shift+Tab

    Move one cell to the next cell in a worksheet.

    Tab key

    Move one cell up in a worksheet.

    Up arrow key

    Move one cell down in a worksheet.

    Down arrow key

    Move one cell left in a worksheet.

    Left arrow key

    Move one cell right in a worksheet.

    Right arrow key

    Move to the edge of the current data region in a worksheet.

    Ctrl+Arrow key

    Enter the End mode, move to the next nonblank cell in the same column or row as the active cell, and turn off End mode. If the cells are blank, move to the last cell in the row or column.

    End, Arrow key

    Move to the last cell on a worksheet, to the lowest used row of the rightmost used column.

    Ctrl+End

    Extend the selection of cells to the last used cell on the worksheet (lower-right corner).

    Ctrl+Shift+End

    Move to the cell in the upper-left corner of the window when Scroll lock is turned on.

    Home+Scroll lock

    Move to the beginning of a worksheet.

    Ctrl+Home

    Move one screen down in a worksheet.

    Page down

    Move to the next sheet in a workbook.

    Ctrl+Page down

    Move one screen to the right in a worksheet.

    Alt+Page down

    Move one screen up in a worksheet.

    Page up

    Move one screen to the left in a worksheet.

    Alt+Page up

    Move to the previous sheet in a workbook.

    Ctrl+Page up

    Open the list of validation choices on a cell that has data validation option applied to it.

    Alt+Down arrow key

    Move to the cell in the upper-left corner of the window when Scroll lock is turned on.

    Home+Scroll lock

    Exit the floating shape navigation and return to the normal navigation.

    Esc

    Scroll horizontally.

    Ctrl+Shift, then scroll your mouse wheel up to go left, down to go right

    To return to where the cursor is, when Scroll lock is turned on.

    Ctrl-Backspace

    Open the Go To dialog box.

    F5


    < to learn Microsoft Office Excel Graphical User Interface (GUI) : Microsoft Excel GUI Parts

    navigate, navigation, navigates, navigator, user interface (UI), user experience (UX)

    Related Post

    Kamis, 07 November 2024

    Daftar Pelajaran Microsoft Office Word

    Mulai Belajar

    * Memulai Microsoft Office Word

    * New Document

    Kelola dokumen

    * Save Document
    * Opening a Document
    * Closing Document
    * Siapkan halaman document
    * Preview Document
    * Print Document

    Mengedit Dokumen
    * Mengetik
    * Masukkan text dan paragraph
    * Undo dan Redo
    * Pilih Text
    * Delete dan Backspace Text
    * Find dan replace Text
    * Insert symbols dan special characters

    Format teks dan paragraf
    * Mengatur Font Text
    * Ubah Text Case
    * Ubah Font Color
    * Text Alignments
    * Indent Paragraphs
    * Set Line Spacing dan paragraph spacing
    * Borders dan Shades
    * Mengatur Tab
    * Terapkan pemformatan dengan menggunakan Format Painter
    * Terapkan built-in styles ke teks
    * Clear formatting

    Membuat dan mengubah list
    * Format paragraph sebagai number list dan bullet list.
    * Ubah bullet character dan number list
    * Tentukan custom bullet character dan number format
    * Increase dan Decrease level.
    * Mulai ulang dan lanjutkan penomoran daftar
    * Restart dan continue numbering list.
    * Mengatur starting number values.

    Format Halaman Dokumen
    * Sesuaikan Margin Halaman
    * Masukkan dan ubah header dan footer
    * Konfigurasikan elemen page background.
    * Tambahkan Page Number
    * Masukkan Page Breaks
    * Masukkan Blank Page
    * Cover Pages
    * Page Orientation

    Bekerja dengan Table
    * Buat Table
    * Table Row & Table Column
    * Pindahkan Table
    * Ubah Ukuran Table
    * Menggabungkan Table Cell
    * Membagi Table
    * Membagi Table Cell
    * Tambahkan Formula
    * Border & Shading

    Membuat dan mengelola tabel referensi
    * Table of Contents
    * Table of Index
    * Table of Author
    * Table of Picture

    Gunakan Grafik
    Sisipkan ilustrasi dan text box
    * Insert shapes
    * Insert pictures
    * Insert SmartArt Graphics
    * Insert Text Boxes
    Memodifikasi elemen graphic
    * Menempatkan objects
    * Wrap text di sekitar objects
    * Menambahkan alternative text di objects untuk accessibility

    Kolaborasi Pada Documents
    * Memodifikasi user information
    * Membagikan sebuah document
    * Bekerja dengan comments
    * Membandingkan document changes.
    * Review sebuah Document
    * Combine document changes
    * Backup document.


    Related Post

    Rabu, 08 Mei 2024

    To Make My Slide Number Bigger In PowerPoint Classic

    How To Make My Slide Number Bigger In Microsoft Office PowerPoint Classic / How To Change The Slide Number Size ( Microsoft Office PowerPoint Classic )

    1. go to View -> Master -> Slide Master.
    2. select a thumbnail on the Slide Pane (on the left side) to make changes. 
    3. Locate and block select the slide number placeholder (#). 
    4. On the Font toolbar, select Font Size and choose a size.

    Bibliography:

    https://www.lifewire.com/
    https://support.microsoft.com/ ( manual ebook )
    https://unesa.ac.id/ ( university )
    https://www.uksw.edu/ ( university )

    Related Post:

    Learn PowerPoint Classic Workspace

    Learn Microsoft Office PowerPoint Classic Workspace:


    Title bar:
    Contains the name of the presentation.
    Menu bar:
    It is displayed at top of window (usually). Displays the names of menus to perform various tasks. Open menus by using the mouse or the keyboard.
    Toolbars:
    Rows of buttons to access a wide range of commands. Each button is an icon and accessed also by mouse. Usually standard and formatting toolbars are displayed at top of the window.
    Standar toolbar:
    Contains shortcut buttons for the most popular commands
    Drawing toolbar:
    It is displayed at bottom of window (usually) and has buttons to add Shapes, Clip Art, WordArt, change colors, and design aspects of objects.
    Outline and Slides pane:
    It is displayed at left of window (usually). The area that can display either an outline of the presentation’s text or thumbnails (miniature pictures of slides).
    Slide pane:
    Area to create, edit, and display presentation slides.
    Notes pane:
    It is displayed at bottom of window (usually). The area to add presentation notes for presenter or audience.
    Task pane:
    An area which appear on right side of the window (usually), showing a list of commands relevant to the currently working task.
    Scroll bars:
    Used with the mouse to move a slide view or outline text right or left and up or down. You can also use the vertical scroll bar to move from slide to slide.
    View buttons:
    Three buttons located in the lower-left corner of the window. You use these buttons to switch between Normal view (the default), Slide Sorter view, and Slide Show.
    Status bar:
    It is displayed at bottom of window. Displays information about the presentation you are working on.

    Notes To see the more clear picture, click on the picture.


    << back to Study About Microsoft Office 1


    Bibliography:

    https://support.microsoft.com/
    https://www.vskills.in/
    https://unimal.ac.id/ ( university )
    https://www.bsi.ac.id/ ( university )

    Microsoft Office, Ms PowerPoint, MsPowerPoint, presentation

    Related Post:


    Kamis, 03 Oktober 2024

    Add References In Visual Basic Classic

    1. Start Microsoft Visual Basic 6.0. To learn click Starting Visual Basic 6.
    2. Using the Project > References menu item, add references to the library.


    Most Common Microsoft Visual Basic Library:
    • Microsoft Access Object Library;
    • Microsoft ActiveX Data Object Library;
    • Microsoft ActiveX Data Objects Recordset Library;
    • Microsoft ADO Ext. For DDL and Security Library;
    • Microsoft DAO Object Library;
    • Microsoft Excel Object Library;
    • Microsoft OneNote Object Library;
    • Microsoft PowerPoint Object Library;
    • Microsoft Project Object Library;
    • Microsoft Object Library;
    • Microsoft Scripting Runtime Library;
    • Microsoft VBScript Regular Expressions;
    • Microsoft Word Object Library;


    < to learn other menu in Visual Basic 6 me, click  VB6 IDE Menu

    Related Post