Search In This Website

Menampilkan postingan yang diurutkan menurut relevansi untuk kueri environment. Urutkan menurut tanggal Tampilkan semua postingan

Selasa, 23 Juli 2024

Theorem and Proof In Latex 1

Latex documents include elements that require special formatting and numbering such as ( theorems, definitions, propositions, remarks, corollaries, lemmas, problems, examples, conjecture and so on ) in environment.

Minimal Working Example

\documentclass[12pt,letterpaper]{article}
\newtheorem{theorem}{Theorem}
\begin{document}

\section{Introduction}
Theorems can easily be defined:

\begin{theorem}
A definition is an exact and concise explanation of a single concept or word.
\end{theorem}
\end{document}

Numbered Theorems, Definitions, Corollaries and Lemmas

Numbered environments in LaTeX can be defined by means of the command \newtheorem :
\newtheorem{environment name}{Text}[parent counter]
\newtheorem{environment name}[shared counter]{Text}
  1. Put command in the preamble.
  2. The name/label {environment name} of the environment that is defined.
  3. The name {environment name} you will use to reference inside a theorem-like environment \begin{environment name}[environment caption]
    \end{environment name}.
  4. The word {Text/Printed Output} that will be printed, in boldface font, at the beginning of the environment.
  5. The additional argument / optional argument [parent counter/sequential level/numberby/hierarchy name/outer counter] is the name of the sequential level (often by section/subsection/etc.) at which the numbering is to take place / the environment counter is reset every time parent counter is incremented.
  6. The additional argument / optional argument [shared counter/sequential level/numberby/hierarchy name/inner counter] is the name of the sequential level at which the numbering is to take place / the environment counter is reset every time shared counter is incremented.
The statement of any theorem can then be enclosed between \begin{theorem} and \end{theorem}:
\begin{environment name}[environment caption]
\end{environment name}
  1. Put command into the body of your document.
  2. You can put a environment caption / theorem’s traditional name, date, discoverer/scientist, or the similar in square brackets. The environment caption prints at the beginning of the paragraph and inside Parentheses / round bracket.
  3. The theorem will be labelled/titled and numbered by LaTeX, and the statement of the theorem with be automatically italicised.

Referencing Numbers

  • To introduce cross-references, you can give the command \label{name} within the statement of a theorem, lemma, proposition or corollary in order assign the given name to that result. 
  • To reference the number assigned to that result in some other theorem, one gives the command \ref{name}; this will be replaced by the number automatically assigned by LaTeX to that result when the LaTeX program is executed. 
  • We recommend using consistent label names like eq:whatever and sec:whatever, but it is not required.
  • The necessary space above and below the statement of the theorem will automatically be generated by LaTeX.

Example

\documentclass[12pt,letterpaper]{article}
\newtheorem{theorem}{Theorem}[section]
\newtheorem{corollary}{Corollary}[theorem]
\newtheorem{lemma}[theorem]{Lemma}

\begin{document}
\section{Introduction}
Theorems can easily be defined:

\begin{theorem}
Let \(f\) be a function whose derivative exists in every point, then \(f\) is 
a continuous function.
\end{theorem}

\begin{theorem}[Pythagorean theorem]
\label{pythagorean} % To introduce cross-references number
This is a theorem about right triangles and can be summarised in the next 
equation 
\[ x^2 + y^2 = z^2 \]
\end{theorem}

% to assign a referencing numbers
And a consequence of theorem \ref{pythagorean} is the statement in the next 
corollary.

\begin{corollary}
There's no right rectangle whose sides measure 3cm, 4cm, and 6cm.
\end{corollary}

You can reference theorems such as \ref{pythagorean} when a label is assigned.

\begin{lemma}
Given two line segments whose lengths are \(a\) and \(b\) respectively there is a 
real number \(r\) such that \(b=ra\).
\end{lemma}

Notes

  1. If you are using either packages with amsmath, you must load amsmath first, example:
    • \usepackage{amsmath}
    • \usepackage{amsthm}
  2. By default, each theorem-like uses its own counter. However it is common for similar types of theorems (e.g. Theorems, Lemmas and Corollaries)  to share a counter.
  3. for above example "Theorem 1.2\label{pythagorean}refers to the 2nd theorem in the 1st section of a document. In this case, specify the theorem in the preamble as follows:
There are three new environments defined in the preamble.
  1. \newtheorem{theorem}{Theorem}[section]
    This is the example presented in the introduction but it has the additional parameter [section] that restarts the theorem counter at every new section.
  2. \newtheorem{corollary}{Corollary}[theorem]
    An environment called corollary is created, the counter of this new environment will be reset every time a new theorem environment is used.
  3. \newtheorem{lemma}[theorem]{Lemma}
    In this case, the even though a new environment called lemma is created, it will use the same counter as the theorem environment. In this case, define subsequent theorems from {theorem}.

Bibliography

http://www.mnstate.edu/ ( university )
http://www.ams.org/
https://www.tcd.ie/ ( university )
https://www.overleaf.com/
http://www.ntnu.no/ ( university )
https://en.wikibooks.org/
http://web.mit.edu/ ( university )
https://www.brown.edu/ ( university )
https://illinois.edu/ ( university )
https://www.impan.pl/ ( university )

latex document typeset, typesetting

Senin, 09 Oktober 2023

Line Break In Equation Using Latex


Remember to \usepackage{amsmath}.

Using Align Environment

If you want to separated between equations by a linebreak \\. You can use the align environment.

For example:

\begin{align*}

1 + 2 &= 3\\

1 &= 3 - 2

\end{align*}

Result:


Notes:

  • The command \\ signifies a line break and within the correct math mode environment, it can start a new equation line.
  • In the align environment, the equations will align at the ampersand &.
  • The asterisk (e.g. equation*) only indicates, that I don’t want the equations to be numbered.

Using Equation And Split Environment

For example:

\begin{equation}

\begin{split}

    1 + 2 & = 3 \\

    1 & = 3 - 2

\end{split}

\end{equation}

Notes:

  • You have to wrap your equation in the equation environment if you want it to be numbered, or you can use equation* (with an asterisk) if you want the equation without number. Inside the equation environment, use the split environment to split the equations into smaller pieces, these smaller pieces will be aligned accordingly.
  • The double backslash (\\) works as a newline character.
  • Use the ampersand character &, to set the points where the equations are vertically aligned.

Using Equation And Aligned Environment

For example:

\begin{equation}

\begin{aligned}

    1 + 2 & = 3 \\

    1 & = 3 - 2

\end{aligned}

\end{equation}

Notes:

  • You have to wrap your equation in the equation environment if you want it to be numbered, or you can use equation* (with an asterisk) if you want the equation without number. Inside the equation environment, use the aligned environment to split the equations into smaller pieces, these smaller pieces will be aligned accordingly.
  • The double backslash (\\) works as a newline character.
  • Use the ampersand character &, to set the points where the equations are vertically aligned.

Bibliography

https://www.overleaf.com/
https://latex-tutorial.com/

Related Post

Jumat, 30 Agustus 2024

Line Break And Paragraph In Latex ( Tutorial ) 1

Paragraph Alignment

  1. type this following latex package code before \begin{document}:
% Allowing hyphenation of most Western European (and some Eastern European) languages,
% to load the fontenc package, type before\begin{document}
\usepackage[T1]{fontenc}

  1. type this following latex code after \begin{document}:
% This following text in left alignment and first line indent

\textbackslash LaTex\{\} \textbackslash LaTex\{\} \textbackslash LaTex\{\}

The animals set to be take care include 75 elephants, 30 hippos, 280 buffalo, 50 hourse, 100 blue bear and 300 zebras, the country’s Ministry of Environment, Forestry and Tourism announced Monday.


% This following text in left alignment and without first line indent
\begin{flushleft}
% change the \LaTex{} \LaTex{} \LaTex{} to:

\textbackslash LaTex\{\} \textbackslash LaTex\{\} \textbackslash LaTex\{\}

The animals set to be take care include 75 elephants, 30 hippos, 280 buffalo, 50 hourse, 100 blue bear and 300 zebras, the country’s Ministry of Environment, Forestry and Tourism announced Monday.

\end{flushleft}

% This following text in right alignment and without first line indent

\begin{flushright}

\textbackslash LaTex\{\} \textbackslash LaTex\{\} \textbackslash LaTex\{\} The animals set to be take care include 75 elephants, 30 hippos, 280 buffalo, 50 hourse, 100 blue bear and 300 zebras, the country’s Ministry of Environment, Forestry and Tourism announced Monday.

\end{flushright}


% This following text in center alignment and without first line indent

\begin{center}

\textbackslash LaTex\{\} \textbackslash LaTex\{\} \textbackslash LaTex\{\} The animals set to be take care include 75 elephants, 30 hippos, 280 buffalo, 50 hourse, 100 blue bear and 300 zebras, the country’s Ministry of Environment, Forestry and Tourism announced Monday.

\end{center}


  1. The full Latex code:

%Typeset/Build program

% !TEX TS-program = pdflatex

% !TEX encoding = UTF-8 Unicode

\documentclass[11pt]{article} % use larger type; default would be 10pt, max 12pt


%%% PAGE DIMENSIONS

\usepackage{geometry} % to change the page dimensions

\geometry{a4paper} % or letterpaper (US) or a5paper or....

% \geometry{margin=2in} % for example, change the margins to 2 inches all round

% \geometry{landscape} % set up the page for landscape

% read geometry.pdf for detailed page layout information


\usepackage[T1]{fontenc}


\title{Paragraph Alignment}

\author{Private Course and Tutor Course}

\date{September 9, 2023} % Activate to display a given date or no date (if empty),

% otherwise the current date is printed


\begin{document}

\maketitle


\section{Normal paragraph}

% This following text in left alignment and first line indent

\textbackslash LaTex\{\} \textbackslash LaTex\{\} \textbackslash LaTex\{\}

The animals set to be take care include 75 elephants, 30 hippos, 280 buffalo, 50 hourse, 100 blue bear and 300 zebras, the country’s Ministry of Environment, Forestry and Tourism announced Monday.


\section{Align Left Paragraph}

% This following text in left alignment and without first line indent

\begin{flushleft}

\textbackslash LaTex\{\} \textbackslash LaTex\{\} \textbackslash LaTex\{\}

The animals set to be take care include 75 elephants, 30 hippos, 280 buffalo, 50 hourse, 100 blue bear and 300 zebras, the country’s Ministry of Environment, Forestry and Tourism announced Monday.

\end{flushleft}


\section{Align Right Paragraph}

% This following text in right alignment and without first line indent

\begin{flushright}

\textbackslash LaTex\{\} \textbackslash LaTex\{\} \textbackslash LaTex\{\} The animals set to be take care include 75 elephants, 30 hippos, 280 buffalo, 50 hourse, 100 blue bear and 300 zebras, the country’s Ministry of Environment, Forestry and Tourism announced Monday.

\end{flushright}


\section{Align Center Paragraph}

% This following text in center alignment and without first line indent

\begin{center}

\textbackslash LaTex\{\} \textbackslash LaTex\{\} \textbackslash LaTex\{\} The animals set to be take care include 75 elephants, 30 hippos, 280 buffalo, 50 hourse, 100 blue bear and 300 zebras, the country’s Ministry of Environment, Forestry and Tourism announced Monday.


\end{center}


\end{document}


Result


Normal paragraph

\LaTex{} \LaTex{} \LaTex{} The animals set to be take care include 75 elephants,

30 hippos, 280 buffalo, 50 hourse, 100 blue bear and 300 zebras, the country’s Ministry

of Environment, Forestry and Tourism announced Monday.

Align Left Paragraph

\LaTex{} \LaTex{} \LaTex{} The animals set to be take care include 75 elephants, 30

hippos, 280 buffalo, 50 hourse, 100 blue bear and 300 zebras, the country’s Ministry of

Environment, Forestry and Tourism announced Monday.

Align Right Paragraph

\LaTex{} \LaTex{} \LaTex{} The animals set to be take care include 75 elephants, 30

hippos, 280 buffalo, 50 hourse, 100 blue bear and 300 zebras, the country’s Ministry of

Environment, Forestry and Tourism announced Monday.

Align Center Paragraph

\LaTex{} \LaTex{} \LaTex{} The animals set to be take care include 75 elephants, 30 hippos, 280 buffalo, 50 hourse, 100 blue bear and 300 zebras, the country’s Ministry of Environment, Forestry and Tourism announced Monday.


If you want to download Latex source code to type paragraph alignment in Latex, click https://www.studydrive.net/en/doc/paragraphalignmentlatex1/1845302?ref=3961484


Line Break And Paragraph In Latex source code

Line Break And Paragraph In Latex result

Notes 

  • To see the more clear picture, click on the picture.
  • To make your document portable across distributions and platforms (e.g. Microsoft Windows, Apple Macintosh), you should avoid spaces in the file names!
  • The file name is in PascalCase or TitleCase.


Bibliography

https://latex.org/
https://www.uchicago.edu/ ( university )

Related Post

Kamis, 01 Agustus 2024

Set Up The Python In Microsoft Windows 8

Set Up The Python Path variable In Microsoft Windows 8

  1. Let’s locate the directory where the Python executable is installed in our system, and note down the path to this directory.
  2. Open the "Start menu" and click "All apps" down arrow button in the bottom-left corner.
  3. Scroll through the list of apps and click a "Control Panel" on the "Windows System". The Control Panel will appear on the screen.
    • Under "View by:",  click "Category"
    • then select the “System and Security” section.
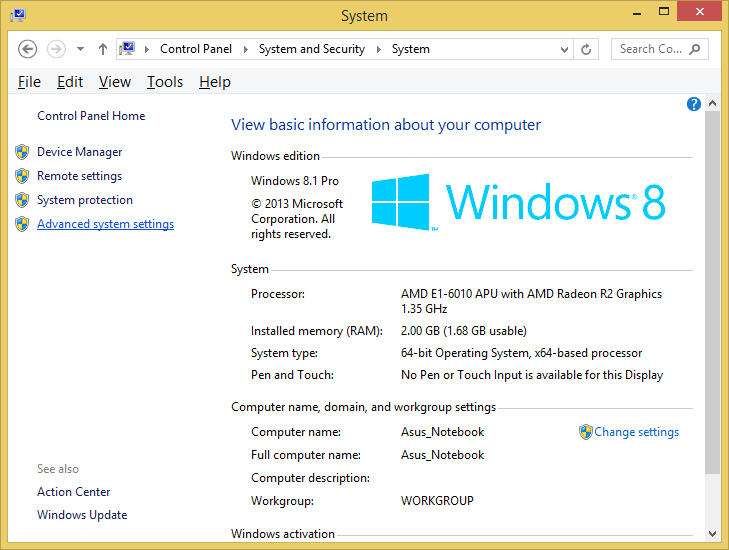
    • then select the “System” section on the right side.
  4. In the System window, click on Advanced System Settings on the left sidebar.
  5. In the System Properties window (Advanced tab):
    • Click the Environment Variables button.
    • Under the System Variables section, find Path variable.
    • Click Edit button to modify the existing variable, or New button to create a new one, if the Path variable is not exist..
    • In the Variable Name field, enter Path
      In the Variable Value field, add the path to our Python installation directory (e.g., "C:\Program Files\Python\pythonXX")  to the list of paths if it’s not already there.
    • Click OK to apply the changes.
  6. Click OK again, click OK again in System Properties window, and restart the computer to ensure the changes take effect.

Set The Python Path Variable Via The Command Line

Notes

WARNING use the step "Set Up The Python Path variable In Microsoft Windows 8" from above, if you have Microsoft Windows Environment Variables Path more than 1024 characters!

If you would prefer to set the Python Path Variable via the command line:
  1. Open Command Prompt (make sure you "Run as administrator" with right click mouse, so you're able to add a system environment variable).
  2. Set the value of the environment variable to your Python installation path as follows:
    setx /m PATH "C:\Program Files\Python\pythonXX"
  3. Close and start Command Prompt window again to reload the environment variables then use the following command to check the it's been added correctly and restart the computer to ensure the changes take effect.
  4. Then use the following command to check the path to your Python installation been added correctly.  Then you should see the path to your Python installation.
    echo %PATH%
Notes: 
  • Be aware if you have Microsoft Windows Environment Variables Path over than 1024 characters when assigning contents to a variable using setx, it can result in loss of data previously held by the target variable like in this screencapture picture article post.
  • If the Path variable or Expandable Environment-Variable Strings %PATH% is exist and not empty then you can add semicolon ( ; ) and then put the directory from the Python executable is installed in our system.
  • Be aware If You running the command with an existing variable without double quotes (" "), Expandable Environment-Variable Strings %PATH% and semicolon ( ; ) can be removes any variable references.
  • Only administrators account can change the Environment Variable.
  • Non standard Command Prompt or PowerShell may not running well.
  • XX is the python version.
  • You can place the installed Python inside the no matter folder that able to execute your Python script and compile your Python script, for example "C:\Program Files\Python\pythonXX".


Bibliography

https://www.python.org/ ( manual ebook )
https://realpython.com/
https://superuser.com/
https://support.microsoft.com/en-us ( manual ebook )
https://learn.microsoft.com/ ( manual ebook )
https://winaero.com/
https://www.bleepingcomputer.com/
https://www.ionos.co.uk/
https://www.itechtics.com/
https://www.liquidweb.com/

install, setup, installation, python setup and usage, using python on windows, environment variable


Related Post

Senin, 05 Mei 2025

Set Up The Python In Microsoft Windows 8 With Picture

Set Up The Python Path variable In Microsoft Windows 8

  1. Let’s locate the directory where the Python executable is installed in our system, and note down the path to this directory.

    Locate the directory of the Python executable folder
    Locate the directory of the Python executable folder

  2. Open the "Start menu" and click "All apps" down arrow button in the bottom-left corner.

    Start Menu Windows opened

  3. Scroll through the list of apps and click "Control Panel" on the "Windows System". The Control Panel will appear on the screen.

    Scroll through the list of apps 1
    Scroll through the list of apps 1


    Scroll through the list of apps 2
    Scroll through the list of apps 2


    click "Control Panel" on the "Windows System"
    click "Control Panel" on the "Windows System"


    Control Panel opened
    Control Panel opened

    • Under "View by:",  click "Category"

      Under the "View by:",  click "Category"

    • then select the “System and Security” section.

      select the “System and Security” section

    • then select the “System” section on the right side.

      then select the “System” section on the right side.

  4. In the System window, click on Advanced System Settings on the left sidebar.

    click on Advanced System Settings on the left sidebar

  5. In the System Properties window (Advanced tab):

    click Advanced tab

    • Click the Environment Variables button.

      click the Environment Variables button.

    • Under the System Variables section, find Path variable.
      find and click Path variable in the middle

    • Click Edit button to modify the existing variable, or New button to create a new one, if the Path variable is not exist.
      Click the Edit button or click the New button.
    • In the Variable Name field, ensure you enter Path.
      Enter Variable name, enter Variable value, then click OK button

      In the Variable Value field, add the path of our Python installation directory (e.g., "C:\Program Files\Python\pythonXX").
    • Click OK button on the Edit System Variable window, to apply the changes.
  6. Click OK button again, click OK button again in System Properties window, and restart the computer to ensure the changes take effect.

    Click OK button on the Environment Variables window


    Click OK button again in System Properties window


    Click Start button > click Power Options button
    on the right top corner > click Restart

Notes

  • In the step 1 to open CommandPrompt, click How To Launch Command Prompt
  • After step 6 from above, then you can check to the "Set The Python Path Variable Via The Command Line" in the step 4 below. After finish, you can go to the next lesson.

Set The Python Path Variable Via The Command Line


WARNING use the step "Set Up The Python Path variable In Microsoft Windows 8" from above, if you have Microsoft Windows Environment Variables Path more than 1024 characters!

If you would prefer to set the Python Path Variable via the command line, and your Microsoft Windows Environment Variables Path is less than 1024 characters, follow this below step  :
  1. Open Command Prompt (make sure you "Run as administrator" with right click mouse, so you're able to add a system environment variable).

    Open the "Start menu" and click "All apps" down arrow button
     in the bottom-left corner.


    Find and hover the Command Prompt


    right click mouse on Command Prompt, then click "Run as administrator"

  2. Set the value of the environment variable to your Python installation path as follows:
    setx /m PATH "C:\Program Files\Python\pythonXX"

    type setx /m PATH "C:\Program Files\Python\pythonXX"

  3. Close and start Command Prompt window again to reload the environment variables and restart the computer to ensure the changes take effect.

    Close the Command Prompt window


    Click Start button > click Power Options button
    on the right top corner > click Restart

  4. After restart the Microsoft Windows. Use the step 1 again to open Command Prompt window. Then use the following command to check the path of your Python installation been added correctly.
    echo %PATH%

    type echo %PATH%

Notes: 
  • Be aware if you have Microsoft Windows Environment Variables Path over than 1024 characters when assigning contents to a variable using setx, it can result in loss of data previously held by the target variable.
  • If the Path variable or Expandable Environment-Variable Strings %PATH% is exist and not empty then you can add semicolon ( ; ) and then put the directory where the Python executable is installed in our system.
  • Be aware If You running the command with an existing variable without double quotes (" "), Expandable Environment-Variable Strings %PATH% and semicolon ( ; ) can be removes any variable references.
  • Only administrators account can change the Environment Variable.
  • Non standard Command Prompt or PowerShell may not running well.
  • XX is the python version.
  • You can place the installed Python inside the no matter folder that able to execute your Python script and compile your Python script, for example "C:\Program Files\Python\pythonXX".


Bibliography

Introduction to computation and programming using Python : with application to computational modeling and understanding data;John V. Guttag;The MIT Press
Python;Abhishek Singh
Python;David Beazley;O'Reilly
Python Crash Course;Eric Matthes;No Starch Press
Python Crash Course;Erick Myers
Python;Dr. Joseph Teguh Santoso, S.Kom., M.Kom
Python;Jubilee Enterprise;Elex Media Komputindo
Python;Budi Raharjo;Informatika
Python for Everybody;Dr. Charles Russell Severance, et. al.
Python for Scientists;John M. Stewart, et. al.
Quick Python;David Matuszek;Routledge
https://superuser.com/
https://support.microsoft.com/en-us
https://www.bleepingcomputer.com/

Jumat, 14 Juni 2024

Set The JAVA_HOME variable

Set The JAVA_HOME Variable In Microsoft Windows 11

<< Previous lesson: Default Java Path Environment
  1. Let’s locate the directory where the JDK is installed on our system, and note down the path to this directory.
  2. Open the Start menu and click All apps in the upper-right corner.
  3. Scroll through the list of apps and click Windows Tools.
  4. Click Control Panel.
  5. Under View by, click Large icons to view a list of all Control Panel items, then select System.
  6. In the System window, click on Advanced System Settings on the left sidebar.
  7. In the System Properties window (Advanced tab):
    • Click the Environment Variables button.
    • Under the System Variables section, find JAVA_HOME.
    • Click Edit to modify the existing variable, or New to create a new one.
    • In the Variable Name field, enter JAVA_HOME.
    • In the Variable Value field, enter the path to our JDK installation directory (e.g., C:\Program Files\Java\jdkX.X.X_XX).
  8. In the System Properties window, select the Path variable under the System Variables section. Click Edit, and add %JAVA_HOME%\bin to the list of paths if it’s not already there.
  9. Click OK to apply the changes and restart the computer to ensure the changes take effect.

Set The JAVA_HOME Variable Via The Command Line

If you would prefer to set the JAVA_HOME (or JRE_HOME) variable via the command line:
  1. Open Command Prompt (make sure you Run as administrator so you're able to add a system environment variable).
  2. Set the value of the environment variable to your JDK (or JRE) installation path as follows:
    setx /m JAVA_HOME "C:\Program Files\Java\jdkXX.X.XX.X"
  3. Close and start Command Prompt window again to reload the environment variables then use the following command to check the it's been added correctly.
    echo %JAVA_HOME%
  4. You should see the path to your JDK (or JRE) installation.
NOTES: 
  • Be aware if you have Microsoft Windows Environment Variables Path over than 1024 characters when assigning contents to a variable using setx, it can result in loss of data previously held by the target variable like in this screencapture picture article post.
  • X is version based on your Java installed version.

<< back to  Study About Java 1


Bibliography

https://support.microsoft.com/en-us
https://www.baeldung.com/
https://www.groovypost.com/

install, setup, installation

Related Post

Rabu, 12 Mei 2021

Environment variable 1

An environment variable is a variable with a dynamically defined value that depends on the context/environment that it is being used (OS, logged in user, etc.).

VariableLocale specificWindows XP (CMD)Windows Vista and later (CMD)
%ALLUSERSPROFILE%YesC:\Documents and Settings\All UsersC:\ProgramData
%APPDATA%YesC:\Documents and Settings\{username}\Application DataC:\Users\{username}\AppData\Roaming
%CommonProgramFiles%YesC:\Program Files\Common FilesC:\Program Files\Common Files
%CommonProgramFiles(x86)%YesC:\Program Files (x86)\Common Files (only in 64-bit version)C:\Program Files (x86)\Common Files (only in 64-bit version)
%CommonProgramW6432%Yes- (not supported, not replaced by any value)C:\Program Files\Common Files (only in 64-bit version)
%COMPUTERNAME%No{computername}{computername}
%ComSpec%NoC:\Windows\System32\cmd.exeC:\Windows\System32\cmd.exe
%HOMEDRIVE%NoC:C:
%HOMEPATH%Yes\Documents and Settings\{username}\Users\{username}
%LOCALAPPDATA%Yes- (not supported, not replaced by any value)C:\Users\{username}\AppData\Local
%LOGONSERVER%No\\{domain_logon_server}\\{domain_logon_server}
%ProgramData%Yes- (not supported, not replaced by any value)%SystemDrive%\ProgramData
%ProgramFiles%Yes%SystemDrive%\Program Files%SystemDrive%\Program Files
%ProgramFiles(x86)%Yes%SystemDrive%\Program Files (x86) (only in 64-bit version)%SystemDrive%\Program Files (x86) (only in 64-bit version)
%ProgramW6432%Yes- (not supported, not replaced by any value)%SystemDrive%\Program Files (only in 64-bit version)
%PUBLIC%Yes- (not supported, not replaced by any value)%SystemDrive%\Users\Public
%SystemDrive%NoC:C:
%SystemRoot%NoThe Windows directory, usually C:\Windows, formerly C:\WINNT%SystemDrive%\Windows
%TEMP% and %TMP%Yes%SystemDrive%\Documents and Settings\{username}\Local Settings\Temp%SystemRoot%\TEMP (for system environment variables %TMP% and %TEMP%), %USERPROFILE%\AppData\Local\Temp (for user environment variables %TMP% and %TEMP%)
%USERDOMAIN%No{userdomain}{userdomain}
%USERNAME%No{username}
e.g. User
{username}
e.g. User
%USERPROFILE%Yes%SystemDrive%\Documents and Settings\{username}%SystemDrive%\Users\{username}
%windir%No%SystemDrive%\WINDOWS%SystemDrive%\Windows

<< back to  Learn Microsoft Windows ( Road Map )

Bibliography:

https://www.advancedinstaller.com/
https://wikipedia.org/
https://microsoft.com/ ( manual ebook )

cmd, command line, command prompt, microsoft windows terminal, install the software, setup the program, environment variable, environ

Related Topics:

Selasa, 23 Juli 2024

Theorem and Proof In Latex 2

Unnumbered Theorem-Like Environments

To add remarks, comments, note environment or examples to a mathematical document. The amsthm package provides this functionality. It's defined using the starred version of \newtheorem

Example:

Suppose I want to have an unnumbered remark environment, I can define the environment like this:

\documentclass[12pt,letterpaper]{article}
% in the preamble:
\newtheorem*{note}{Note}

\begin{document}

% later in the body document:
\begin{note}
This is a note about something.
\end{note}
\end{document}

Proof Environments

Proofs are the core of mathematical papers and books and it is customary to keep them visually apart from the normal text in the document. The amsthm package provides the environment proof for this.
The word Proof is italicized and there is some extra spacing, also a special symbol is used to mark the end of the proof. This symbol ( QED ) can be easily changed, to learn how see the next section.
\documentclass{article}
\usepackage[english]{babel}
\usepackage{amsthm}

\begin{document}
\section{Introduction}
\begin{proof}
Here is some text for the proof.
\end{proof}
\end{document}

Proof Environment With Math Equation

Occasionally you will want to end a proof with an equation; it’s generally a recommended style to the symbol (QED) will appear on a same line by itself, like:
\documentclass{article}
\usepackage[english]{babel}
\usepackage{amsmath}
\usepackage{amsthm}
% use math equation inside proof theorem environment
\begin{proof}
\begin{equation}       % instead of $
f(x)=y\tag*{\qedhere}  % the \tag*{} is new 
\end{equation}         % instead of $
\end{proof}
\end{document}

Changing the QED symbol

The symbol printed at the end of a proof is called the “QED symbol / halmos ”, named after the Hungarian mathematician Paul Halmos, who was renowned for his expository skills. To quote the meaning of QED from Wikipedia:
QED is an initialism of the Latin phrase quod erat demonstrandum, meaning “thus it has been demonstrated”.
It is straightforward to use a symbol, or wording, of your choice to represent the QED symbol. The LaTeX command:
\renewcommand\qedsymbol{$\blacksquare$}
can be used to replace the default white square for a black square printed by $\blacksquare$, the parameter inside the braces. 

Theorem styles

The package amsthm provide special commands to accomplish this.
Here is a list of the possible pre-defined Theorem styles:
  • definition boldface title, Roman body. Commonly used in definitions, conditions, problems, and examples.
    Sample appearance: Definition 2. Definition text.
  • plain boldface title, italicized body. Commonly used in theorems, lemmas, corollaries, propositions and conjectures. (default).
    Sample appearance: Theorem 1. Theorem text.
  • remark italicized title, Roman body. Commonly used in remarks, notes, annotations, claims, cases, acknowledgments and conclusions.
    Sample appearance: Remark 3. Remark text.

Notes: 

  • If you are using either packages with amsmath, you must load amsmath first, example:
    \usepackage{amsmath}
    \usepackage{amsthm}
  • General LaTeX guidelines, Avoid manual formatting, use instead appropriate LaTeX constructs.


Bibliography

http://www.mnstate.edu/ ( university )
http://www.ams.org/
https://www.tcd.ie/ ( university )
https://www.overleaf.com/
http://www.ntnu.no/ ( university )
https://en.wikibooks.org/
http://web.mit.edu/ ( university )
https://www.brown.edu/ ( university )
https://illinois.edu/ ( university )
https://www.impan.pl/ ( university )
https://uwaterloo.ca/ ( university )

latex document typeset, typesetting