Search In This Website

Menampilkan postingan yang diurutkan menurut tanggal untuk kueri command prompt. Urutkan menurut relevansi Tampilkan semua postingan

Minggu, 28 September 2025

Set The JAVA_HOME variable In Microsoft Windows 8

From step 1 to step 10, you can study at the Set Up A Java Development Kit In Microsoft Windows 8 With Picture
  1. Let us locate the directory where the JDK is installed on our system, and note down the path to this directory.
  2. Open the Start menu and click "All apps" down arrow button in the bottom-left corner.
  3. Scroll through the list of apps and click "Control Panel" on the "Windows System".
  4. The Control Panel will appear on the screen.
  5. Under "View by:" on the right side, click "Category", 
  6. After then select the “System and Security” section.
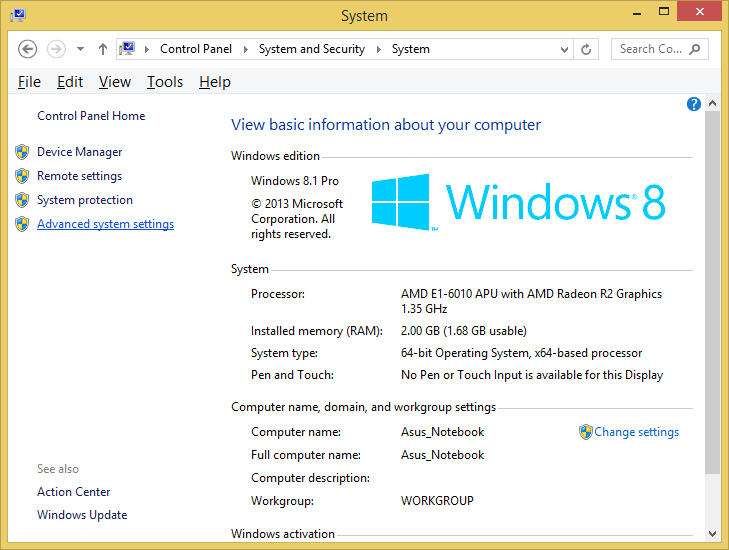
  7. then select the System section on the right side.
  8. In the System window, click on Advanced System Settings on the left sidebar.
  9. In the System Properties window (Advanced tab):
  10. Click the Environment Variables button.

Add JAVA_HOME Variable In Microsoft Windows 8

This following step to add JAVA_HOME variable:
  1. Under the System Variables section, click a New button to create a new one.


  2. In the Variable Name field, type JAVA_HOME.


  3. In the Variable Value field, enter the path to our JDK installation directory (e.g., in this post C:\runtime\Java\jdkX.X.X_XX\). Then press OK button.


Add %JAVA_HOME% To The Path Of Windows Environment Variable

This following step to add %JAVA_HOME% to the Windows Environment Variable:
  1. In the System Properties window, select the Path variable under the System Variables section. Click Edit button, 


  2. and add %JAVA_HOME%\bin to the list of paths if it’s not already there. Click OK  button.


  3. Click OK  button to apply the changes and restart the computer to ensure the changes take effect.


Check %JAVA_HOME% Has Installed Successfully

  1. Start Command Prompt window then use the following command to check the %JAVA_HOME% has been added correctly.


  2. echo %JAVA_HOME%. You should see the path to your JDK (or JRE) installation location without bin folder.


after this you can follow and practise this optional step below according to your condition:

Edit JAVA_HOME

  1. Under the System Variables section, found JAVA_HOME variable, click Edit button to modify the existing variable.


  2. change the Variable Value field with enter the path to our JDK installation directory (e.g., in this post C:\runtime\Java\jdkX.X.X_XX\ ). Then press OK button.


NOTES: 


<< back to  Study About Java 1

Bibliography

https://www.asus.com/ ( hardware )
https://www.codecademy.com/
https://www.youtube.com/@ProgrammingKnowledge
https://docs.oracle.com/ ( manual ebook )

Senin, 22 September 2025

Set Up A Java Development Kit In Microsoft Windows 8 With Picture

  1. Let’s locate the directory where the Java executable is installed in our system, and note down the path to this directory.

    Locate the directory of the Java executable folder
    Locate the directory of the Java executable folder
  2. Open the "Start menu" and click "All apps" down arrow button in the bottom-left corner.

    Start Menu Windows opened
    Start Menu Windows opened

     "All apps" down arrow button in the bottom-left corner.

  3. Scroll through the list of apps and click "Control Panel" on the "Windows System".

    Scroll through the list of apps
    Scroll through the list of apps then click "Control Panel" on the "Windows System"

  4. The Control Panel will appear on the screen.

    Control Panel opened
    Control Panel opened
  5. Under "View by:" on the right side,  click "Category", 

    Under "View by:",  click "Category",
    Under "View by:",  click "Category", 
  6. After then select the “System and Security” section.

    select the “System and Security” section
    select the “System and Security” section
  7. then select the “System” section on the right side.

    then select the “System” section on the right side.
    then select the “System” section on the right side.
  8. In the System window, click on Advanced System Settings on the left sidebar.

    click on Advanced System Settings on the left sidebar
  9. After In the System Properties window (Advanced tab):

    click Advanced tab
  10. Click the Environment Variables button.

    click the Environment Variables button.
  11. Under the System Variables section, find Path variable.

    find and click Path variable in the middle
    find and click Path variable in the middle
  12. Click Edit button to modify the existing variable, or New button to create a new one, if the Path variable is not exist.

    Click the Edit button or click the New button. In the Variable Name field, ensure you enter Path
    Click the Edit button or click the New button.
  13. In the Variable Name field, ensure you enter Path.  In the Variable Value field, add the path of our Java installation directory (e.g., "C:\runtime\Java\jdk1.6.0_21\bin"). Click OK button on the Edit System Variable window, to apply the changes.

    Enter Variable name, enter Variable value, then click OK button
    Enter Variable name, enter Variable value, then click OK button
  14. Click OK button again, click OK button again in System Properties window.

    Click OK button on the Environment Variables window.
    Click OK button on the Environment Variables window.

    Click OK button again in System Properties window
  15. And restart the computer to ensure the changes take effect.

    Click Start button > click Power Options button on the right top corner > click Restart
    Click Start button > click Power Options button
    on the right top corner > click Restart

Notes


jdk, java sdk, software development kit, application, programming, install

<< back to Study About Java 1


Bibliography

https://www.youtube.com/@OSTechHelp
https://www.youtube.com/@YTRtutorial
Java Ebook Oracle Press
Java Ebook Pearson Publisher

Rabu, 17 September 2025

Hello World In PlantUML

  1. type this on a text editor:
    @startuml
    skinparam HeaderFontColor Black
    skinparam FooterFontColor Black

    header
    This is a header
    endheader

    title
    Hello World In PlantUML
    endtitle

    note right
    This is a note
    end note

    legend
    This is a legend
    endlegend

    caption figure 1 Hello World

    footer
    This is a footer
    endfooter
    @enduml
  2. Open your Command Prompt, to learn how to open Command Prompt click How To Launch Command Prompt
  3. Go to your PlantUML installation, click Check PlantUML Installation  to learn how to go to PlantUML installation folder.


  4. type
    java -Xms512m -Xmx1024m -jar plantuml.jar "D:\work\blogging\programming\UML\PlantUML\helloWorld.plantuml"
     in Command Prompt


  5. See the output, below


Kamis, 04 September 2025

Install Dynamic-Link Library (DLL)

To Register Or Install Dynamic Link Library (DLL) Using regsvr32

The basic syntax of regsvr32 is:
regsvr32 [path_to_dll_file]
  1. Open your Microsoft Windows Command Line As Administrator. To learn how to open Microsoft Windows Command Prompt, click
    How To Launch Command Prompt
    or
    How To Launch Command Prompt In Windows 8
  2. Once the elevated Command Prompt is open ( Open As Administrator ), you can register the DLL. Go To dll file directory.Type CD "\Program Files (x86)\Common Files\Data Dynamics\ActiveReports Pro\" and press Enter.

  3. Type this in the Command Prompt:
    C:\Windows\SysWOW64\regsvr32.exe arpro2.dll
  4. Then you can see the successful output.

Notes

  • Quotation Marks: Use double quotation marks (") around the path and filename if there are any spaces in the file path.
  • Different between 64-bit than 32-bit: On a 64-bit Windows system, there are two versions of regsvr32.exe. The 64-bit version is located in C:\Windows\System32, and the 32-bit version is in C:\Windows\SysWOW64. You need to use the correct version of regsvr32 for the DLL you are trying to register.


Senin, 25 Agustus 2025

How To Start MySql From Command Line

How To Start MySQL Server From Microsoft Command Line In Microsoft Windows 8.1

  1. Open your Microsoft Windows Command Line As Administrator.
    To learn how to open Microsoft Windows Command Prompt, click
    How To Launch Command Prompt
    or
    How To Launch Command Prompt In Windows 8
  2. Go To MySQL Server directory
    Type D: and press Enter.
  3. Type CD \softRun\xampp-win32-1.6.7\mysql\bin\


  4. Type this following command:
    mysqld --console
  5. Press Enter
  6. This will display mysqld status, mysql version and mysql port.


Notes
  • In the Step 2 and 3, adjust the path based on your MySQL installation. To learn how to Go to MySQL directory, click Top Command Prompt (CD / CHDIR)
  • In the Step 6, it maybe display different with your MySQL.

How To Find Out Is Mysql Running?

  1. Open your Microsoft Windows Command Line As Administrator.
    To learn how to open Microsoft Windows Command Prompt, click
    How To Launch Command Prompt
    or
    How To Launch Command Prompt In Windows 8
  2. Go To MySql Server directory
    Type D: and press Enter.
  3. Type CD \softRun\xampp-win32-1.6.7\mysql\bin\

  4. Type this following command:
    mysqladmin --user=root ping
  5. Press Enter
  6. This will display mysqld status is alive.

Notes
  • In the Step 2 and 3, adjust the path based on your MySQL installation. To learn how to Go to MySQL directory, click Top Command Prompt (CD / CHDIR)
  • In the Step 4, adjust root to your username.

How To Find Out Is MySQL Running In The Right Port According To Our Preferences?

  1. Open your Microsoft Windows Command Line As Administrator.
    To learn how to open Microsoft Windows Command Prompt, click
    How To Launch Command Prompt
    or
    How To Launch Command Prompt In Windows 8
  2. Type this following command:
    netstat -ano | findstr 3306
  3. Press Enter
  4. This will display ip address and port status is LISTENING.


Notes
  • In the Step 2 and 3, adjust the 3306 with your port.

< to check MySql version, click How To Check MySQL Version

<< back to Study About PHP 1

Rabu, 30 Juli 2025

How To Check Python GTK Version

Prerequisites:

  1. Install Python. In this example using Python 2.7.13
  2. Install PythonGTK.

Tutorial

1. Open Command Prompt.
2. Running your Python interactive console / Python interpreter / Python shell by typing python.

3. Typing :
import pygtk
import gtk
print(gtk.pygtk_version)
print(gtk.gtk_version)
4. Then for print(gtk.pygtk_version) you get output similar to this :
(2, 24, 0)
5. Then for print(gtk.gtk_version) you get output similar to this :
(2, 24, 10)


<< back to Study About Python

Study About Python

Getting Started


Jumat, 25 Juli 2025

How To Check AsciiDoctor Gem Dependencies

How To Check AsciiDoctor Has Installed Locally

Syntax: gem list <ruby-gem-name> --local

1. Open Command Prompt.

2. Type gem list asciidoctor --local

3. Press Enter on keyboard.

Step 2 and Step 3 To Check AsciiDoctor Has Installed Locally


How To Check AsciiDoctor Ruby Gem Dependencies

Syntax: gem dependency <ruby-gem-name> --reverse-dependencies --local

1. Open Command Prompt.

2. Type gem dependency asciidoctor --reverse-dependencies --local

3. Press Enter on keyboard.

4. Sample Output:

Gem asciidoctor-2.0.23

  concurrent-ruby (~> 1.1.0, development)

  cucumber (~> 3.1.0, development)

  erubi (~> 1.10.0, development)

  haml (~> 6.1.0, development)

  minitest (~> 5.22.0, development)

  nokogiri (~> 1.13.0, development)

  rake (~> 12.3.0, development)

  slim (~> 4.1.0, development)

  tilt (~> 2.0.0, development)

Step 2 To Check AsciiDoctor Ruby Gem Dependencies

Step 3 After Press Enter on keyboard


<< back to Study About AsciiDoctor


<< back to Study About Ruby


<< back to Study About Java 1


Bibliography

https://guides.rubygems.org/ ( manual ebook )

https://rubygems.org/

https://www.ruby-lang.org/  ( manual ebook )

Kamis, 24 Juli 2025

How to Creating A JAR File Using the Command Line

Prerequisites

Before you begin, ensure you have the following tools on your system:
  • Java Development Kit (JDK) installed and configured in your system's PATH. You must download JDK from the official Java website, if you don't have JDK. JDK is required for compiling Java code (javac) and running JAR files (java).
    If you want to learn default Java Path For Windows And Linux Environment, click Default Java Path Environment >
    You must setup PATH environment, click Set The JAVA_HOME variable >
    To check the Java version, click How To Check Your Java Version >
  • A Text Editor, for example Notepad: To write your Java code and potentially to write a manifest file.
  • A Terminal or Command Prompt: To execute compilation and JAR creation commands.

Assumption

  • Ensure you have a Java class with a main method ( after You compiled a Java source code File ), which serves as the entry point for your Java simple application (JAR) or Java simple program (JAR). You can use this Java exercise, click Hello World In Java and then you must compile the Java Program, click How To Compile Java 1.
  • Ensure you understand to using Text Editor and a Terminal or Command Prompt. If you are not understand to using Text Editor and Command Prompt, read Notes below.

The Steps

1. First we navigate to the root directory of your Java class files project directory. In this example the directory is D:\demo\java\GettingStarted\HelloWorld.

navigate to the root directory
of your Java class files project directory

list your root directory
of your Java class files project directory

2. Create a Manifest File: Open your Text Editor and then create a text file (e.g., manifest.txt) and add the Main-Class entry. Make sure there's a newline at the end of the Main-Class line. The full contents Of Manifest.txt example:
Main-Class: helloWorld
Class-Path: helloWorld.jar

Notepad program show

Type Manifest.txt example contents

3. Save file As Manifest.txt in directory D:\demo\java\GettingStarted\HelloWorld\.

click File > Save As menu

Navigate to D:\demo\java\GettingStarted\HelloWorld\.
And then type Manifest.txt in File name box.

click Save button

file Manifest.txt has saved

4. Create the JAR File
Now, use the jar command to package your compiled .class file(s) and the manifest file (if applicable) into a single .jar file, for example:
jar cvfm helloWorld.jar helloWorld helloWorld.class
The options and arguments used in this command are: 
-c: Creates a new archive.
-v: Provides verbose output, listing the files as they are added.
-f: Specifies the filename of the JAR archive (helloWorld.jar).
-m: Specifies the manifest file to use (manifest.txt).

Create the JAR File

The JAR file has created

5. Run the Executable JAR
If you created an executable JAR, you can run it directly from the Command Prompt:
java -jar helloWorld.jar
You should see the output: Hello World

Run the Executable JAR

The Executable JAR has succeed to run

Notes


<< back to  Study About Java 1

Bibliography

https://docs.oracle.com/ ( manual ebook )
https://www.cmu.edu/ ( university )
https://www.helsinki.fi/ ( university )
https://www.coursera.org/
https://www.iitk.ac.in/ ( university )
https://www.ntu.edu.sg/ ( university )